
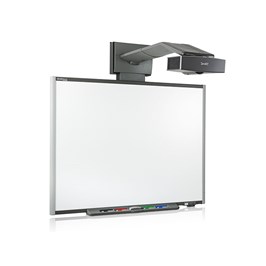
A new Smartboard 680i3 projector lamp
Time to replace the Smartboard 680i3 projector lamp? Don’t stress out. This guide gives step by step instructions.
It’s time to replace the Smartboard 680i3 projector lamp when the projected image gets darker or starts to deteriorate.
Keep your projector working
An authentic projector lamp makes all the difference in keeping your Smartboard 680i3 projector working. Avoid the temptation of buying a cheaper projector lamp since it won’t be properly manufactured. Bargain basement prices mean problems down the road. Scroll for the for the 6 main reasons to avoid counterfeit lamps. Read the 7 Ways to Spot a Counterfeit Lamp to learn more about avoiding counterfeit lamps.
Find these lamp on Amazon sold by these authorized dealers:
- SpArc Bronze SmartBoard 20-01032-20 Projector Replacement Lamp with Housing
- Lutema 20-01032-20-L02 SmartBoard 20-01032-20 Replacement DLP/LCD Cinema Projector Lamp, Premium
- ePharos® 20-01032-20 20-01032-21 Replacement Lamp With Housing For SMARTBOARD 600I UNIFI 65W 660I UNIFI 65W 680I UNIFI 65W SBP-10X SBP-20W ST230i Unifi 55 Unifi 55w Unifi 65 Unifi 65w Unifi 65w
- Smartboard Projector Lamp Part Smartboard 20-01032-20 ST29017 Model Smartboard 600i4 680i Gen 3
- Lutema 20-01032-20-L02 SmartBoard 20-01032-20 Replacement DLP/LCD Cinema Projector Lamp, Premium
- Lutema 20-01032-20-L02 SmartBoard 20-01032-20 Replacement DLP/LCD Cinema Projector Lamp, Premium
Changing the Smartboard 680i3 projector lamp
Your Smartboard 680i3 projector using the SmartBoard 20-01032-20 projector lamp.
Important Safety tips BEFORE replacing the projector lamp:
- Close the projector lens door to prevent scratching or touching of the lens.
- Press the power button twice on the ECP (extended control panel) or on the remote to put the system in Standby mode The power button light on the ECP turns solid amber when the system is in Standby.
- Turn off the power switch and disconnect the power cord and all connected cables.
- This projector operates under high temperature and there is a burn risk so be sure to wait at least one hour minutes for the projector’s housing to completely cool.
Step 1: Remove the projector plate assembly from the boom
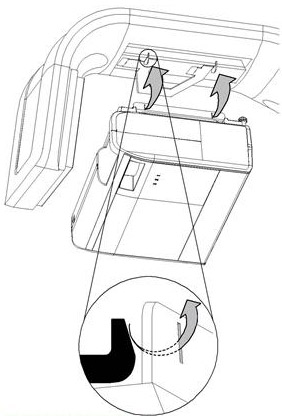
- To remove the projector from the boom, brace the projector with one hand and unscrew the thumbscrew connecting the projector plate to the boom. Be careful not to put any pressure or weight on the projector. Place the thumbscrew to one side.
- Carefully unhook the hinges on the plate assembly from the connecting flange hook on the boom
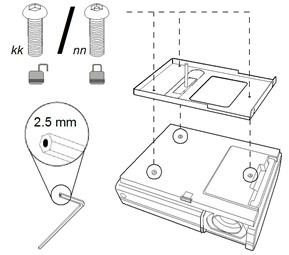
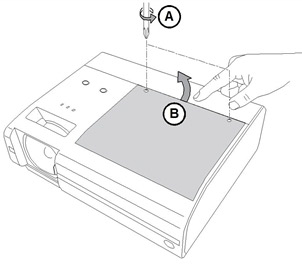
- Lay the projector on a flat surface and loosen the three screws connecting the projector plate to the projector. Put the screws in a safe place.
- Turn the projector back over so it’s face up with the warning lights and setting buttons face upwards.
Step 2: Removing the old lamp
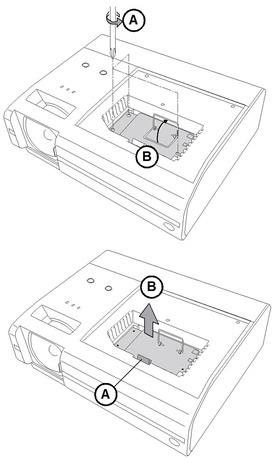 Loosen the two screws on the outer lamp cover with a Phillips No. 2 screwdriver. These screws cannot be removed. Raise the outer lamp cover using a flat screwdriver or your finger. Keep the outer lamp cover in a safe place.
- Loosen the screw on the inner lamp cover. Remove the screw and raise the inner lamp cover out of the lamp slot using a flat screwdriver or your finger. Keep the inner lamp cover and the screw in a safe place.
- Loosen the three screws holding the SmartBoard 20-01032-20 projector lamp in place. Rotate the handle on the old lamp so it faces upwards.
- Press on the tab and pull up with the handle on the old lamp. Release the tab. NOTE: The SmartBoard 20-01032-20 projector lamp contains mercury and should properly recycled and NEVER thrown into regular garbage.
Inserting the new lamp
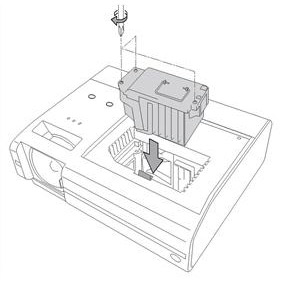
- Remove all packaging from the new SmartBoard 20-01032-20 projector lamp. Press the tab, put the new lamp into the lamp slot, and push it all the way down. Release the tab.
- Tighten the three lamp screws on the SmartBoard 20-01032-20 projector lamp.
- Put the inner lamp cover back on and secure the inner lamp screw back into the lamp slot. Tighten the screw to ensure the lamp cover is secure.
- Put the outer lamp cover back into its original position. Align the cover and tighten the screws until the outer lamp cover is secure.
To replace the projector plate assembly on the projector boom
- Attach the projector plate to the projector using the three original screws removed during the projector plate disassembly.
- To place the projector back into the boom, attach the projector plate hinges into the corresponding flange hook on the projector boom. Be sure to hold the projector plate assembly firmly in place while connecting it to the boom.
- Pass the threaded rod through the attachment hole on the projector boom, and then secure the projector by attaching and screwing the thumbscrew.
- Connect the power cord and all the connector cables. Open the projector lens door. Reconnect the projector to the power and turn it on. You will need to realign the image. Does this by holding onto the projector and turning the thumbscrew to adjust the level postion.
- You must reset the lamp timer.
Resetting the lamp timer
- Press the power button on the ECP or remote twice to put the projector back into Standby mode. The power button light on the ECP turns solid amber when the projector is in Standby.
- Press and hold the up button on the remote control for approximately 10 seconds. When the projector beeps, press and hold the down button on the remote control for approximately 10 seconds. The lamp timer clears after another beep.
- Press the power button on the ECP or remote to start up the system. The power button light on the ECP turns solid green when the system starts.
- To confirm that the lamp timer has been reset, press the MENU button on the remote control. Scroll to the Status Display menu heading, and then confirm that 0 h appears in the Lamp timer field. Your lamp reset count has increased by one.
- Wait five minutes for the projector lamp to warm up.
- Put the system back into Standby mode by pressing either the ECP power button on the projector or on the remote. The power button light will flash amber when the projector is in Standby mode.
- Once the projector is in Standby mode, turn the master power switch off and then on again. The projector is now ready to use.
6 reasons to avoid generic lamps:
- shorter lamp life
- created with toxic materials and carcinogenic parts including Krypton-85
- prone to explosions
- can damage the sensitive electronics in your projectors
- no safeguards to protect your eyesight
- no guarantee or refunds offered.
Learn how to extend the life of your SmartBoard 20-01032-20 projector lamp with Top tips for extending DLP projector lamp life
Leave a Reply