We're now Screen and Projector! For updated content, visit ScreenAndProjector.com and follow @screenandproj on social media!

monitor-eyes_projector_lamps

Key elements OEM projector lamps use to protect your eyesight

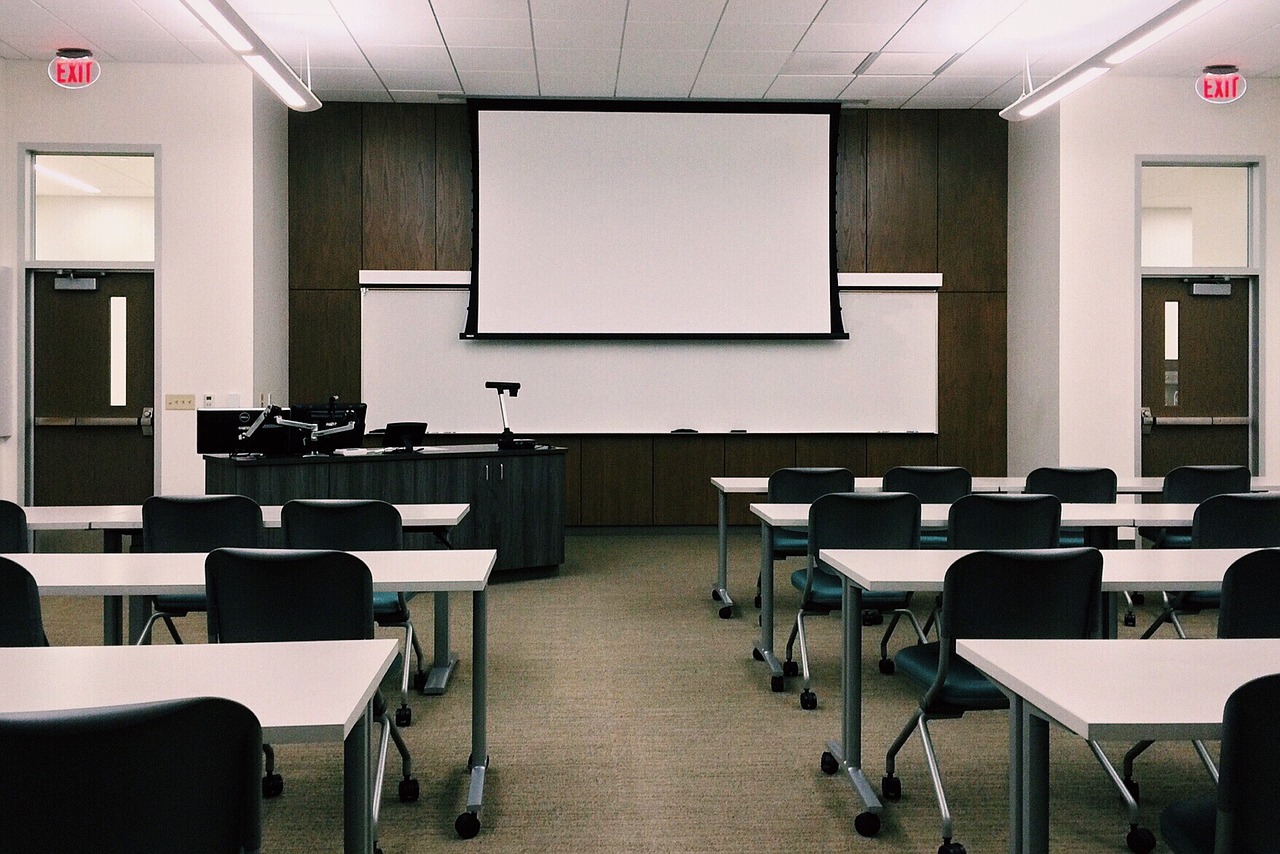
Whether used for business, in the classroom, or for home entertainment, your projector is a key element for your multimedia set-up. Not only do you want your projector working at its best, you also want to protect your eyesight. Learn how OEM projector lamps protect your eyesight

DLP projectors use UHP lamps high intensity light that emit ultraviolet radiation (UV) and infrared radiation (IR) invisibke to the human eye.

In order to protect your eyesight OEM manufacturers create their projector lamps with some important safety features. Through the use of specially coated glass, filters and reflectors, OEM projector lamps are designed to keep your eyesight safe from UV damage. Most counterfeit lamps lack any of these features.  Learn more about the three key elements in your projector lamp that keep your eyesight safe.

Stopping UV light

projector_lamp_coatings

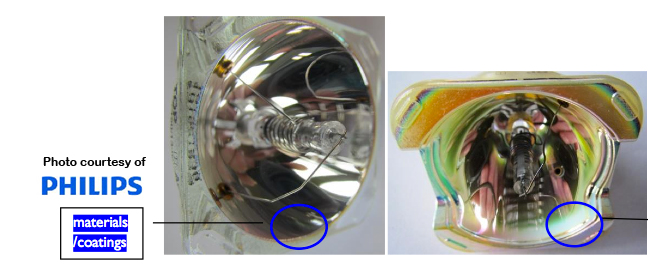
OEM projectors lamps are manufactured with special UV coated reflectors that reduce harmful rays and protect your eyesight. Counterfeit lamps don’t offer this protection. Notice how OEM lamp on the left is absorbing the light while the counterfeit lamp on the right is actually reflecting the UV light back out. Exposure to this reflected light can be dangerous to your eyesight, particularly for young child and teenagers whose eyes are still developing.

Preventing UV leakage

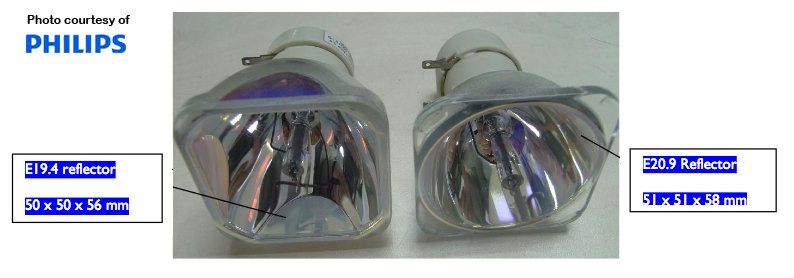
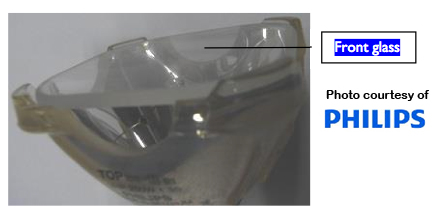
When it comes to safe projector lamps, a few millimeters can make all the difference. The lamp reflector covering the bulb is a key element for safe projector lamps. It must fit the lamp cage properly to ensure that UV light doesn’t leak through. Notice the  2mm gap on the left lamp and the light seeping through causing exposure to the UV light. Since the light is not going through the lamp at the proper angle the projector’s optics will eventually be damaged and the heat build up may eventually short circuit the electrical components. This can result to either costly repairs or the projector needing to be replaced.

Special coatings

projector_lamp_front_glass


UV light protection is further enhanced with the use of a high-performance coating providing even more blockage.  Most counterfeit lamps are missing this protective coating exposing you to these harmful rays when you install them into your projector.

Tagged with: ,

classroom-projectors-eye-safety

 Create eye safety in the classroom when using projectors

Projectors are an excellent resource for teachers and professors allowing them to present subject matter in new ways. While projectors are quite a flexible tool for education purposes but you’ll need to create a culture of eye safety in the classroom.

One of the key health and safety concerns about using projection equipment in the classroom is preventing unnecessary exposure to the extremely bright UV light that projectors give off.

By following these simple guidelines, you can ensure your classroom stays safe and avoids any potential for eye damage:

  • Remind students not to stare directly into the beam of the projector.
  • Remind students never to look directly into the projector lens.
  • At a distance of 4 feet, the recommended exposure limit before eyesight strain or injuries is 20 seconds. Try to keep the amount of time spent inside the beam at a minimum.
  • Encourage students to keep their back to the projector beam when working at any interactive board.
  • Never turn to face the class when in the beam but step out of the beam to interact with the audience.
  • If students spend a great deal of time in front the projector beam consider investing in a neutral density filter than allows for brightness adjustments.
  • Supervise younger children at all times when the projector is being used.
  • Close the windows blinds instead of increasing the projector brightness.
  • Use a maximum of 1,500 ANSI lumens for your projector. This is adequate for most classroom environments.
  • If possible, mount the projector onto the ceiling or some other inaccessible location so it’s hard to step into the beam or to look directly into the projector lens.
  • Make sure the screen or whiteboard is the proper size for the classroom. A small board in a large classroom will make viewing text or other visual difficult in a large classroom. Increasing brightness is NOT the way to correct this problem.
  • Post health and safety reminders in the classroom close to projectors to remind everyone of the rules for projection use.
  • Keep a bit of ambient light in the room to prevent eyestrain for happening. A perfectly dark room with a large projected image can create eye fatigue.

Learn more tips on making your classroom projector healthy:

Be sure to visit our School Projector page for more teacher resources.


Epson-V11H293320- projector-Epson- ELPLP49-lampFollow our 3-step guide to change the Epson V11H293320 projector lamp.

Its easy to install a new Epson V11H293320 projector lamp when you follow this simple guide.

Step 1: Know when to replaceEpson-V11H293320-projector-lamp-Epson-ELPLP49-Lamp-Light

Watch for the signs that it’s time to replace the EpsonV11H293320 projector lamp :

  • The projector image gets darker and starts to deteriorate.
  • The projector lamp flashes red.
  • The warning message REPLACE THE LAMP appears on screen.

A replacement warning message will also appear on screen. You can expect 4000 hours of lamp from the lamp depending on the settings and usage.

Protect your projector with original lamps

Only genuine Epson V11H293320 projector lamp should be used in order to keep your projector is good working order. You’ll need an authentic Epson ELPLP49, which has been manufactured to meet the specifications of the your projector.

Learn the 7 Ways to spot a counterfeit lamp. Scroll down for more information on why to avoid counterfeit lamps.

Find this authentic lamp on Amazon sold by these authorized dealers:

Installing a new lamp

Before installation:

  • Turn power button off wait for light to stop flashing
  • Turn off power swtich on the back of the Epson V11H293320 projector
  • Unplug the power cord
  • Allow the Epson V11H293320 to cool for one hour – it should be cool to the touch. Inside of the projector can be very hot since these machines operator under high temperatures and you run the risk of being burned if the projector has not cooled down.
  • Do not operate the projectors while any of the lamps are removed as this may result in malfunctions, fire hazard and other accidents.

Caution: Don’t touch the screen or the actual bulb with your finger since the oil from your skin can cause a black spot on the bulb.

Epson-V11H293320- projector-lamp-Epson- ELPLP49-lamp1. The lamp cover for the Epson V11H293320.
is found on top of the projector. Take the screwdriver that came with the projector and put it into opening on the lamp cover to release the cover switch. Remove the lamp cover.

2. Remove the two screws on either side of Epson ELPLP49 lamp. Place the screws to either side.

Epson-V11H293320-projector-lamp-remove-Epson ELPLP49-lamp


3. Pull the lamp out using the top handle. Be sure to pull it out straight. Pulling too quickly can cause the bulb to shatter. Learn what to do should the bulb shatter.

NOTE: The Epson ELPLP49 lamp contains mercury and should not be thrown into regular garbage. Recycle your used lamps!

Epson-V11H293320-projector-lamp-install-lamp-Epson ELPLP49-lamp

4, Take the new Epson ELPLP49 lamp by the handle and gently put it into place making sure the lamp is facing in the right direction.

Epson-V11H293320-projector-lamp-tighten-lamp-Epson ELPLP49-lamp5. Replace the Epson ELPLP49 screws on the newly installed lamp.

Epson-V11H293320-projector-lamp-cover-on-Epson ELPLP49-lamp

6. Re-connect the lamp cover. Tighten the screws on the cord and turn on the Epson V11H293320 projector.

7. Re-attach the power cord. Turn the projector on and let it warm up.

8. Reset the Lamp Operating time.

Reset the Epson Lamp Timer

Reset the Epson V11H293320 Lamp Replacement Counter only when the Epson ELPLP49 lamp has been replaced.

Epson-V11H293320-projector-lamp-reset-lamp-counter-menu1-Epson- ELPLP49-lamp

  • Turn the Epson V11H293320 projector on.
  • Press MENU to display the configuration menu.
  • Press the down arrow to move down the menu to the Reset option.

Epson-V11H293320-projector-lamp-reset-lamp-counter-menu2-Epson- ELPLP49-lamp

  • Press Enter to enter the Reset Menu.
  • Press the down arrow to move down the menu to the Reset Lamp Hours option.
  • Press Enter.

Epson-V11H293320-projector-lamp-reset-lamp-counter-menu3-Epson- ELPLP49-lamp

  • When the Reset Lamp Hour option has been chosen the Reset Lamp Hours message will appear.
  • Use the cursor to move to the YES option.
  • Press Enter to reset the lamp hours to zero.

Prolong the life of the Epson ELPLP49 lamp:

Extend the life of the newly installed Epson ELPLP49 with the following tips:

  • Keep your air filters clean to avoid overheating the projector.
  • Turn off the Epson V11H293320 and let it stand for at least one hour ever 24 hours. An average use of four to five hours per day will ensure longer lamp life.
  • Make sure there is enough airflow around the projector particularly if it’s been permanently mounted.
  • Learn more with Top tips for extending DLP projector lamp life

Why avoid counterfeit lamps?

Knock-off lamps may seem like a bargain due to their low prices but these counterfeit lamps can damage the sensitive and expensive mechanisms in your Epson V11H293320 projector. They are also prone to explosions and actually have a much shorter working life that authentic lamps due to the inferior materials used during their production. Even more troubling are the toxic, carcinogenic materials you are exposed to after installing one of these generic lamps. Installing a knock-off lamp will also void the guarantee on your Epson V11H293320 leaving you unprotected should anything happen after installation. Avoid hassles and buy Epson ELPLP49 projector lamps from an authorized dealer.

Tagged with: , , ,

Epson_Home_Cinema_8345_projector_lamp
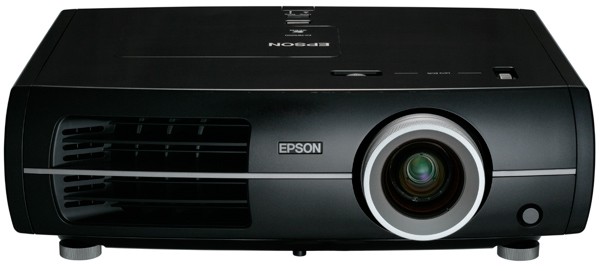
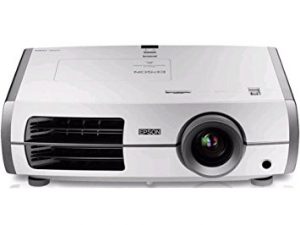
Use this guide to replace your Epson Home Cinema 8345 projector lamp

Epson- Home-Cinema-8345-projector-lamp_warningWatch for the signs that it’s time to replace the Epson Home Cinema 8345 projector lamp:

  • The projector image gets darker and starts to deteriorate.
  • The projector lamp flashes red.
  • The warning message REPLACE THE LAMP appears on screen.

A replacement warning message will also appear on screen. You can expect 4000 hours of lamp from the lamp depending on the settings and usage. You’ll need model Epson ELPLP49.

Find this authentic lamp on Amazon sold by these authorized dealers:

Installing a new Epson Home Cinema 8345 projector lamp

Before installation:

  • Turn power button off wait for light to stop flashing
  • Turn off power switch on the back of the Epson Home Cinema 8345 projector
  • Unplug the power cord
  • Allow the Epson Home Cinema 8345 projector to cool for one hour – it should be cool to the touch. Inside of the projector can be very hot since these machines operator under high temperatures and you run the risk of being burned if the projector has not cooled down.
  • Do not operate the projectors while any of the lamps are removed as this may result in malfunctions, fire hazard and other accidents.

Caution: Don’t touch the screen or the actual bulb with your finger since the oil from your skin can cause a black spot on the bulb.


Epson- Home-Cinema-8345-projector-lamp-Epson-ELPLP49-projector-lamp_remove_cover1. The lamp cover for the Epson Home Cinema 8345 projector is found on top of the projector. Take the screwdriver that came with the projector and put it into opening on the lamp cover to release the cover switch. Remove the lamp cover.

Epson- Home-Cinema-8345-projector-lamp-Epson-ELPLP49-projector-lamp_remove-scews


2. Remove the two screws on either side of Epson Home Cinema 8345 projector lamp. Place the screws to either side.


Epson- Home-Cinema-8345-projector-lamp-Epson-ELPLP49-projector-lamp_remove


3. Pull the lamp out using the top handle. Be sure to pull it out straight. Pulling too quickly can cause the bulb to shatter. Learn what to do should the bulb shatter.

NOTE: The Epson ELPLP49 contains mercury and should not be thrown into regular garbage. Recycle your used lamps!

Epson- Home-Cinema-8345-projector-lamp-Epson-ELPLP49-install_replacement_projector-lamp


4, Take the new Epson ELPLP49 lamp by the handle and gently put it into place making sure the lamp is facing in the right direction.

Epson- Home-Cinema-8345-projector-lamp-tighten-Epson ELPLP49-projector-lamp-screws


5. Replace the Epson ELPLP49 screws on the newly installed lamp.

6. Re-connect the lamp cover. Tighten the screws on the cord and turn on the projector.

Epson- Home-Cinema-8345-projector-lamp-lamp-cover-on-Epson ELPLP49-projector-lamp


Reset the Epson Lamp Timer

Reset the Epson Home Cinema 8345 projector Lamp Replacement Counter only when the Epson ELPLP49 lamp has been replaced.


Epson- Home-Cinema-8345-projector-lamp-reset-lamp-counter-menu1-Epson- ELPLP49-lamp

  • Turn the Epson Home Cinema 8345 projector projector on.
  • Press MENU to display the configuration menu.
  • Press the down arrow to move down the menu to the Reset option.

Epson- Home-Cinema-8345-projector-lamp-reset-lamp-counter-menu2-Epson- ELPLP49-lamp

  • Press Enter to enter the Reset Menu.
  • Press the down arrow to move down the menu to the Reset Lamp Hours option.
  • Press Enter.

Epson- Home-Cinema-8345-projector-lamp-reset-lamp-counter-menu3-Epson- ELPLP49-projector-lamp

  • When the Reset Lamp Hour option has been chosen the Reset Lamp Hours message will appear.
  • Use the cursor to move to the YES option.
  • Press Enter to reset the lamp hours to zero

Prolong the life of the Epson ELPLP49 lamp:

Extend the life of the newly installed Epson ELPLP49 with the following tips:

  • Keep your air filters clean to avoid overheating the projector.
  • Turn off the Epson EMP-7500 and let it stand for at least one hour ever 24 hours. An average use of four to five hours per day will ensure longer lamp life.
  • Make sure there is enough airflow around the projector particularly if it’s been permanently mounted.
  • Learn more with Top tips for extending DLP projector lamp life

Protect your projector with original lamps

Only genuine a Epson ELPLP49 genuine projector lamp should be used in order to keep your Epson Home Cinema 8345 projector in good working order. An OEM projector lamp has been manufactured to meet the specifications of the Epson Home Cinema 8345 projector.

Knock-off lamps may seem like a bargain due to their low prices but these counterfeit lamps can damage the sensitive and expensive mechanisms in your Epson Home Cinema 8345 projector. They are also prone to explosions and actually have a much shorter working life that authentic lamps due to the inferior materials used during their production. Even more troubling are the toxic, carcinogenic materials you are exposed to after installing one of these generic lamps.

Learn the 7 Ways to spot a counterfeit lamp.

Tagged with: , , ,

Sony VPL-VW50-projector-lamp

Instructions to replace the Sony VPL-VW50 projector lamp

Our guide shows you how to install a replacement Sony VPL-VW50 projector lamp with easy step-by-step instructions.

Buy authentic

Don’t settle for anything but the best for your Sony VPL-VW50 projector and install an authentic projector lamp. Don’t get caught with a counterfeit lamp. They have shorter lamp and are more toxic due to the substitute materials used by counterfeit manufacturers. Fake lamps won’t work properly with the sensitive electronics in your projector and are prone to explosions. Keep your projector working properly and invest in an authentic projector lamp.

Find this lamp on Amazon sold by these authorized dealers:

When to replace?

When the this Sony VPL-VW40 projector lamp projector lamp is reaching end of life, the Lamp/Cover light will continue to flash red in 3 second intervals. The message “Please replace the Lamp/Filter” will also start flashing on screen. If the projector lamp dims or the color looks strange, change it immediately. Sony recommends replacing the air filter at the same as replacing the lamp.

Replacing the Sony VPL-VW40 Lamp and Air Filter

Before installations preparations:Sony-VPL-VW50-projector_Sony-LMP-H200_replacement_lamp

  • Unplug the AC power cord on the Sony VPL-VW50 projector.
  • Your Sony VPL-VW40 projector uses the Sony LMP-H200 projector lamp. Before installing the lamp, let the projector cool for at least 40 minutes. It should be cool to the touch. Don’t rush the cooling as these projectors operate using extremely high temperatures and you run the risk of a serious burn.
  • The projector lamp cover is on the bottom of the projector so you will need to turn it over. Put down a soft cloth on a flat surface to prevent the projector getting scratched. Turn the projector over gently. Don’t lean on the projector and make sure the surface is flat and stable. Sony-VPL-VW50-projector_
  • Using a Philips screwdriver, loosen the screw holding the projector lamp cover in place. Slide the projector lamp cover. Put it to one side.

Sony-VPL-VW50-projector_Sony-LMP-H200_remove_lamp

Loosen the 3 screws on the Sony LMP-H200 lamp using a Phillips screwdriver. Grab the wire handle on the Sony LMP-H200 projector lamp and gently pull the lamp straight out. Take care not to bang the lamp as you can cause the bulb to break.

NOTE: The Sony LMP-H200 projector lamp contains mercury and should not be thrown into regular garbage. Recycle this lamp!

To finish the projector lamp installation:

  • Remove the packaging from the new Sony LMP-H200 projector lamp.
  • Lift up the handle and slowly lower the Sony LMP-H200 projector lamp into the projector.
  • Push it in securely until it reaches the end. Sony-VPL-VW40-projector_Sony-LMP-H200_replacement_lamp_lid
  • Tighten the three screws on the lamp.
  • Also don’t touch the actual bulb in the new lamp as oily fingerprints can burn a black spot on the lamp when it heats up.
  • Slide the lamp cover back onto the Sony VPL-VW50 projector.
  • Close the projector lamp cover and tighten the screws.
    Remember to install the lamp cover properly as the projector will not turn on if the cover is loose or not installed correctly.

Replacing the Sony VPL-VW50 air filter

Sony-VPL-VW50-projector_Sony-LMP-H200_remove_air_filter_cover

  • Remove the filter holder. The air filter will be inside the holder. Don’t touch the fan inside as this can damage the projector.
  • Sony-VPL-VW50-projector_Sony-LMP-H200_remove_air_filter
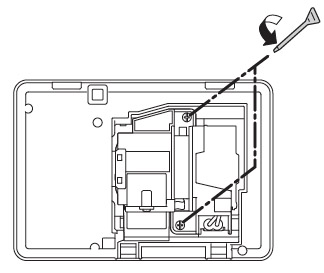
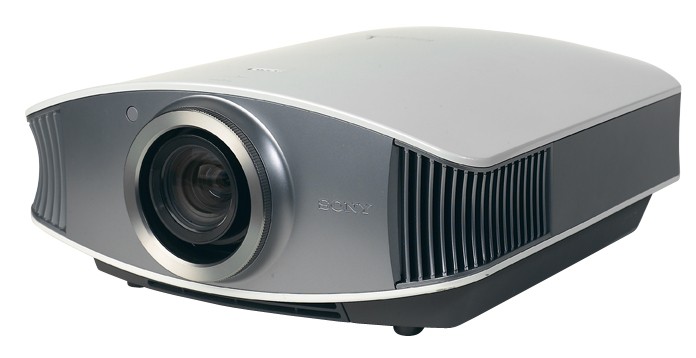
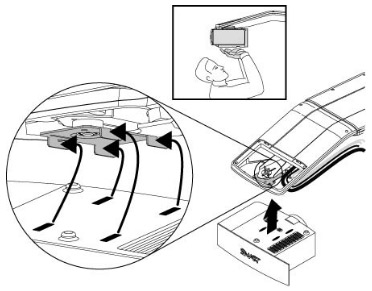
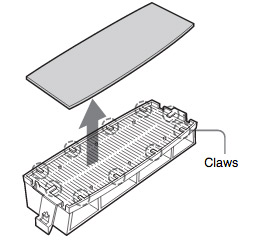
Remove the old Sony VPL-VW50 filter and put it to one side. Attach the new air filter so that is fits into the 10 claws properly on the holder.
  • Aligning the air filter with the shape of the filter holder will make it easier to install.
  • Be sure to put the air filter holder back into the projector aligned up properly. If not, the projector will not turn back on!
  • Wipe off any dust from the ventilation intake holes using a soft cloth. Put the projector back in its original position

Resetting the Sony VPL-VW50 projector lamp timer

  • To reset the projector lamp timer, plug the AC power cord back into Sony VPL-VW50 projector.
  • Using the remote, scroll down to the Setup Menu.
  • Press Enter.

Sony_VPL-VW40_projector_LMP-H200_lamp_replacement_message


  • A Lamp Setting message will appear asking you if the projector lamp has been replaced.
  • Click on Yes.


Sony_VPL-VW40_projector_LMP-H200_Final_lamp_replacement_message

  • You will see a confirmation message and the Projector Lamp Timer will be automatically reset to zero.
  • You can see the number of hours left on your lamp by going to the Information Menu.


You can extend the life of the Sony LMP-H200 projector lamp by always making sure the filter is clean and there is enough airflow around the projector. Learn how to get a longer projector lamp life with top tips for extending DLP projector lamp life.


Tagged with: , , ,

Smartboard_UNIFI55_projector

Follow this replacement guide for a new Smartboard UNIFI 55 projector lamp.

When the projected image gets darker or starts to deteriorate then it’s time to replace the Smartboard UNIFI 55 projector lamp.

Go with authentic

An authentic projector lamp makes all the difference in keeping your Smartboard UNIFI 55 projector working. If the price is too good to true, then you should avoid the lamp. Bargain basement prices mean problems down the road. Scroll down to see more reasons to avoid counterfeit lamps.

Find these lamp on Amazon sold by these authorized dealers:

When to replace

Smartboard_UNIFI 55_Smartboard_ 20-01032-20_ projector_lamp_warning

When the Smartboard UNIFI 55 projector lamp is reaching end of life you’ll see the warning message appear on screen. Replace the lamps immediately when this message shows up and don’t try to extend the use of the lamp or you may cause the lamp to explode and damage the projector.


Changing the Smartboard projector lamp

Your Smartboard UNIFI 55 projector uses the SmartBoard 20-01032-20 projector lamp.

Important Safety tips BEFORE replacing the projector lamp:

  1. Close the projector lens door to prevent scratching or touching of the lens.
  2. Press the power button twice on the ECP (extended control panel) or on the remote to put the system in Standby mode.
  3. Turn off the power switch and disconnect the power cord and all connected cables.
  4. This projector operates under high temperature and there is a burn risk so be sure to wait at least one hour minutes for the projector’s housing to completely cool.

Step 1: Remove the projector from the boom

Smartboard_UNIFI 55_Smartboard_ 20-01032-20_ projector_lamp_cover
Before you can replace the projector lamp, you must remove the projector from
the boom. You’ll need two people to do this.
Ensure that you remove the projector’s plastic lens cover.
Remove the cable cover and disconnect all cables from the Smartboard UNIFI 55 projector.

To remove the projector from the mount, hold tSmartboard_-885i4_Smartboard_-20-01032-20_-remove_projector_mount
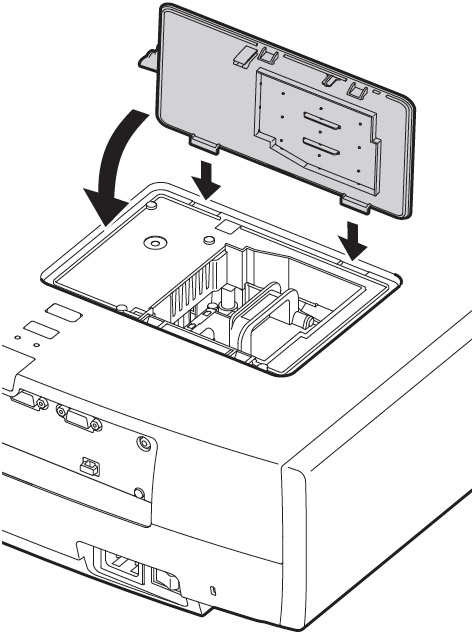
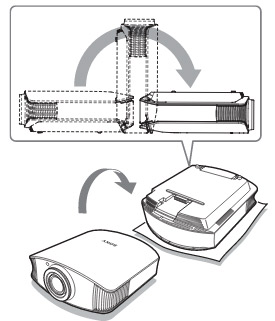
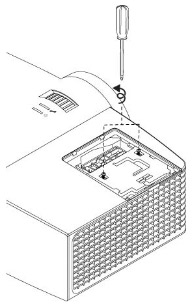
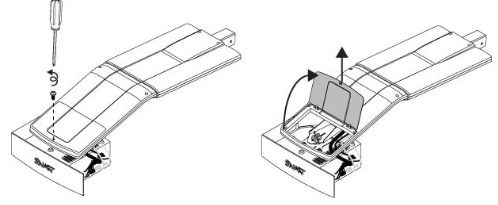
he projector and without applying pressure, remove the screw holding the cable cover in place. Lift the cover off.

If you use a projector padlock, make sure that you remove it from the locking loop.
Smartboard_UNIFI 55_Smartboard_ 20-01032-20_ projector_lamp_mount
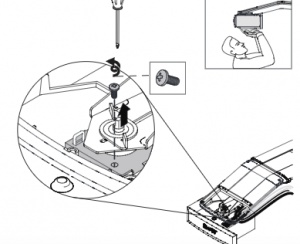
If you need access to the projector locking
screw, loosen the wingnut and slide the
projector all the way back, away from your interactive whiteboard’s screen, and
then re-tighten the wingnut.
Loosen the wing nut and slide the Smartboard UNIFI 55 projector away from the interactive whiteboard screen. Then remove the single screw on the bracket.
Smartboard_UNIFI 55_Smartboard_ 20-01032-20_ projector_lamp_remove_mount
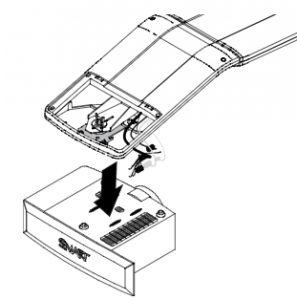
Take care as the projector will be loose once the screw on the mount have been loosened. Have the second person ready to hold the projector.
Using two hands carefully unhook and remove the projector from the projector boom. Lay the Smartboard UNIFI 55 projector boom flat with the warning lights facing upwards.

Step 2: Remove the old lamp

Smartboard_885i4_Smartboard_20-01032-20_remove_projector_lid-2

Smartboard_880i4_Smartboard_20-01032-20_remove_projector_lid-3
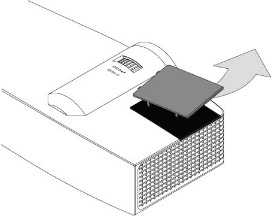
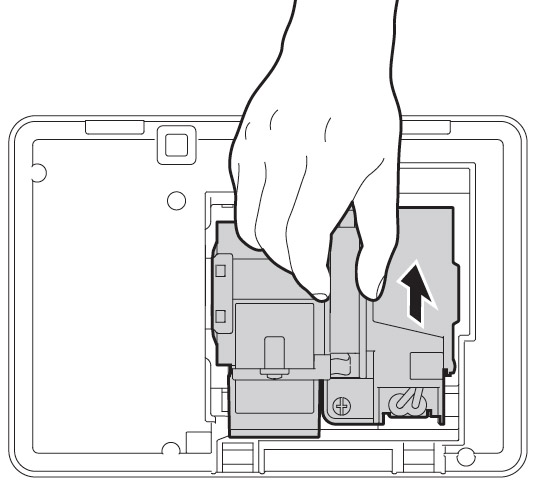
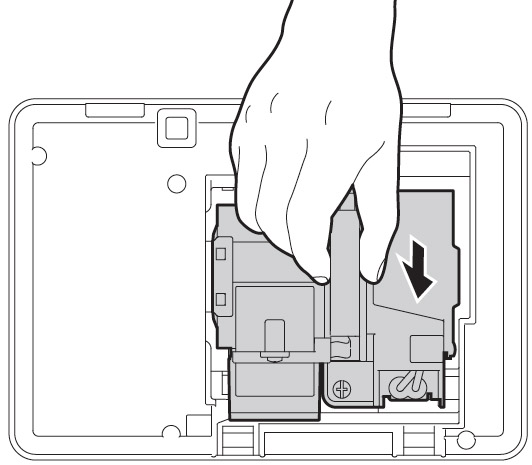
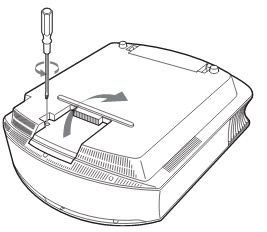
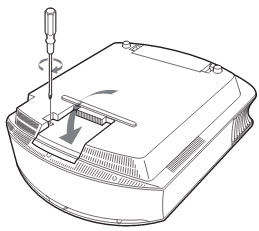
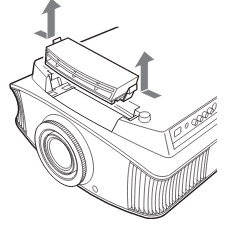
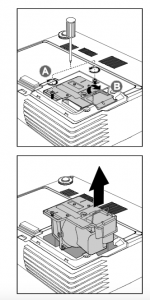
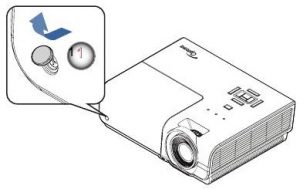
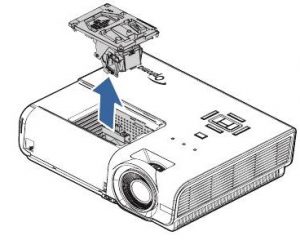
Pull off the outer lamp cover with the your finger and set it aside.

Loosen the two screws holding the SmartBoard 20-01032-20 projector lamp in place.

Press on the tab and pull up with the handle on the old lamp. Release the tab. NOTE: The SmartBoard 20-01032-20 projector lamp contains mercury and should properly recycled and NEVER thrown into regular garbage

Remove all packaging from the new SmartBoard 20-01032-20 projector lamp. Press the tab, put the new lamp into the lamp slot, and push it all the way down. Release the tab.

Put the outer lamp cover back into its original position. Align the cover and tighten the screws until the outer Smartboard UNIFI 55 projector lamp cover is secure.

Tighten the two lamp screws on the SmartBoard 20-01032-2

Replace the projector plate assembly on the projector boom

You will need two people to do this.

Smartboard_885i4_Smartboard_20-01032-20_replace_projector_mount-2

Smartboard_885i4_Smartboard_20-01032-20_replace_projector_mount

  1. Using both hands, left the projector and align the hooks on the boom with the slots on the projector. Have someone hold the projector in place.
  2. To place the projector back into the boom, attach the projector plate hinges into the corresponding flange hook on the projector boom.
  3. Secure the projector to the plate with the original screw.
  4. Replace the projector padlock.
  5. Replace the projector cover on the top of the boom. Without applying pressure to the boom, replace and tighten the screw on the cover until it’s secure. Connect all the cables and put the cable cover back on.

Resetting the lamp timer

Your Smartboard UNIFI 55 has a built in lamp timer that tracks the life of the SmartBoard 20-01032-20 projector lamp. Whenever you change the lamp you need to reset the lamp timer back to zero.

  1. Using the remote control, press the following buttons quickly to access the service menu: Down, Up, Up, Left, Up.
  2. Scroll down to the Lamp Hour Reset field and press OK. Both Standard and Economy setting will be reset to zero.
  3. Press the Menu button on the remote control to make the Smartboard UNIFI 55 Setting menu appear.
  4.  Select the Lamp Hours to confirm that it’s been reset to zero.
  5. Wait five minutes for the projector lamp to warm up.

Learn how to extend the life of your SmartBoard 20-01032-20 projector lamp with Top tips for extending DLP projector lamp life.

6 reasons to avoid generic lamps:

Tagged with: , ,

Infocus_IN1124_PROJECTO
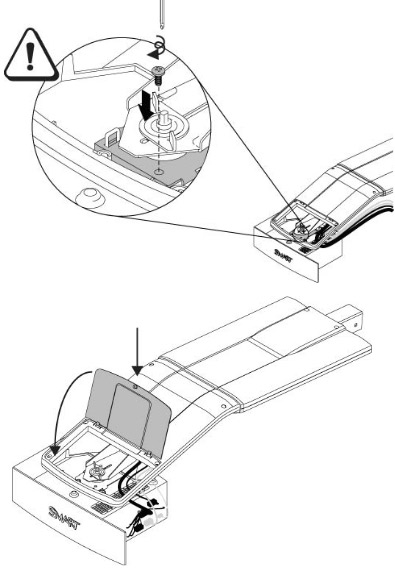
Install a replacement Infocus IN1124 projector lamp using this guide.

Replace the Infocus IN1124 projector lamp quickly by following this guide.

Why go with authentic

Buy an authentic replacement projector lamp and avoid the headaches associated with counterfeit lamps. Find the 6 most common problems associated with counterfeits at the end of this post.

Find this lamp on Amazon sold by these authorized dealers:

Install the replacement projector lamp

Your InFocus IN1124 projector needs the InFocus SP-LAMP-076 replacement projector lamp. Follow these important safety steps BEFORE installing the replacement

  • Turn off the InFocus IN1124 projector and unplug the power cord.
  • To avoid getting burned, let the projector fully cool before changing the lamp.
  • Do not operate the projectors while any of the lamps are removed as this may result in malfunctions, fire hazard and other accidents.

Infocus_IN1124_projector_Infocus_SP-LAMP-076_cover

  • Loosen the two captive screws on the lamp cover.
  • Remove the lamp cover.
  • Infocus_IN1124_projector_Infocus_SP-LAMP-076_remove
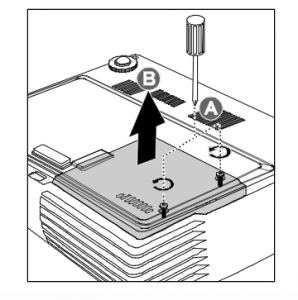
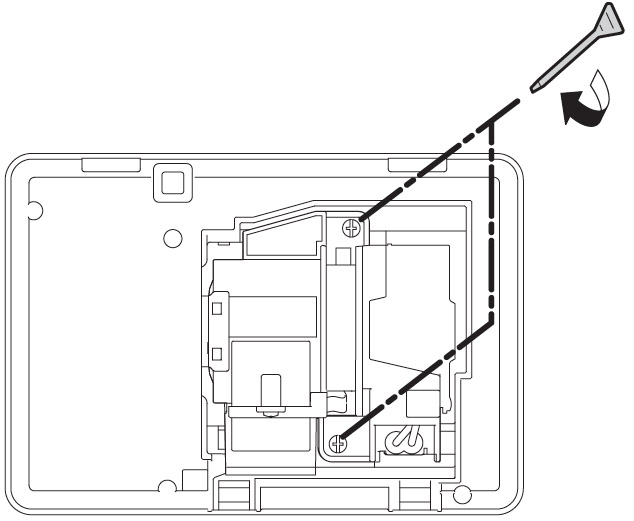
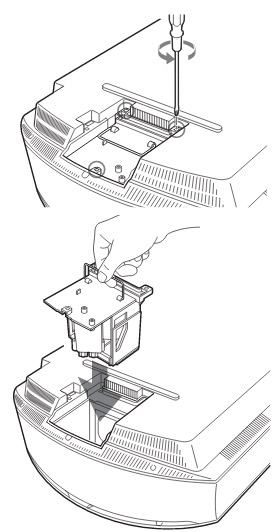
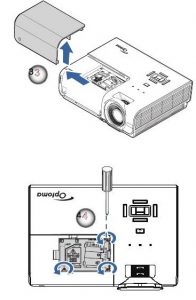
Remove the two screws from the lamp module.
  • Lift the module handle up. Pull firmly on the module handle to remove the lamp module.
  • NOTE: The InFocus SP-LAMP-076 contains mercury and should not be thrown into regular garbage. Recycle this used lamp!

Infocus_IN1124_projector_Infocus_SP-LAMP-076_insert


  • Place the new lamp into the projector being sure to line it up properly. Align the lamp module with the connector and ensure it is level to avoid damage.
  • Make sure the lamp is sitting securely in place and the lamp connector must be
  • connected properly before tightening the screws.
  • Tighten the two screws on the lamp.
  • Replace the lamp cover and tighten the screws.

To reset the lamp timer:

  • Press MENU
  • Select INSTALLATION II/ ADVANCED. Press Enter
  • Scroll down to select LAMP HOUR RESET. Press Enter
  • Press the left arrow, then down arrow, then up arrow and double arrows
  • Press the MENU button to get back to INSTALLATION II

Tips for longer lamp life

  • Keep your air filters clean to avoid overheating the projector.
  • Turn off the Infocus IN1124 and let it stand for at least one hour ever 24 hours.
  • Make sure there is enough airflow around the projector particularly if it’s been permanently mounted.
  • Top tips for extending DLP projector lamp life

Top reasons to avoid counterfeit lamps:

Buy from a legitimate source to keep your projector under warranty and working properly.

Tagged with: , ,

projector_lens


Dust on your projector lens? Here’s how to clean it.


Your projector lens is similar to a camera and should be cleaned the same way. You can get everything you need to clean your projector lens at a camera store.

Before cleaning:

  • Turn off the projector
  • Unplug the power cable
  • Let the projector cool down. It should be cool to the touch.

Keep it clear

Avoid permanently fogging your lens. Never use alcohol or other abrasive solvents to clean your projector, especially your lens. Avoid putting lens cleaner directly on the lens as well. Both of these action will create a permanent haze giving your image a foggy look.

Proper steps

Step 1: Used compressed air or a small blower brush to remove any dust or debris from the lens. Don’t try cleaning the lens before using the compressed air or you can scratch the lens. Be sure to stand at least seven inches away from the lens . Purchase the right type of compressed air that is suitable for lens.

 Step 2: If the lens is still dirty, use a camera microfiber cloth to gently wipe the lens in a circular motion staring from the center. If the lens is sticky, then put one or two drop of lens cleaning solution onto lens tissue and gently wipe the lens – again in a circular motion. You can also use a carbon-based lens using its soft brush pen to clean the lens. Avoid using rags that will leave any lint. Paper towels or tissues as the hard fibers in this material can scratch the lens while leaving particles behind.

Step 3: Let the lens dry if you have used the solution. Give another blast to compressed air to remove any dust from the cloth. Avoid touching the lens directly. Oil from your fingers will leave a mark.

Learn more about cleaning your projector:

Optoma_EH500_projector
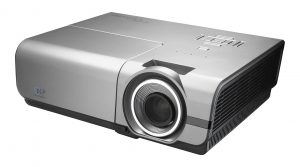
Follow this guide to replace the Optoma EH500 projector

When it’s time to replace the Optoma EH500 projector lamp you’ll notice the picture quality is diminishing or the color appears off. The projector automatically detects the lamp life. When the lamp life is nearing the end of use, you will receive a warning message. Optoma_EH500_projector_Optoma_BL-FU310B_lamp_warning

Go with authentic

With so many choices, it can be confusing finding the correct projector lamp It’s easy to get duped into buying counterfeit projector lamp posing. The Optoma EH500 uses the Optoma BL-FU310B projector lamp. Look for the seal of approval and watch for telltale signs you are about to purchase a counterfeit lamp:

See below for more reasons to avoid counterfeit lamps.

Find this lamp on Amazon sold by these authorized dealers:


Installing the projector lamp

Before installing the Optoma EH500 projector lamp follow these safety precaution

  • Turn off the projector
  • Unplug the power cord
  • Allow the Optoma EH500 projector to cool down for at least 30 minutes. If should be cool to the touch to prevent to getting burned.

To replace the lamp

  • Remove the button covering the cover screw. Loosen to screw to remove the projector cover
  • Optoma_EH500_projector_Optoma_BL-FU310B_remove_lamp
  • Slide the top cover forward, and lifting the top cover off.
  • Remove the screw on the Optoma BL-FU310B projector lamp cover and then open it up.
    Loosen the three screws from the Optoma BL-FU310B projector lamp.

Optoma_EH500_projector_Optoma_BL-FU310B_replace_projector_lamp

  • Raise the handle and pull out the Optoma BL-FU310B projector lamp. NOTE: The Optoma BL-FU310B projector lamp contains mercury and should not be thrown into regular garbage. Recycle this lamp.
  • Insert the replacement Optoma BL-FU310B projector lamp.
  • Tighten the four screws on the lamp.
  • Replace the project cover and tighten the screw.
  • You are now ready to reset the lamp timer.

Reset the Optoma EH500lamp timer

Your Optoma EH500 comes equipped with an automatic lamp timer that tracks the number of hours left on the projector lamp. Each time you change the lamp you need to reset the lamp timer.

Optoma_EH500_projector_Optoma_BL-FU310B_lamp_hours

  • Open the Options Menu from the Menu.
  • Scroll down to the Lamp Reset option.Press Enter.

Optoma_EH500_projector_Optoma_BL-FU310B_reset_lamp_timer

  • A second screen appears asking if you want to reset the lamp hours to zero. Scroll over and choose Yes. Press Enter. The lamp timer will be reset to zero.

Longer lamp life

Learn the TOP Tips for extending the lamp life in your Optoma EH500 projector lamp projector.

Reasons to avoid counterfeit lamps

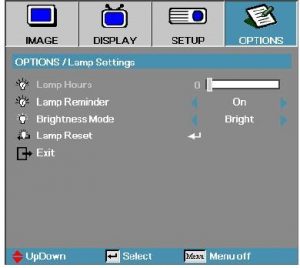
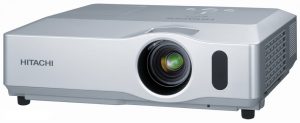
Install a new Hitachi CP-X450 projector lamp

Watch for these signs that indicated the Hitachi CP-X450 projector lamp is reaching its end of life:

  • Both the Hitachi CP-X460 Power and Lamp Indicators are flashing red while the Temp Indicator is turned off.
  • Color tone on the screen may also appear weak or washed out.
  • Picture has poor color quality.

Invest in authentic

The only replacement projector lamp that will keep your projector working is the Hitachi DT00841 (CPX401) bought from an OEM manufacturer. While knock-off lamps appear to be a bargain, they will actually end up costing you more money due to their various problems:

Learn to spot copycat lamps posing as authentic lamps. Keep track of projector lamp life so you’ll know when to replace the projector lamp.

Find this lamp on Amazon sold by these authorized dealers:

Installing the Hitachi CP-X450 projector lamp

Hitachi_CP-X450_projector_change_Hitachi-DT00841_projector_lamp
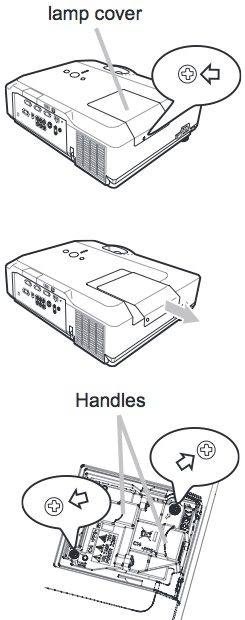
Safety steps before installing the new lamp

  • Turn off the Hitachi CP-X450 projector.
  • Unplug the power cord.
  • Allow the projector to cool for at least 45 minutes. It should be cool to the touch. This projector works using high heat and there is danger you can be burned.
  • NOTE: If the projector is mounted on the ceiling, don’t stand underneath the projector while opening the cover.
  • Prepare the new Hitachi CP-X450 projector lamp. If the projector is mounted on a ceiling, or if the lamp has broken, contact your dealer for assistance.
  • Loosen the screw (marked by arrow) of the lamp cover and then slide the lamp cover to the side to remove it.
  • Loosen the 2 screws (marked by arrow) of the projector lamp, and slowly pick up the lamp by the handles. Be careful not the bang the lamp. The Hitachi DT00841 projector lamp contains mercury and must be recycled properly. Do not throw it in regular garbage.
  • Insert the new lamp, taking care not to touch the actual bulb. Oil in your fingers will cause a dark spot on the lamp when it heats up.
  • Tighten the two screws of the Hitachi DT00841 projector lamp that were loosened to remove the old projector lamp.
  • Slide the lamp cover back in place and firmly fasten the screw of the lamp cover.
  • Turn on the projector and set the lamp timer:

To reset the projector lamp timer:

Note: Reset the projector lamp time only when you have replaced the lamp so the Hitachi CP-X450x projector can properly track the lamp life. Otherwise you run the risk of using the lamp beyond its lamp life.HitachiCP-X450_projector_Hitachi-DT00841_projector_lamp_reset_timer

  • Press the MENU button
  • Scroll down to the GO TO ADVANCED MENU option. Press ENTER
  • Scroll down to the OPTION menu in the left column and press ENTER.
  • Scroll down to LAMP TIME. Press ENTER To make a dialogue field appear
  • Scroll up to the RESET option on the dialogue box.
  • The lamp setting will be set to zero.

Replacing the air filters

Get more hours from your  by Hitachi CP-X450x keeping your air filters clean to avoid overheating the projector.

  • Pull the filter frame’s knob up while holding the filter cover. The filter frame will come off and the air filter will appear.
  • Take out the old air filter and insert the new air filter.
  • Put the filter frame back.
  • Put the filter unit back into the projector
  • Turn the projector on and reset the filter time using the FILTER TIME item in the EASY MENU.

Learn more with top tips for extending DLP projector lamp life.

Tagged with: , , ,
Join the discussion on Facebook! All your questions, answered! The Screen & Projector Group