We're now Screen and Projector! For updated content, visit ScreenAndProjector.com and follow @screenandproj on social media!

Series_642_Mitsubishi_home_cinema_RPTVPart 2 in a series on how to connect HDMI devices to your 620 Mitsubishi home cinema.

The Mitsubishi 642 home cinemae series has HDMI feature called CEC (Consumer Electronics Control) that allows one device to control another. Similar to an A/V receiver or disc player being controlled through the TV.

Be sure to read Part 1: Adding HDMI devices to your 620 Mitsubishi home cinema before starting this section.

Enabling HDMI controls in the 620 Mitsubishi home cinema

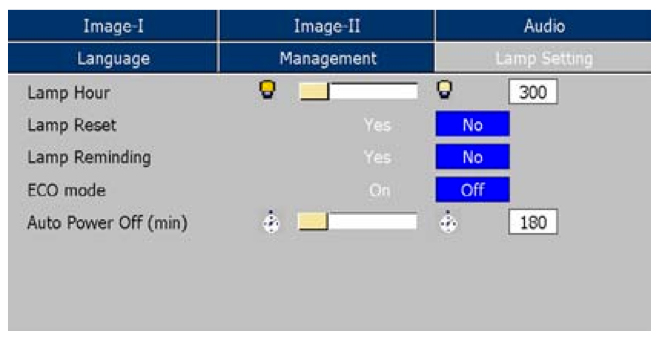
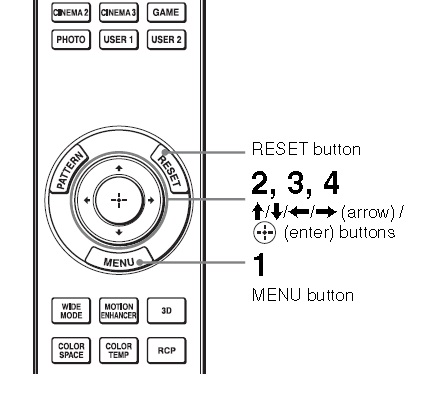
In order to find which CEC functions are available with the 620 Mitsubishi home cinema, you must enable  the HDMI Control. First enable the HDMI Control.

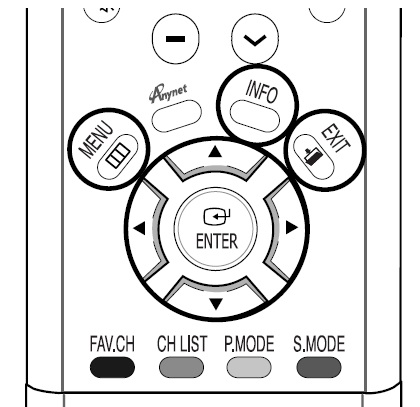
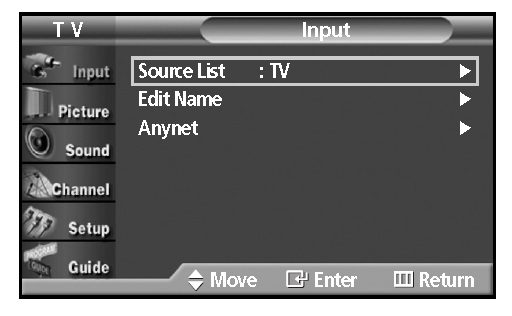
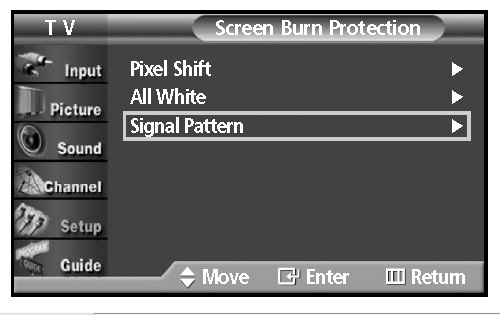
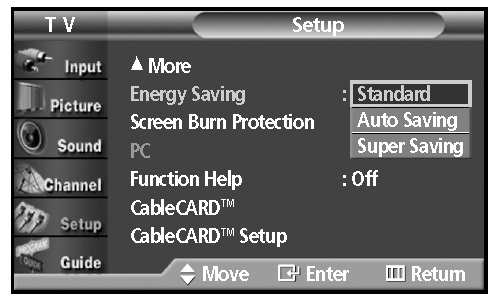
  • From the TV: Enable HDMI control from either the New Device Found menu showing on screen or from the Inputs/HDMI Control menu.
  • From the device: Most HDMI CEC compatibile devices have an off/on switch the device menu. Look for a menu item listed as HDMI Control.

Proper detection of CEC in the 620 Mitsubishi home cinema

To ensure proper detection of HDMI control of CEC devices:

  • Power on HDMI devices before connecting them to the TV.
  • Connect and set up HDMI devices one at a time.

Do the following steps:

620 Mitsubishi home cinema
  • Power on the device and allow it to complete the power-on sequence (boot up).
  • Stop any playback.
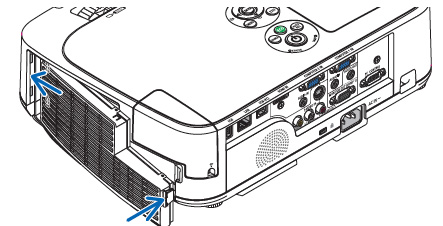
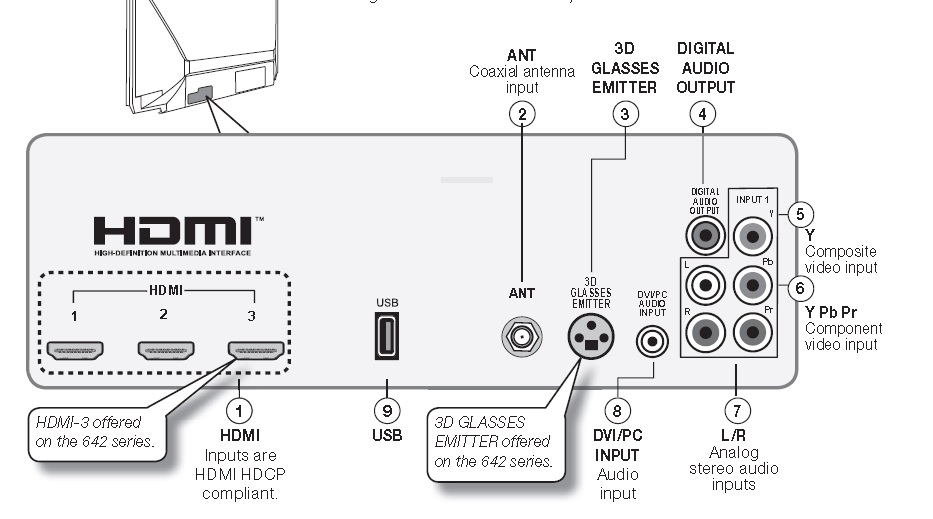
  • Connect the device to one of the TV’s HDMI inputs.
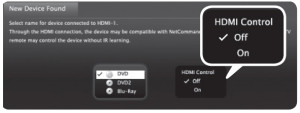
  • When the TV detects the connection, the New Device Found screen will appear.
  • Note: See “If the New Device Found Screen Has No HDMI Control Option” on this page is not an option that is being offered.

Series_642_Mitsubishi_home_cinema_RPTV_Hdmi_CEC_menu

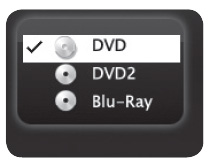
  • When prompted for a name, highlight a name for the device and press ENTER to add a check. This may later override the name you assign.

Series_642_Mitsubishi_RPTV_Hdmi_set_devices

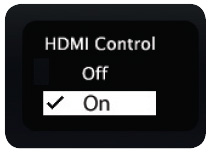
  • Highlight On and press ENTER to add a check.
  • Highlight EXIT and press ENTER to close the New Device Found screen.
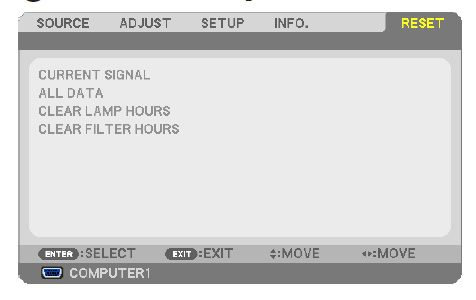
  • NOTE: At any time after completing Auto Input Sensing, you can set the TV’s HDMI control on or off in the Inputs /HDMI Control menu.


HDMI Control Option found in the 620 Mitsubishi home cinema

If the New Device Found screen shows no option for HDMI Control, one of these conditions applies:
A. HDMI Control is turned off in the menus of the new device:
Action needed:

  1. Highlight EXIT and press ENTER to close the New Device Found screen.
  2. Display the device’s setup menus and enable the device’s CEC capabilities.
  3. Wait for the TV’s New Device Found screen to appear again.
  4. If the New Device Found screen does not appear, power off the device. Power on the device and wait for the New Device Found screen to display the HDMI Control option.

B. The HDMI cable cannot support CEC Action:
Action needed: Upgrade your HDMI cable to one that supports CEC.

C. The device does not have CEC compatibility:

Action needed: Control the device with its own remote control or program the TV’s remote control to operate the device.

Continue reading:

Part 3: Troubleshooting HDMI connection to your 620 Mitsubishi home cinem

Having problems figuring this out or need more help? Sign up on our forum and get all the help you need.

Tagged with: , , ,

mitsubishi-642-RPTV_HDMI_connectionsYour 620 Mitsubishi home cinema can bring variety to your home entertainment centre.

You can your 620 Mitsubishi home cinema of your Blu-ray players, newer DVD players, video games, 3D content, and set-top boxes to watch your favourite films, TV shows or play favourite games.

Review all the available options

1. HDMI® Inputs (High-Definition Multimedia Interface)

The HDMI inputs support uncompressed standard and high-definition digital video formats, bitstream Dolby Digital 5.1, and PCM digital stereo audio. Use the HDMI inputs to connect to high-definition receiver or DVD player. These inputs support 480i, 480p, 720p, 1080i, and 1080p video formats. The TV’s HDMI inputs are compatible with many DVI-D and HDMI computer video signals.  To connect a device’s DVI output to the TV’s HDMI input, use an HDMI-to-DVI adapter or cable plus an analog audio cable. Connect the audio cable to the DVI/PC AUDIO INPUT jack on the TV to receive audio from your DVI device.

2. ANT ( Antenna)

Connect your main antenna or direct cable service(without a cable box) to ANT. The ANT input can receive digital and analog over-the-air channels from a VHF/UHF antenna or non-scrambled digital/analog cable source.

3. 3D GL ASSES EMITTER

Use this jack for the special synchronization emitter supplied with some 3D glasses. The emitter sends out a signal that synchronizes your 3D glasses with the screen display.

4. DIGITAL AUDIO OUTPUT

This output sends Dolby Digital or PCM digital audio to your digital A/V surround sound receiver. Incoming analog audio is converted by the TV to PCM digital audio. If you have a digital A/V receiver, this is the only audio connection needed between the TV and your A/V receiver.

5. Y/VIDEO (Composite Video)

Analog standard-definition video inputs. Use the adjacent R and L inputs if you wish to send audio to the TV speakers.

6. Y/VIDEO Pb Pr (Component Video)

Analog video inputs able to accept high-definition video from a high-definition source device. Use the adjacent R and L inputs if you wish to send audio to the TV speakers.

7. L/R (INPUT 1 audio)

Analog stereo inputs for use in conjunction with adjacent composite or component video jacks.

8. DVI/PC INPUT

Connect a DVI device to one of the TV’s HDMI inputs and use this jack to send analog audio to the TV.

9. USB

For software updates only. To check for updates, visit www.mitsubishi-tv.com and follow the support link.

HDMI Cable Categories

HDMI cables are available as Standard and High-Speed types.

High-Speed HDMI Cables:

Blu-ray players, newer DVD players, video games, 3D content, and set-top boxes require High-Speed HDMI cables, suitable for clock frequencies up to 340 MHz or data rates of up to 10.2 gigabits per second. Use high-speed cables for 1080p HD signals carrying extended color encodings (i.e., 30 or more bits, also called Deep Color). High-Speed HDMI cables are also suitable for standard HDTV signals. Mitsubishi recommends you use high-speed HDMI cables to connect newer source devices High-speed cables bring you the full benefits of Deep Color. These HDMI inputs can also accept digital DVI video signals.

Standard HDMI Cables:

Standard HDMI cables may be unmarked. They are suitable for standard HDTV 720p, 1080i, and 1080p signals with 8-bit color depth. Use Standard HDMI cables for clock frequencies up to 74.25 MHz or data rates of up to 2.2 gigabits per second.

Continue reading:

Part 2: Connecting HDMI devices to your 620 Mitsubishi home cinema

Having problems figuring this out or need more help? Sign up to our forum and get all the help you need.


Tagged with: , ,

Optoma_EP7161_projector_lampDon’t call the technician! Consult our installation guide to replace the Epson EP7161 projector lamp.

Step 1: Get the right lamp!

Your Optoma EP7161 uses the Optoma BL-FU180A  projector lamp. Only OEM lamps can keep your projector working at optimal best. Invest in an authentic Epson EP7161 projector lamp.

Why avoid generic lamps?

Look for the seal of approval to be sure you’re getting an authentic lamp. Generic appear to be a great deal with their great price tag. But they are actually going to cost you more in the long run. These generics are created with toxic materials and often don’t have the proper safeguards to protect your eyesight. They are also prone to explosions, don’t last as long as authentic and can damage the sensitive optics in your Optoma EP7161 projector. Learn the 7 Ways to Spot a Counterfeit Lamp.

Buy this lamp on Amazon sold by these authorized dealers:

Step 2: Know when to replace

Watch for these telltale signs that the Optoma BL-FU180A projector lamp is reaching end of life:

  • faded image
  • colours are off or not as vivid
  • blinking LED lights on the Optoma EP761P projector
  • the following warning sign on your screen:

Optoma-EP7161_projector_Lamp_Replacement_warning_Optoma_BL-FU180A_projector_lamp

Step 3: Installing a new Optoma BL-FU180A

Follow these important safety steps before installing a new Optoma BL-FU180A  projector lamp:

  • Switch off the power to the Optoma EP7161 projector by pressing the Power/Standby button.
  • Disconnect the power cord.
  • Allow the projector to cool down for at least 30 minutes. If should be cool to the touch. These projectors run using high temperatures and you can burn yourself badly if you don’t allow the projector to cool down.

Optoma_EP7161_BL-FU180A_remove_lamp_cover-Optoma BL-FU180A (SP.82G01.001)_projector_lamp


Step 1: Place something soft underneath the Optoma EP7161 and then turn the projector onto it’s back. Remove the two screws holding the cover in place.

Optoma_EP7161_BL-FU180A_remove__projector_lamp_cover


Step 2: Push the cover up to remove it.


Optoma_EP7161_BL-FU180A_remove_lamp_screws__projector_lamp

Step 3: Use a screwdriver to remove the two screws holding the Optoma BL-FU180A projector lamp module in place.

Slowly put out the old lamp by grabbing the edge of the lamp. Be careful not to bang the lamp against the projector as this may case the bulb to break. Learn what to do if the lamp has exploded inside the projector.

The used projector lamp contains mercury and should be properly recycled. Don’t throw it into regular garbage.


Optoma_EP7161_BL-FU180A_new_lamp_projector_lampOptoma_EP7161_BL-FU180A_lamp_projector_lamp

Step 4: Place the new Optoma BL-FU180A  into the Optoma EP7161 projector lamp. Tighten the two screws on the lamp. Replace the lamp cover and tighten its two screws.
You must now reset the Lamp Replacement Timer.

Reset the lamp timing on the Optoma EP7161

Optoma_EP7161_projector_Lamp_Setting_Menu_Optoma_BL-FU180A_projector_lamp

The Optoma EP7161 projector has an automatic lamp reset timer that tracks the life of the lamp and triggers the lamp replacement warning. You need to reset the timer each time the lamp is replaced.

  • Press the Menu option on either the remote or on the projector.
  • Scroll over the Lamp Setting. Press enter.
  • Select Reset Lamp Hours. Press Enter
  • The Execute/Cancel command line will appear.
  • Scroll over to choose Execute. Press Enter. The lamp hours is reset to zero.

Make the Optoma BL-FU180A projector lamp last longer with these tips:

  • Turning on the Eco Mode to lower power consumption and extend the lamp life by 130%.
  • Keep your air filters clean to avoid overheating the projector.
  • Turn off the Optoma EP7161 projector and let it stand for at least one hour ever 24 hours.
  • Make sure there is enough airflow around the projector particularly if it’s been permanently mounted.
  • Top tips for extending DLP projector lamp life
Tagged with: , , ,

Epson_EMP_6010_projector-Epson_EMP_6010_projector

Follow our 3-step guide to replace the Epson EMP-6010 projector lamp.

Warning signs

Watch for the signs that the Epson EMP-6010 projector lamp needs to be replaced. Look for these signs:

  • Dark image
  • Image that has deteriorated
  • On warning message appears on screen
  • Lamp light flashes red and stays lit
  • Lamp light turns red and stays on
  • Check Lamp Usage

Buy authentic Epson EMP-6010 projector lamp

Protect your investment and buy the best possible lamp for your Epson EMP-6010. Bargain lamps advertised as “generic compatible” lamps actually end up costing more in the long run due to their shorter lamp life. They are also prone to explosions and have been manufactured with toxic materials. Installing one can also damage the sensitive components in your projector. Save yourself unnecessary headaches. Buy authentic.

Buy this lamp on Amazon from the following authorized dealers:


Install the Epson ELPLP45

Before installation:

  • Turn power button off wait for light to stop flashing.
  • Turn off power swtich on the back of the Epson EMP-6010 projector.
  • Unplug the power cord.
  • Allow the Epson EMP-6010 projector to cool for one hour – it should be cool to the touch. Inside of the projector can be very hot since these machines operator under high temperatures and you run the risk of being burned if the projector has not cooled down.
  • Do not operate the projectors while any of the lamps are removed as this may result in malfunctions, fire hazard and other accidents.

Epson_EMP-6010_ELPLP45_lamp_remove_coverStep 1: Loosen the screw holding the lamp cover in place.

Step 2: Remove the lamp. Put the cover to one side.

Epson_EMP-6010_ELPLP45_lamp_remove_screws

Step 3: Loosen the two screws holding the Epson ELPLP45 lamp in place.

Epson_EMP-6010_ELPLP45_remove_lampStep 4: Gently remove the lamp. Pulling too quickly can cause the bulb to shatter. Learn what to do should the bulb shatter.

NOTE: The Epson ELPLP45 lamp contains mercury and should not be thrown into regular garbage. Recycle your used lamps!

Epson_EMP-6010_ELPLP45_install_new_lampStep 5: Gently insert the Epson ELPLP45 lamp making sure it’s facing the right way.

Caution: Don’t touch the actual bulb with your finger since the oil from your skin can cause a black spot on the bulb.

Tighten the screws on the new Epson ELPLP45 lamp.

Epson_EMP-6010_ELPLP45_replace_cover

Step 6: Repeat Steps 1 and 2. Replace the lamp cover and tighten the screw on the Epson EMP-6010  lamp cover. You are now ready to reset the lamp timer.

Reset the lamp timer on the Epson EMP-6010

Reset the Epson EMP-6010 Lamp Replacement Counter only when the Epson ELPLP45 lamp has been replaced.

  • Press the MENU button on the remote control. The Lamp Reset Menu will appear.
  • Scroll down to the RESET LAMP HOURS. Press ENTER.
  • A prompt appears asking if you want to replace the lamp.
  • Select YES and press ENTER. Press MENU to exit.

Prolong the life of the Epson ELPLP45 lamp:

Extend the life of the newly installed Epson ELPLP45 with the following tips:

  • Keep your air filters clean to avoid overheating the projector.
  • Turn off the Epson EMP-6010 projector and let it stand for at least one hour ever 24 hours. An average use of four to five hours per day will ensure longer lamp life.
  • Make sure there is enough airflow around the projector particularly if it’s been permanently mounted.
  • Learn more with Top tips for extending DLP projector lamp life
Tagged with: , , , ,

Protect_your_eyesight_DLP_projectors

DLP projectors offer amazing visuals with crisp colours and clear images.  However, there are some associated health risks particularly with your eyesight.

Health and safety experts recommend no more then 1/10 of a seconds direct exposure to the high intensity lamps used with projectors.

Looking directly into the lamp for even a few second of direct exposure can damage your retinas. Fortunately, most of us will experience an eye aversion response, a reflex that makes us turn away from the light automatically to protect our eyesight.

There is still the danger of peripheral overexposure so it is important to know how to position both yourself and the projector to minimize the danger to your eyesight.

Projector safety tips:

  • Never stare directly into the projector’s beam of light.
  • Keep your back to the light beam as much as possible.
  • Use a laser pointer to highlight key areas on your presentation and avoid stepping into the beam.
  • Make sure your screen is out of sight line with audience so they are NOT looking into the beam while watching the presentation.
  • Ceiling mounted projector minimize the audience staring into the beam.
  • Reducing the ambient lighting will reduce the amount of lamp power needed and lower the intensity of the beam.
  • Avoid using the setting for 1500 Lumen and higher.
  • Keep some ambient light in the room as this helps eye to eye contact and helps the eyes adjust.
  • Be sure to supervise any students and watch they don’t look into the projector
  • For use in the classroom, consider investing in a close-coupled projector that sits close to the screen eliminating any light leakage.
  • When using an interactive whiteboard be sure to look at the board and not into the beam from the projector.
  • Restore natural daylight as soon as the interactive whiteboard session is completed.
  • Be sure to install original equipment manufactured (OEM) projector lamps that are installed with proper UV reflectors to protect your eyesight. Knock-off, generic projector lamps don’t offer this protection and can actually damage your eyesight.
Tagged with: , ,

Optoma_Theme_Scene_HD65_projector_lamo_replacement

Replacing the projector lamp in your Optoma Theme Scene HD65 projector is easy when you follow this installation guide.

Warning signs

The Optoma Theme Scene HD65 projector automatically detects the projector lamp life. Watch for these telltale signs that your Optoma Theme Scene HD65 projector lamp is approaching its end of life:

  • the Lamp LED flashing orange
  • picture has poor colour quality
  • image vibrancy and definition has deteriorated
  • a warning message appears on screen:

Optoma HD65_Optoma BL-FS180C_warning_for_lamp
When you see any of these signs, especially the warning message, change the lamp immediately.

Go with authentic lamps

Your Optoma Theme Scene HD65 uses the Optoma BL-FS180C projector lamp and in order to keep your projector working at its best you need to always install and authentic lamp. Generics have inferior parts so are prone to overheating or exploding. Although they may have a cheaper price tag, counterfeit lamps have a shorter life and deliver a much poorer image on screen. Often these lamps use toxic chemicals as substitutes and can’t be calibrated properly to with your projector’s sophisticated optics. Keep your projector working and go with an authentic Optoma BL-FS180C lamp.

Always look for the seal of approval and watch for telltale signs you are about to purchase a counterfeit lamp:

Buy this lamp on Amazon from the following authorized dealers:


Step 3: Installing the Optoma Theme Scene HD65 projector lampOptoma HD65_Optoma BL-FS180C_warning_for_ceiling_mounted

Follow these important safety tips before changing the projector  lamp:

  • Make sure the HD65 projector is turned off by pressing the Power button on the projector.
  • Disconnect the power cord.
  • Allow the HD65 projector to cool down for at least 30 minutes. If should be cool to the touch. These projectors run using high temperatures and you can burn yourself badly if you don’t allow the projector to cool down.
  • Use caution with ceiling mounted projectors. Wear safety glasses to protect your eyesight in case the lamp has exploded and there are glass shards inside.

Optoma HD65_Optoma BL-FS180C_install_new_projector_lamp

1. Use a screw driver to loosen the two screws holding the projector lamp cover in place. Make sure you have followed the safety tips before taking the cover off.  Place the lamp over to one side.

2. Remove both screws holding the Optoma BL-FS180C projector lamp in place.

3. Lift the wire handle and gently remove it from the projector. Be careful not to hit the projector lamp or you can cause it to break. Learn what to do if the lamp is broken inside the projector.

4.  Finish the installation:

  • Take the new Optoma BL-FS180C projector lamp out of its packaging and lift the handle on the lamp. Gently place it into the projector making sure not to touch the actual bulb. Oil from fingerprint marks can burn black spots onto the lamp when it heats up.
  • Tighten the screws on the projector lamp.
  • Close the lid. Tighten the cover screws.

You are now ready to reset the lamp timer.

Reset the Optoma Theme Scene HD65 projector lamp timer

Your Optoma Theme Scene HD65  will automatically track the number of hours left in the lamp. You need to reset the lamp timer when you change the Optoma BL-FS180C projector lamp so the HD projector can accurately track lamp life. To se the lamp timer:

Optoma HD65_Optoma BL-FS180C_reset_projector_lamp_timer


  • Press the Menu button to open the On-Screen-Data (OSD) menu.
  • Press the right/left arrow button to move to the Options menu.
  • Press the right/left arrow button button to move down to Lamp Reset.
  • Press Enter button to bring up the answer screen.
  • Scroll over to select YES.
  • Be sure the Lamp Reminder is set to on.

Learn the TOP Tips for extending the lamp life in your Optoma Theme Scene HD65 projector.


Tagged with: , , ,

Sony_VPL-HW30ES_remote_menu_control How to use the Sony VPL-HW30ES projector menus

The Sony VPL-HW30ES projector uses on-screen menu for making different adjustments and settings.

You can access the menus and sub menus using certain buttons on the remote control.

Adjustable options and settings menus are displayed in four types of windows:

  • Pop-up menu
  • Setting menu
  • Adjustment menu
  • Next menu window

When you select an item name, an arrow will pop up, Pressing the arrow will lead to the next window menu where available options are shown.

To use menus

Sony_VPL-HW30ES_menu_ Press MENU to display the main menu window.

  • Press up or down buttons to select a menu item.
  • Press the left arrow or all the up / down / left together to bring up the next menu.
  • Items that can be set or adjusted with the selected menu appear.
  • Selected item is shown in white.

Sony_VPL-HW30ES_submenu_choices

  • Press up or down buttons to select a menu item.
  • Press the left arrow or all the up / down / left together to bring up the next menu.

Sony_VPL-HW30ES_setting_menuDepending on the setting chosen, you’ll see one of the four menu types:

  • Pop-up menu
  • Setting menu
  • Adjustment menu
  • Next menu window

Sony_VPL-HW30ES_setting_items

Changing adjustment levels

To increase the value, press the up or right arrow. To decrease the value, press the down or left arrow. Press the middle to restore the original screen.

Changing the setting levels

Press up and down arrows to change the setting. Press the middle to restore the original screen. Depending on the selected item, you can restore the original menu screen by pressing the left arrow. Available items to adjust are dependent on the input signal. Items that can’t be adjusted or set will not appear in the menu. You may need to change the input signal to see a different menu with the item you are trying to set.

Reset menus

You can reset the picture and other options to the factory preset using the reset button and menu option.

Sony_VPL-HW30ES_reset_menu

  • Select RESET from Picture menu
  • When the sub menu appears, select YES using the left arrow key followed by the middle key.
  • This resets the following to their factory preset value:
    • Cinema Black Pro
    • Motionflow
    • Contrast
    • Brightness
    • Color
    • Hue
    • Color Temp
    • Sharpness
    • Expert Setting

Resetting adjusted items

Select an item in the Menu screen, and display one of the four menu types. Press the RESET button on the remote control to reset only selected settings to their factory preset value.

NOTE: The RESET button on the remote control is available only when the adjustment menu or the setting menu is selected. The Setup menu is used to change the factory preset settings.

Preset data menus

This Sony VPL-HW30ES projector has 32 types of preset data for input signals. To create the optimum image, the projector automatically detects the signal type and adjusts the data using one of the settings from the preset memory. You can see the number and signal type by displaying the Information Menu. All data can be adjusted through the Screen menu.

See  digital chart below:

Sony_VPL-HW30ES_digital_preset_


Sony_VPL-HW30ES_digital_memory_menu


Analog chart

There is an additional 20 presets memory settings for analog computer signals. You can save new input signals. When a new signal is input for the first time, the memory number is displayed as 0. There is room for 20 user memory settings; if more than 20 are registered the newest memory always overwrites the oldest setting. Before creating a setting, refer to the chart to see if the signal has been registered.

See chart below:

Sony_VPL-HW30ES_analog_setting


Tagged with: , ,

Follow this guide to replace the Sony VPL-HW30AES projector lamp when it has reached end of life.

Sony_VPL-HW30ES_projector_When to replace?

The Sony VPL-HW30AES is a home theater that can handle both 2D and 3D images on screen and it uses the Sony LMP-H202 projector lamp. When the Sony VPL-HW30AES projector lamp is reaching its end of life, the Lamp/Cover light starts flashing red and continue to flash in 3 second intervals. As the the lamp dims and the color balance of the picture goes off, and the message “Please replace the Lamp/Filter” appears on the screen. Then you must replace the lamp immediately.

Authentic Sony VPL-HW30AES projector lamp are critical!

Don’t settle for anything but the best for your Sony VPL-HW30AES projector. Always buy an authentic replacement projector lamp. Look for the seal of approval so you know you are getting an OEM projector lamp and not an imitation.

6 reasons to avoid generic lamps:

Learn to spot copycat lamps posing as authentic lamps.

Find this lamp sold on Amazon by these authorized dealers:

Replacing the Sony LMP-H202 Projector Lamp and Air Filter

Sony recommends replacing the air filter at the same as replacing the lamp.

Replacing the Lamp

Sony_VPL-HW30AES_projector_LMP-H202_turning_over_projector_lamp_replacmentBefore replacing the Sony LMP-H202 projector lamp, let the projector cool at least 30 – 45 minutes. This projector operates under high temperatures and you can get badly burned if the projector has not cooled down.

Unplug the AC power cord.

The lamp cover is on the bottom of the projector so you will need to turn it over. Put down a soft cloth on a flat surface to prevent the projector getting scratched.

Turn the projector over gently. Don’t lean on the projector and make sure the surface is flat and stable.

Sony_VPL-HW30AES_projector_LMP-H202_open_projector_lamp_coverUsing a Philips screwdriver, loosen the screw holding the projector lamp cover in place. Slide the lamps cover off the Sony VPL-HW30AES projector. Put it to one side.


Loosen the 3 screws on the SSony_VPL-HW30AES_projector_loosen_LMP-H202_screwsony LMP-H202 projector lamp using a Phillips screwdriver. Grab the old LMP-H202 by the indented side handles and and pull the lamp straight out.

NOTE: The Sony LMP-H202 projector lamp contains mercury and should not be thrown into regular garbage. Recycle this lamp!

Finish the projector lamp installation

Sony_VPL-HW30AES_projectoR_new_lamp

  • Remove the packaging from the new projector lamp.
  • Lift up the handle and slowly lower it into the projector.
  • Push the projector lamp in securely until it reaches the end.
  • Tighten the three screws on the projector lamp.
  • Be careful not to touch the optical block inside the projector as this can damage the picture.
  • Also don’t touch the actual bulb in the new lamp as oily fingerprints can burn a black spot on the lamp when it heats up.

Sony_VPL-HW30AES_projector_LMP-H202_Close_lamp_coverSlide the lamp cover back onto the Sony VPL-HW30AES projector.

Close the proejctor lamp cover and tighten the screws.

Remember to install the projector lamp cover properly as the projector will not turn off if the cover is loose or not installed correctly.

Replacing the air filter

Sony_VPL-HW30AES_projector_LMP-H202_remove_filter_holder

Remove the Sony VPL-HW30AES filter holder. The air filter will be inside the holder. Don’t touch the fan inside as this can damage the projector.

Sony_VPL-HW30AES_Lam-H202_remove_air_filterRemove the old Sony VPL-HW30AES filter and put it to one side. Attach the new air filter so that is fits into the 10 claws properly on the holder.

Aligning the air filter with the shape of the filter holder will make it easier to install.

Be sure to put the air filter holder back into the projector making sure it aligned up properly. If not, the projector will not turn back on!

Sony_VPL-HW30AES_projector_LMP-H202_clean_ventilation_holesWipe off any dust from the ventilation intake holes using a soft cloth. Put the projector back in its original position and turn it on. You’ll need to reset the lamp timer and to do this you must turn the Sony VPL-HW30AES projector back on.

Reset the projector lamp timer

Using the remote, scroll down to the Setup Menu. Press Enter.

Sony_VPL-HW30AES_projector_LMP-H202_lamp_replacement_message

A Lamp Setting message will appear asking you if the lamp has been replaced.

Click on Yes.

You will see a confirmation message and the Lamp Timer will be automatically reset to zero.

Sony_VPL-HW30AES_projector_LMP-H202_Final_lamp_replacement_messageYou can see the number of hours left on your lamp by going to the Information Menu.

You can extend the life of the Sony LMP-H202 projector lamp by always making sure the filter is clean and there is enough airflow around the projector. Learn more about making your projector lamp last longer: Top tips for extending DLP projector lamp life.

Tagged with: , , ,

Samsung_HPR5052_how_to_use_menusKeep your screen crisp and clear by preventing screen burn on the Samsung HP-R5052.

Your Samsung HP-R5052 TV has a simple, easy-to-use menu system that makes it convenient and fast to use. There are some important features you need to set up to ensure your Samsung HP-R5052 keeps it crisp screen and clear images.

Viewing the Menus

Samsung HP-R5052_using_remote_for_menuYou can view the on screen menus using the input MENU button on the Samsung HP-R5052 remote control. Use the arrow keys to scroll up and down/ left or right through sub menus. Press MENU to choose the options. EXIT to close the menu. To access:

  • With the power on, press the MENU button on the remote control. The main menu appears on the screen.
  • Select the INPUT menu choices.
  • Press the up or down button to move through the menu items
  • Press the left / right / ENTER buttons to display, change, or use selected items.
  • Press the ENTER button to enter items

NOTE: The on screen menu will disappear from the screen after two minutes. Press MENU to open up the menu again or EXIT to leave the menu area.

Samsung HP-R5052_using_menus

To get info on your settings: Press the INFO button on the remote control.

Preventing Screen Burn-in

The wide screen format on your Samsung HP-R5052 TV is designed for a 16:9 aspect ratio. Watching films from DVDs or video games can result in dark side-bars on the screen. Side bars as well as stationary images on the screen such as computer graphics and logos or patterns and can create an uneven aging of the PDP display.

The result is image retention, images burnt into the screen creating ghost images on the screen. To reduce image retention, the Samsung HP-R5052 TV is equipped with screen burn prevention that allows you to move the picture around the screen.

To access the screen burn-in prevention:

To get info on your settings: Press the INFO button on the remote control.

Samsung HP-R5052_screen_burn_protection_second_menu

  • Press the MENU button.
  • Press the up or down button to select SETUP.
  • Press ENTER.
  • Press the up or down button to select SCREEN BURN PROTECTION.

Samsung HP-R5052_screen_burn_protection_third_menu

  • Scroll down to PIXEL SHIFT.
  • Press ENTER.

Samsung HP-R5052_screen_burn_protection_fourth_menu

  • Options available include:
  • Horizontal Dot: Move picture side to side
  • Vertical Dot: Move picture up and down on the screen
  • Time: Program the time between movement of the picture in minutes

Optimum condition for pixel shift;

  • Horizontal Dot: 2
  • Vertical Line: 2
  • Time: 2

NOTE: Pressing the up or down button alternates between ON or OFF for this option.

Reducing the effects of screen burn

Samsung HP-R5052_reduce_screen_burn_final_menuIf screen burn has occurred, you can select a white screen or signal pattern (rolling screen) to help remove screen burn artifacts.

  • Press the MENU button.
  • Press the up or down button to select SETUP
  • Press ENTER.
  • Press the up or down button to select SCREEN BURN PROTECTION.
  • Scroll down to select:
    • ALL WHITE: Removes after-images on the screen by changing coloured pixels to white.
    • SIGNAL PATTERN: Removes after-images on the screen by moving all the pixels on the PDP according to a pattern. NOTE: Signal Pattern is the more effective of the two.

NOTE: This after-image removal function has to be executed for a long time (approximately 1 hour) to effectively remove after-images on the screen. Repeat if after-image is not removed.

Using the Energy Saving Feature

Samsung HP-R5052_energy saving_menu_optionsThis feature adjusts the screen brightness automatically depending on the surrounding lighting conditions.


  • Press the MENU button.
  • Press the up or down button to select SETUP
  • Press ENTER.
  • Press the up or down button to select ENERGY SAVING.
  • Press ENTER to bring up the submenu:
    • Standard: Operates in standard mode regardless of the surrounding lighting
    • Auto Saving : Automatically adjusts to the surrounding lighting.
    • Super Saving : Enters maximum power saving mode regardless of the surrounding lighting.
  • Press the MENU button to exit.
Tagged with: , , ,

Follow this guide to install a new NEC NP M271X projector lampNEC-NP_M271X-projector_NEC_NP16LP

When the NEC NP M271X projector lamp has reached its end of life, the LAMP INDICATOR will blink red. Shortly afterwards message LAMP HAS REACHED THE END OF ITS USABLE LIFE. PLEASE REPLACE THE LAMP AND FILTER will appear on the screen.

Look for the seal of approval

Be sure the purchase an authentic NEC NP M271X projector lamp. Although generic lamps seem like a bargain,they actually have a much shorter lamp life than original lamps. Unauthorized copy cat manufacturers don’t have access to the proper materials and often use toxic and carcinogenic substitutes. They are also unable to properly calibrate these generic lamps so generic often end up damaging the sophisticated electronics in your NEC NP M271X projector. Since they are unstable, generics are also prone to explosions. Your projector warranty will be void if a generic is installed. Go with an authentic.

Find this lamp sold on Amazon by these authorized dealers:

End of life signs

The end of life message about replacing the lamp is displayed for one minute when the projector is turned on and when the POWER button or remote control is pressed. Remove the message by pressing any button on the projector or remote control.

The progress indicator shows the percentage of remaining bulb life. When the lamp usage reaches 0, the Lamp Life REMAINING starts a count down from 100 hours. When the count down reaches 0, the projector will turn off and not turn on.

Changing the NEC NP15LP lamp

Follow these important safety instructions before installing the new lamp

  • turn off the NEC NP M271X projector.
  • unplug the projector from its power source.
  • unplug the power cable.
  • wait until the projector is cool to the touch to avoid getting burned.


NEC_NP M271X_NEC_NP16LP_remove_lamp_screwLoosen the NEC NP M271X lamp cover screw.


NEC_NP M271X_NEC_NP16LP_remove_lamp_cover

Push and slide the lamp cover off


NEC_NP M271X_remove_NEC_NP16LP_lamp_screws

Loosen the two screws holding the NEC NP15LP lamp in place. (The screws will not come out only loosen.) Remove the lamp by holding the indent and pulling up.


NOTE: Your NEC NP15LP lamp should be properly recycled. These lamps contain mercury and can’t be placed into common garbage.


NEC_NP M271X_install_new_NEC_NP16LP_lampInstall a new lamp housing into the NP M271X projector, gently pressing the lamp housing into the socket. Take care not to touch the actual bulb as your finger prints can leave oil marks that burn black marks onto the bulb.

NEC_NP M271X_tighten_NEC_NP16LP_lamp_screws

Push the top center on the lamp to secure it. Tighten the screw on the lamp.


NEC_NP M271X_replace_lamp_cover_NEC_NP16LP

Reattach the NEC NP M271X lamp cover by sliding the cover until it snaps into place. Tighten the screw on the lamp cover.

Replacing the filters

There are four filters in the NEC NP M271X projector:

  • Honeycomb hard filter – large and small
  • Accordion soft filter — large and small

Replace all four filters at the same time. Before replacing the filters wipe off any dust and dirt that came loose from the old filters. NOTE: The filters are made with two different types of material in the membrane. Both perform the same.


NEC_NP M271X_NEC_NP16LP_remove_air_filterPush the catch to release the filter and gently pull it out.

NEC_NP M271X_NEC_NP16LP_detach_filter_cover

The filter cover is fixed at six separate points in the projector. Bow the filter cover by pushing it slightly until it releases.


NEC NP M271X_NEC_NP16LP_replace_dark_filtersRemove the dark sponge filter and clean the filter unit and cover. Attach the new non-woven white material filters.

NEC_NP M271X_NEC_NP16LP_replace_four_filters

  • Filter unit: Attach two honeycomb hard filters to the NEC NP-M271x filter unit.
  • Filter cover: Attach the two accordion soft filters to the filter cover. Be sure to align the accordion slits with the protrusions of the filter cover.

NEC_NP M271X_NEC_NP16LP_attach_filter_coverAttach the filter cover back to the filter unit. Align the filter until with the filter cover and push the protrusions into place.

Make sure all the six mounting points are aligned properly.

NEC_NP M271X_NEC_NP16LP_attach_filter

Insert the two catches of the top of the filter into the groove of the cabinet. Push the filter until it clicks into place.

Reset the lamp timer

Once the NEC NP15LP lamp and NEC NP M271X filter have both been replaced you will need to reset the timer for both. You want the projector to be able to accurately track the lamp life.

NEC_NP M271X_NEC_NP16LP_lamp_timerClear usage hours and reset hours

  • Plug in the power cord into the wall outlet.
  • Turn on the projector.
  • From the MENU select RESET.
  • Choose CLEAR LAMP HOURS.
  • A confirmation message appears.
  • Select YES.

Reset the filter hours:

  • Scroll up to CLEAR Filter HOURS.
  • A second submenu will appear.
  • Select YES. Press the ENTER button.

Extending the life of the NEC NP15LP lamp

Get your newly installed NEC NP15LP lamp will last longer by choosing the ECO option. The ECO MODE increases lamp life by lowering the power consumption. There are three modes to choose from on the NEC NP M271X projector:

  • Auto Mode: 4000 hours
  • Normal: 5000 hours
  • Eco ModeL 8000 hours

Learn more tips to extend the life of the NEC NP15LP lamp lamp.

Tagged with: , , , ,
Join the discussion on Facebook! All your questions, answered! The Screen & Projector Group