We're now Screen and Projector! For updated content, visit ScreenAndProjector.com and follow @screenandproj on social media!

NEC NP-P350W_projector_NEC_NP17LPFollow our guide to replace your NEC NP-P350W projector lamp and filter.

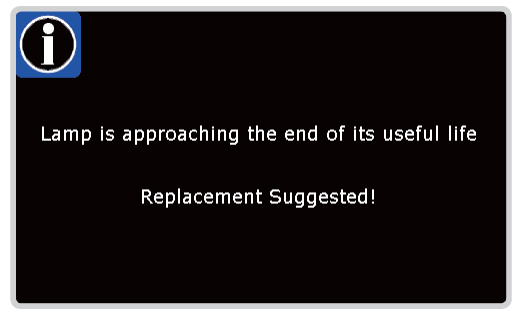
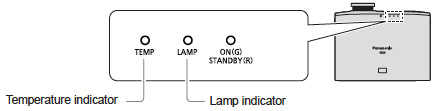
Your NEC NP-P350W projector uses the NEC NP17LP lamp. When the NEC NP-P350W projector lamp has reached end of life, the LAMP indicator will begin to blink red . A warning message will appear on screen:  LAMP HAS REACHED THE END OF ITS USABLE LIFE. PLEASE REPLACE THE LAMP AND FILTER.

NEC NP-P350W_projector_NEC_NP17LP_lamp_usage
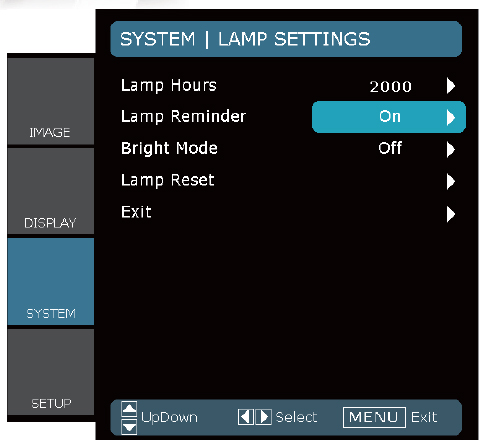
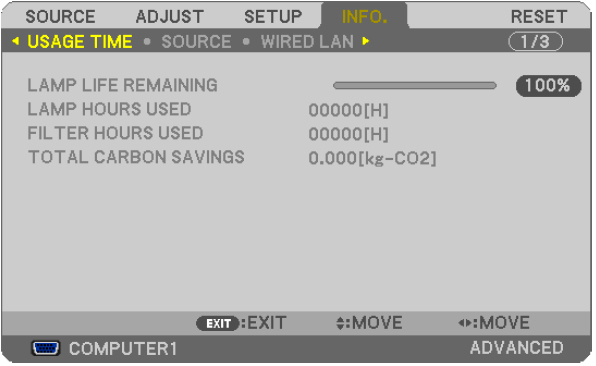
Lamp life and hours can be checked by selecting INFO and then USAGE TIME.

This NEC NP-P350W projector does not allow a reset of a lamp already used. If you use the lamp beyond it’s lamp life for more than 100 hours, the projector will turn off and then go into standby mode. When this happens, press the HELP button on the remote for 10 seconds to set the lamp timer back to zero.

The importance of NEC NP-P350W projector lamp

Always invest in a genuine NEC NP17LP lamp in order to keep your NEC NP-P350W projector working. Your original manufacturer (OEM) has created these lamps to fit your NEC NP-P350W projector and keep the sophisticated components working properly. While generic lamps may be sold at discount prices, their inferior workmanship and cheap materials often result in damage to the interior of projectors. They are also prone to explosions which can release toxic heavy metals into the air as well as damage your projector beyond repair. Read more about the 7 Ways to Spot a Counterfeit Lamp.

Find the lamp sold on Amazon by the following authorized distributors:

  • NEC NP17LP Projector Assembly with High Quality Or
  • NEC NP17LP-UM REPLACEMENT LAMP FOR NP-UM330X/UM330W, NP-UM330X-WK1/UM330W-WK1, NP-UM330XI/UM33
  • Installing the NEC NP-P350W projector lamp

    NOTE: Follow these important safety instructions before installation of the new lamp:

    • turn off the projector.
    • unplug the projector from its power source.
    • unplug the power cable.
    • wait until the projector is cool to the touch to avoid getting burned.

    or_NEC_NP17LP_remove_lamp_cover

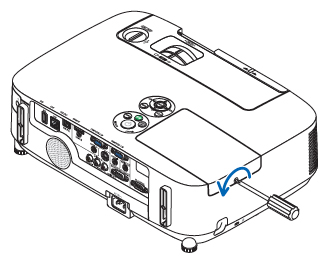
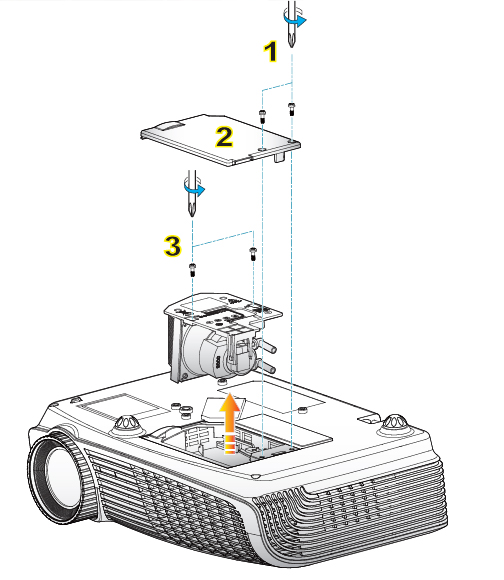
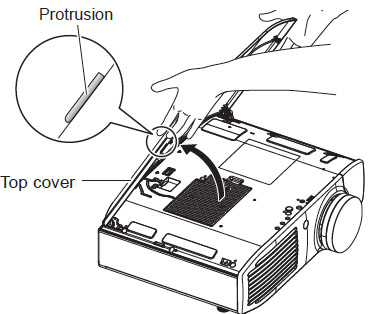
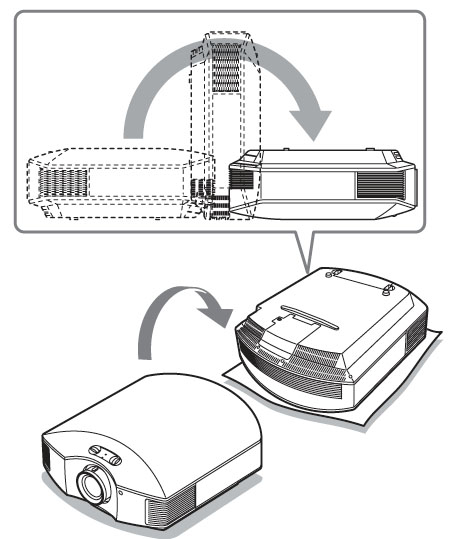
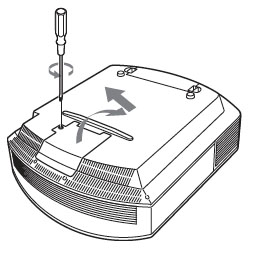
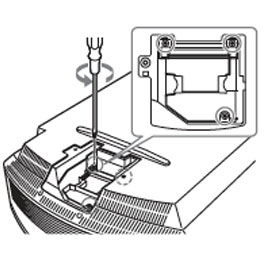
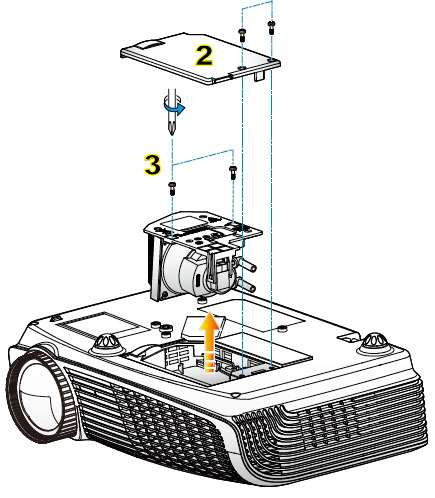
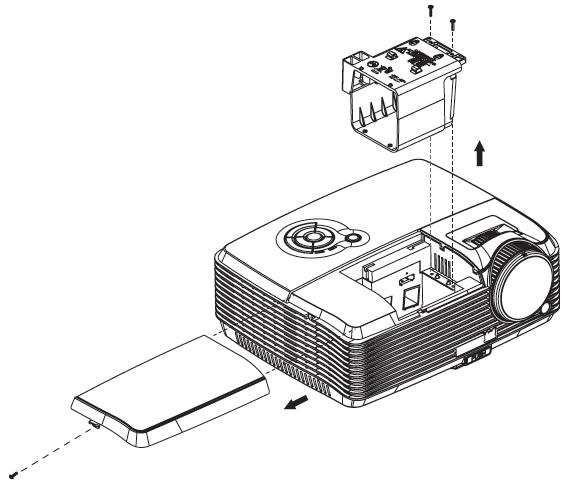
    1. Loosen the lamp screw.  (It can’t be removed from the cover.)

    NEC NP-P350W_projector_NEC_NP17LP_remove_lamp_screw

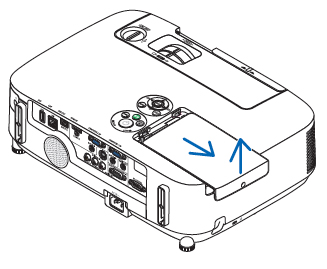
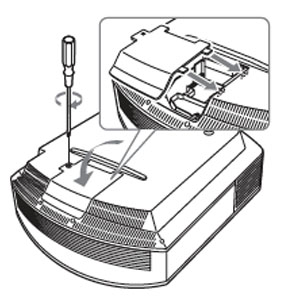
    2. Push and slide the cover off and then up toe remove it from the NEC NP-P350W projector.

    NEC NP-P350W_projector_NEC_NP17LP_loosen_lamp_screw
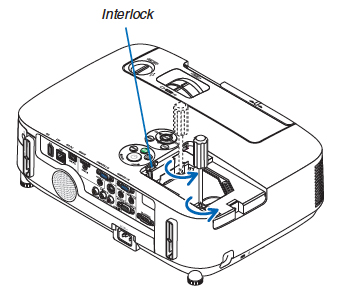
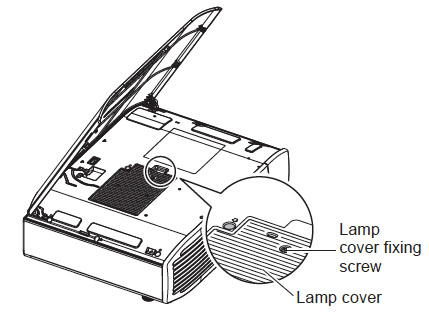
    3. Loosen the two screws holding the NEC NP17LP lamp housing. These screws are not removable so when the screwdriver start turning around without doing anything, you have gone as far as you can.

    NOTE: Your old NEC NP17LP lamp should be properly recycled. These lamps contain mercury and can’t be placed into common garbage.

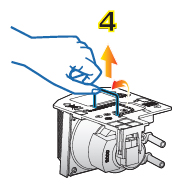
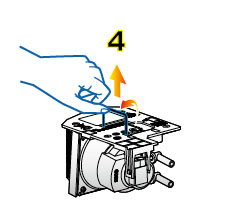
    4. Grab the lamp by the side indents and gently lift it up.

    NEC-NP-P350W_projector_NEC_NP17LP_install_lamp
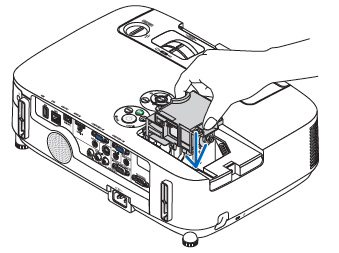
5. Remove the new lamp from the packaging. Gently plug the lamp into the sock.
    Push the top center of the lamp to secure it into the projector.
    Tighten the two screws.
    NEC-NP-P350W_projector_NEC_NP17LP_tighten_cover_screw
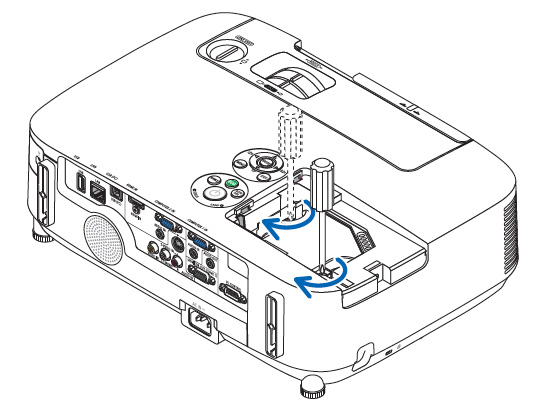
6. Re-attach the lamp cover by sliding the cover back on until it snaps into place. Tighten the screw on the cover.

    You are now ready to replace the air filter.

    Replacing the NEC NP-P350W filter

    • Always replace the lamp first before replacing the filter.
    • Replace all four filters at the same time.
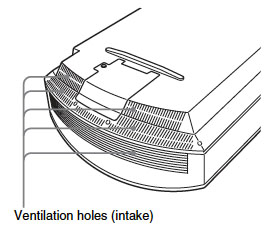
    • Before replacing the filters, wipe off any dust from the projector cabinet.
    • The filters CAN’T BE WASHED. Soap and water will damage them and ruin your projector.
    • Be sure to put the filters into place. Incorrect attachment will cause dust and dirt to get inside the projector.

    NEC NP-P350W_projector_NEC_NP17LP_filter_cover
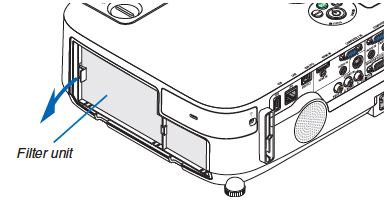
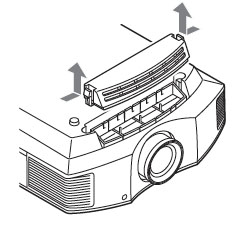
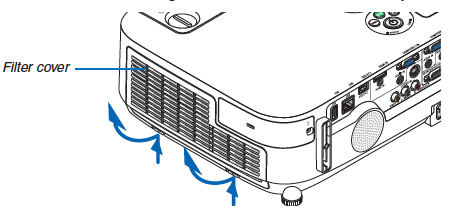
1. Push up the buttons on the left and right to release the filter unit. Pull it out.

    2. Remove the filter unit by pulling out the tab.

    NEC NP-P350W_projector_NEC_NP17LP_filter_unit

    NEC NP-P350W_projector_NEC_NP17LP_remove_accordion_filter
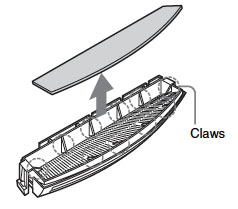
3. Removing the filters

    • To remove each of the four filters, turn the filter unit over and pull out the large and small accordion filters.
    • Push the left end of each filter to remove the two hard honeycomb filters (large and small). The large filter cannot be removed by pushing it on its right end — use the other end.
    • Remove the dust from inside and outside the projector making sure the filter unit and cover are also clean.
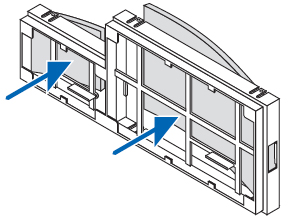
    NP17LP_install_new_filters
    To attach the four new filters:

    • Insert the left end of the large and small honeycomb filters and then the right end of both. The large filter can’t be inserted if you put the right end in first. Always go with the left.
    • Turn the filter unit over to attach the large and small accordion filter. Each has a slit on it that must be aligned with each protrusion of the filter unit.
    • Once all four are attached properly with a good fit. Put the filter unit back into the projector.

    To make sure it’s facing the right way:

    • Insert the two catches on the topside of the filter cover into the groove in the projector cabinet.
    • Push the buttons on the left and right to close the filter cover.
    • Push the filter cover until it clicks into place.

    Clearing and resetting the NEC NP-P350W lamp and filter timer

    Once the NEC NP17LP lamp and NEC NP-P350W filter have both been replaced you will need to reset the timer for both. Failure to do so will make the projector shut down.

    NEC NP-P350W_projector_NEC_NP17LP_timer_filter_reset
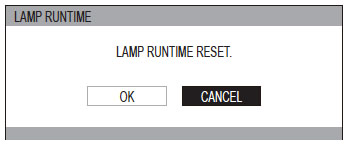
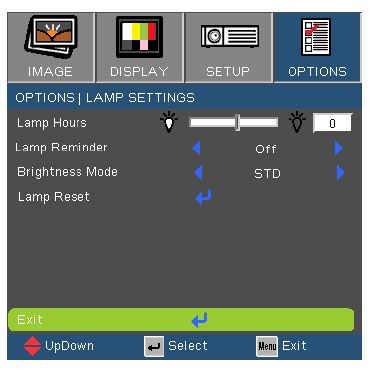
Reset the lamp timer:

    • Using the remote control, click the MENU option.
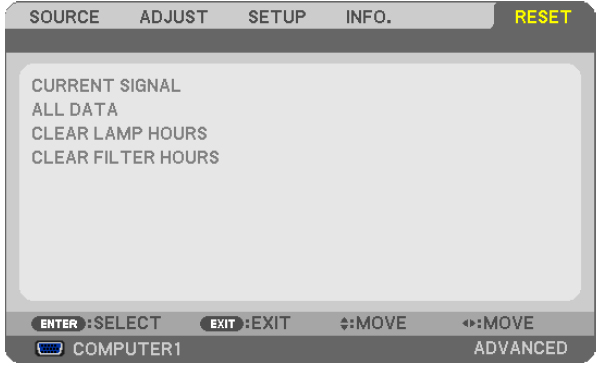
    • Move to RESET menu.
    • Move down to CLEAR LAMP HOURS.
    • A second submenu will appear. Select YES.
    • Press the ENTER button. Lamp life will be returned to zero.

    Reset the filter hours:

    • Scroll up to CLEAR Filter HOURS.
    • A second submenu will appear.
    • Select YES. Press the ENTER button.

    Extending the life of the NEC NP-P350W projector lamp

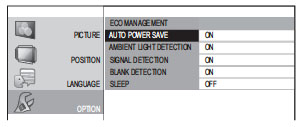
    Get your newly installed NEC NP17LP lamp to last longer by using the ECO option. The ECO MODE increases lamp life by lowering the power consumptions. There are three modes to choose from:

    • OFF: Default setting for 100% brightness
    • Auto ECO: Lamp power consumption is controlled by the projects and will change between OFF and ECO1 automatically according to the picture.
    • ECO1: Lamp consumption set at 75%

    NEC-NP-P350W_projector_NEC_NP17LP_eco_modeTo activate the ECO Mode:

    • Select SETUP
    • Scroll to GENERAL
    • Scroll to ECO MODE.

    Each time you press the button the choice will cycle through the three choices. When the projector is in ECO mode, the LAMP indicator will light green.

    NEC NP-P350W_projector_NEC_NP17LP_lamp_eco_modeThe leave symbol will be shown at the bottom of the menu as well.

    Learn more tips to extend the life of the NEC NP17LP lamp.

Tagged with: , , ,

optoma_hd20_optoma_BL-FP230DThis easy to follow guide will help you replace the Optoma HD20 projector lamp.

When to replace the lamp?

Your Optoma HD20 projector uses the Optoma BL-FP230D projector lamp. When the Optoma HD20 projector lamp is approaching end of life, you may notice the Lamp-LED light flashing red or the picture quality starting to have poor resolution with washed out colours.

Optoma_HD20_Optoma_BL-FP230D_lamp_warningAs the projector lamp approaches end of life, the lamp replacement message flashes on screen. Change your projector lamp immediately. The projector will not work if the lamp has burnt out or broken.

If you hear a loud pop when turning on the projector, the projector lamp has broken. Learn what to do if the lamp has exploded inside the projector.

Buying the right brand of lamp

You will want to be prepared and have your replacement Optoma BL-FP230D (SP.8EG01GC01) ready and waiting. Be sure to purchase an authentic OES lamp for your Optoma HD20 projector. If you are buying over the Internet, you’ll notice an overwhelming selection but unfortunately many of the lamps being sold are counterfeit with long list of associated problems:

Learn 7 ways to stop a counterfeit projector lamp.

Buy this lamp on Amazon sold by these authorized dealers:

Installing the Optoma HD20 projector lamp

Before replacing the Optoma BL-FP230D (SP.8EG01GC01) follow these important safety tips:

  • Switch off the power to the Optoma HD20 1080p projector by pressing the Power/Standby button.
  • Disconnect the power cord.
  • Allow the projector to cool down for at least 30 minutes. If should be cool to the touch. These projectors run using high temperatures and you can burn yourself badly if you don’t allow the projector to cool down.

Optoma_HD20_Optoma_BL-FP230D_replace_lamp

1. Use a screwdriver to undo the two screws holding the lamp cover in place. The screws on the lamp cover and the lamp cannot be removed.

2. Remove the lid and place to one side. Don’t lose the lid as the Optoma HD20 projector will not turn back on until the lamp cover has been properly installed.

3. Remove the two screws holding the Optoma BL-FP230D (SP.8EG01GC01) in place.

Note: The used BL-FP230D lamp contains mercury and should be properly recycled. Don’t throw it into regular garbage.

4. Lift up the wire handle on the Optoma BL-FP230D (SP.8EG01GC01) lamp and slowly remove it from the projector.

Optoma_HD20_Optoma_BL-FP230D_install_new_lampBe careful not to bang the lamp against the projector as this may case the bulb to break. Learn how to clean up a broken lamp.

5. Remove the new BL-FP230D (SP.8EG01GC01) from its packaging. Taking care not to touch the actual bulb, lift up the handle on the new lamp and insert it gently into the Optoma HD20 projector.

6. Tighten the two screws on the lamp.

7. Replace the lamp cover and tighten its two screws. You are now ready to reset the Lamp Replacement Timer.

Reset the Lamp Replacement Timer

The Optoma HD20 1080p projector has an automatic lamp timer that tracks the numbers of hours left in the lamp. If you don’t reset the lamp replacement timer you run the risk of the lamp being used beyond its recommended life and possibly exploding in the projector.

Optoma_HD20_Optoma_BL-FP230D_reset_lamp_timerTo reset the Lamp Replacement Timer:

  • Turn on the projector.
  • Press MENU.
  • Select SYSTEM.
  • Select Lamp Settings.
  • Select Lamp Reset.
  • Select Yes.
  • Press MENU to exit.

Tips for extending Optoma BL-FP230D (SP.8EG01GC01) lamp life:

  • Turn off Bright Mode to return to standard brightness and lower power consumption. This will exclude lamp life.
  • Keep your air filters clean to avoid overheating the projector.
  • Every 24 hours, turn off the projector and let it stand for 1 hour
  • Make sure there is enough airflow around the Optoma HD20 projector particularly if it’s been permanently mounted.
  • Learn more with Top tips for extending DLP projector lamp life
Tagged with: , , , ,

Panasonic-PT-AR100U_projector_WITH_Panasonic_LAA-110_projector_lampChanging the Panasonic PT-AR100U projector lamp is as easy as 1-2-3!

Step 1: Know when to replace the lamp

When the Panasonic PT-AR100U projector lamp reaches over 1800 hours the REPLACE LAMP message will display for 30 seconds but disappears when you press any button. Over 2000 hours, the message will be displayed on screen for longer. Watch for these telltale signs that your Panasonic PT-AR100U projector lamp is approaching end of life:

  • the lamp indicator will light up red and stay lit until the lamp is replacedPanasonic PT-AR100U_projector_LAA-110__projector_lamp_indcator
  • picture has poor colour quality
  • image vibrancy and definition has deteriorated
  • a warning message appears on screen: Replace Lamp

When you see any of these signs, especially the warning message, change the lamp immediately. Avoid the temptation to left the projector run longer as it can result in a complete shut down of the Panasonic PT-AR100U projector.

Step 2: Buy an authentic projector lamp

It can be confusing trying to find the correct projector lamp since there are so many choices. It’s easy to get duped into buying an inferior knock-off lamp posing as an authentic lamp. Always look for the seal of approval and watch for telltale signs you are about to purchase a counterfeit lamp:

Buyer beware! You get want you pay for and with generic “compatible” lamps that usually means a host of problems that can leave you with a damaged Panasonic PT-AR100U projector:

Find this lamp sold on Amazon by the following authorized dealers:

eWo’s PANASONIC ET-LAA110 Projector Lamp Bulb with housing Replacement for PANASONIC PT-LZ370 PT-AR100 AH1000

Step 3: Installing the Panasonic ET-LAA110 projector lamp

Follow these important safety tips before changing the projector lamp:

  • Switch off the power to the projector by pressing the Power/Standby button.
  • After waiting 30 seconds, disconnect the power cord.
  • Disconnect the video cable cord as well.
  • Allow the projector to cool down for at least 30 minutes. If should be cool to the touch. These projectors run using high temperatures and you can burn yourself badly if you don’t allow the projector to cool down.

Panasonic PT-AR100U_projector_LAA-110_remove_projector_lamp_coverA. Hold the protrusion at the front cover of the projector and push up to open. Be careful not to open the panel too far. If the panel comes off, hold the cover in the middle, align the hinge with the support. Push the arm in the direction of the arrow towards the inner side of the projector and push it into the groove.

Note: When the projector is mounted on the ceiling, stand at the left side of the projectors when opening/close the top cover.

Panasonic PT-AR100U_projector_LAA-110_remove_projector_lamp

B. Use a Philips screwdriver to loosen screw holding the Panasonic PT-AR100U projector lamp cover in place.

C. Loosen the two screws holding the Panasonic ET-LAA110 projector lamp in place. Holding the handle of the projector  lamp unit with the lock held in the direction of the black arrow, pull up the lamp in a vertical motion. Be careful not to hit the projector lamp or you can cause it to break. Learn what to do if the lamp is broken inside the projector.

NOTE: The Panasonic ET-LAA110 projector lamp contains mercury and should not be thrown into regular garbage. Recycle this projector lamp!

D. Insert the new projector  lamp making sure its facing the right direction. Gently press down on the A section (see image above)at the the top of the lamp gently to make sure the lamp is installed all the way. Tighten the two screws to make sure the lamp is secure. Put the lamp cover back on and tighten the screw so it stays in place. Close the projector lamp cover and re-install the video cable and power cord. Turn on the projector to reset the lamp timer.

Reset the Panasonic PT-AR100U projector lamp timer

Your Panasonic PT-AR100U comes equipped with an automatic lamp timer that tracks the number of hours left for the Panasonic ET-LAA110 projector lamp. Each time you change the lamp you need to reset the lamp timer. Failure to do so may cause the projector to use the lamp over the recommended period of 2000 hours time resulting in the projector lamp exploding.

Panasonic PT-AR100U_projector_LAA-110_projector_lamp_reset

  • Press the MENU button to display the menu screen.
  • Selection OPTION using the arrows buttons to scroll up or down.
  • Press the ENTER button and select LAMP RUNTIME.
  • Hold the ENTER button down to 3 seconds for the confirmation message to appear.
  • Using the arrow buttons scroll over the OK field.
  • Click ENTER.
  • The Lamp Runtime will be reset to 0 and the projector will power down. In a few minutes it will enter standby mode and be ready for use.

Extend the life of the Panasonic ET-LAA110 projector lamp:

Panasonic PT-AR100U_projector_LAA-110_eco_management_projector_lampYou can reduce power and extend the life of the Panasonic ET-LAA110 projector lamp with the ECO management option.

  • Press the MENU button to display the menu screen.
  • Selection OPTION using the arrows buttons to scroll up or down.
  • Press the ENTER button and select ECO MANAGEMENT
  • Select AUTO POWER SAVE.
  • Hold the ENTER button turn on
  • Click ENTER to exit the MENU.
  • The projector Lamp Runtime will be reset to 0 and the projector will power down. In a few minutes it will enter standby mode and be ready for use.

Note: Lamp power will not decrease in the following cases: Immediately after the lamp illuminates or after the Lamp Power is set.

Learn more tips for extending the projector lamp life in your Panasonic PT-AR100U projector.

Tagged with: , , , ,

Sony_vpl-hw30es_projector_LMP-H202When it’s time to replace the Sony VPL-HW30ES projector lamp follow this handy guide.

The Sony VPL-HW30ES is a home theater projector that delivers supports 2D and 3D images on screen. When the Sony VPL-HW30ES projector lamp is reaching its end of life, the  Lamp/Cover light will start flashing red and continue to flash in 3 second intervals.

As the the lamp dims and the color balance of the picture goes off,  and the message “Please replace the Lamp/Filter” appears on the screen. Then you must replace the lamp immediately.

Sony VPL-HW30ES projector lamp are critical!

Don’t settle for anything but the best for your Sony VPL-HW30ES projector.  Look for the seal of approval so you can rest assured you are buying an authentic Sony LMP-H202 that will keep your projector running properly. Why avoid generic lamps?

6 reasons to avoid generic lamps:

Learn to spot copycat lamps posing as authentic lamps.

Find this lamp sold on Amazon by these authorized dealers:

Replacing the Sony LMP-H202 Lamp and Air Filter

Sony recommends replacing the air filter at the same as replacing the Sony VPL-HW30ES projector lamp.

Replacing the Lamp

Sony_VPL-HW30ES_projector_LMP-H202_turning_overBefore replacing the Sony LMP-H202 let the Sony VPL-HW30ES projector cool at least 30 – 45 minutes. This projector operates under high temperatures and you can get badly burned if the projector has not cooled down.

Unplug the AC power cord.

The lamp cover is on the bottom of the projector so you will need to turn it over. Put down a soft cloth on a flat surface to prevent the projector getting scratched.

Turn the projector over gently. Don’t lean on the projector and make sure the surface is flat and stable.

Sony_VPL-HW30ES_projector_LMP-H202_open_lamp_cover

Using a Philips screwdriver, loosen the screw holding the lamp cover in place. Slide the lamps cover off the Sony VPL-HW30ES projector. Put it to one side.


Sony_VPL-HW30ES_projector_loosen_LMP-H202_screws


Loosen the 3 screws on the Sony LMP-H202 lamp using a Phillips screwdriver. Grab the old LMP-H202 by the indented side handles and and pull the lamp straight out.

NOTE: The Sony LMP-H202 contains mercury and should not be thrown into regular garbage. Recycle this lamp!

Sony_VPL-HW30ES_projecto

Remove the packaging from the new lamp.
Lift up the handle and slowly lower it into the projector.
Push it in securely until it reaches the end.
Tighten the three screws on the lamp.
Be careful not to touch the optical block inside the projector as this can damage the picture.
Also don’t touch the actual bulb in the new lamp as oily fingerprints can burn a black spot on the lamp when it heats up.


Sony_VPL-HW30ES_projector_LMP-H202_Close_lamp_coverSlide the lamp cover back onto the Sony VPL-HW30ES projector.
Close the lamp cover and tighten the screws.

Remember to install the lamp cover properly as the projector will not turn off if the cover is loose or not installed correctly.

Replacing the air filter

Sony_VPL-HW30ES_projector_LMP-H202_remove_filter_holder

Remove the filter holder. The air filter will be inside the holder. Don’t touch the fan inside as this can damage the projector.

MP-H202_remove_air_filter

Remove the old filter and put it to one side. Attach the new air filter so that is fits into the 10 claws properly on the holder.

Aligning the air filter with the shape of the filter holder will make it easier to install.

Be sure to put the air filter holder back into the projector making sure it aligned up properly. If not, the projector will not  turn back on!

Sony_VPL-HW30ES_projector_LMP-H202_clean_ventilation_holes

Wipe off any dust from the ventilation intake holes using a soft cloth. Put the projector back in its original position and turn it on. You’ll need to reset the lamp timer and to do this you must turn the Sony VPL-HW30ES projector back on.

Using the remote, scroll down to the Setup Menu. Press Enter.


Sony_VPL-HW30ES_projector_LMP-H202_lamp_replacement_message

A Lamp Setting message will appear asking you if the lamp has been replaced.

Click on Yes.


Sony_VPL-HW30ES_projector_LMP-H202_Final_lamp_replacement_message

You will see a confirmation message and the Lamp Timer will be automatically reset to zero.

You can see the number of hours left on your lamp by going to the Information Menu.


You can extend the life of the Sony LMP-H202 lamp by always making sure the filter is clean and there is enough airflow around the projector. Learn more with Top tips for extending DLP projector lamp life.

Tagged with: , , ,

Optoma_GT700_projector_BL-FPI80E_lampLearn how to replace the Optoma GT700 gaming projector lamp using this guide.

The Optoma GT700 is the ultimate for gamers, sports lovers and film buffs. It’s wide screen format is perfect for 3D gaming or HD viewing.  Like any other projector, it uses a specialized projector lamp that will need to be changed after 3000 hours of use. Follow our 4-step guide to changing the Optoma GT700 gaming projector lamp.

Step One: Buying the right projector lamp

Your Optoma GT700 uses the BL-FP180E (SP.8EF01GC01) projector lamp.

Be sure to buy an authentic projector lamp in order to keep your projector working properly and avoid safety and health issues from counterfeit lamps. While the price of generic lamps can be tempting, installing them into your Optoma GT700 projector can result in the sophisticated optics being damaged beyond repair. Generic lamps also don’t have the proper safeguards and can damaged your eyesight. Scroll down to learn more. Why buy authentic?

Find this lamp sold on Amazon by these authorized distributors:

Step Two: Know when to replace

When the Optoma BL-FP180E (SP.8EF01GC01) projector lamp life is reaching end of life, you’ll see a warning sign appear on screen.

Optoma_GT700_BL-FPI80E_lamp_warning

Replace the lamp immediately when you see this warning signs. Using the lamp beyond its recommended 3000 hours can result in the lamp exploding inside the projector. This results in a messy and time consuming clean up job. Watch for these other signs that the BL-FP180E (SP.8EF01GC01) lamp may be reaching it’s end of life:

  • the Lamp LED flashing amber
  • picture has poor colour quality
  • image vibrancy and definition has deteriorated

Step Three: Installing a new Optoma BL-FP180E lamp

Pre-installation safety Preparation:

Follow these important safety tips before installing a new BL-FP180E into your Optoma GT700 projector.

  • Switch off the power to the projector by pressing the Power/Standby button.
  • Allow the projector to cool down for at least 30 minutes. If should be cool to the touch. The Optoma GT700 runs at a high temperature and you can burn yourself badly if you don’t allow the projector to cool down.
  • Disconnect the power cord.

Step-by-step instructions

Remove the old lamp

Optoma_GT700_BL-FPI80E_replace_lamp1: Use a screwdriver to loosen the two screws holding the projector lamp cover in place. The Optoma GT700  projector should be cool to the touch.

2: Remove the lamp cover and place to one side. Don’t lose the screws to the cover as the projector will not turn back on until the projector lamp cover has been properly installed.

3: Remove both screws holding the BL-FP180E (SP.8EF01GC01) in place.Lift the wire handle on the lamp and gently remove it from the projector. Be careful not to hit the lamp or you can cause it to break.

Install the new lamp:

Optoma_GT700_BL-FPI80E_install_new_lamp

  • Take the new Optoma BL-FP180E (SP.8EF01GC01) projector lamp out of its packaging and lift the handle on the lamp.
  • Gently place it into the projector making sure not to touch the actual bulb. Oil from fingerprint marks can burn black spots onto the lamp when it heats up.
  • Tighten the screws on the projector lamp.
  • Close the lid. Tighten the cover screws.
  • You are now ready to reset the lamp timer.

Step 4: Reset the Optoma GT700 projector lamp timer

Your Optoma GT700 comes equipped with an automatic projector lamp timer that tracks the number of hours left for the BL-FP180E (SP.8EF01GC01) lamp. Each time you change the lamp you need to reset the lamp timer. Failure to do so may cause the projector to use the lamp over the recommended period of time resulting in the lamp exploding.

Optoma_GT700_BL-FPI80E_reset_lamp_timer

To reset the lamp timer:

  • Press MENU
  • Select OPTIONS
  • Select Lamp Settings
  • Select Lamp Reset
  • Select Yes

TIPS FOR LONGER LAMP LIFE:

Under Brightness Mode:

  • Choose STD to dim the projector lamp and lower power consumption making the lamp last longer.
  • Choose BRIGHT to make the lamp brighter but decrease lamp life.

Why buy authentic?

Watch for telltale signs you are about to purchase a counterfeit lamp:

Learn the TOP Tips for extending the lamp life in your Optoma GT700 projector.


Tagged with: , , ,

Changing the Viewsonic PJD6531w projector lamp can be hassle-free when you follow our how-to-guide.

ViewSonic_Projector_PJD6531W_RLC-049_lamp

When it’s time to replace the Viewsonic PJD6531w projector lamp you’ll notice the Power LED lamp light becomes a bright blue and Lamp LED becomes bright red. A warning message will also flash onscreen. Replace the lamp immediately and discontinue use of the old lamp. Failure to do can result in the lamp exploding and damaging your Viewsonic PJD6531w.

Note: Viewsonic recommends you contact a service rep before changing the lamp.

Authentic lamps are critical!

Your Viewsonic PJD6531w is a sophisticated piece of technology with sensitive optics stored inside it’s main operating system. It doesn’t make sense to buy a cheap, reproduction lamp that is inferior to authentic OEM lamps. These Original Equipment Manufacturer (OEM) lamps are created using the proper materials and with the proper fittings.  Look for the seal of approval that lets you know you are buying an authentic projector lamp.

6 reasons to avoid generic lamps:

Learn how to spot the copycat lamps posing as authentic lamps.

Find this lamp sold on Amazon by these authorized dealers:

Installing the Viewsonic PJD6531w projector lamp

Your Viewsonic PJD6531w projector lamp uses the Viewsonic RLC-049 projector lamp. Before replacing the  follow these crucial safety tips to prevent injury to yourself or the projector:

  • NEVER change the lamp unless the Viewsonic PJD6531w projector is cool to the touch. The PJD6531w operates under extremely high temperatures and you can burn yourself quite badly.
  • Switch off the power to the Viewsonic PJD6531w projector.
  • Disconnect the power cord.

 ViewSonic_PJD6531W_RLC-049_lamp1. Use a screwdriver to undo the screw holding the lamp cover in place. Remove the lamp cover, being careful not to lose the screws.

2. Slide the lid  — slowly — off the projector. and place to one side. Don’t lose the lid because the Viewsonic PJD6531w  projector will not turn back if the lamp cover hasn’t been installed properly.

3. Remove the two screws holding the Viewsonic RLC-049 lamp in place.

Note: The used Viewsonic RLC-049 lamp contains mercury and should be properly recycled. Don’t throw it into regular garbage.

4. Grab the Viewsonic RLC-049 lamp by it’s side edges and slowly lift the lamp put of the projector. Be careful not to bang the lamp against the projector as this may case the bulb to break.

Learn what to do if the lamp has exploded inside the projector.

  • Remove the new Viewsonic RLC-049 from its packaging.
  • Taking care not to touch the actual bulb, lift up the handle on the new lamp and insert it gently into the Viewsonic PJD6531w into projector.
  • Tighten the two screws on the lamp.
  • Replace the lamp cover and tighten its two screws. Reset the lamp timer.


Reset the Lamp Replacement Timer

The Viewsonic PJD6531w projector has an automatic lamp timer that tracks the numbers of hours left in the lamp. Each time you install a new lamp, you’ll need to to reset the lamp timer to know how many hours are left and when to change the bulb.

ViewSonic_PJD6531W_lamp_reset_menuRLC-049_lamp

To reset the Lamp Replacement Timer:

  • Turn on the projector.
  • Using the remote press MENU or press the MENU button on the projector
  • Scroll to the main menu
  • Select Settings
  • Scroll down to Lamp Hours
  • Press the arrow button to move to the right,
  • Select YES.
  • Press MENU to exit.

Extend the life of the Viewsonic RLC-049 by setting the Viewsonic PJD6531w to Eco Mode. This lowers the brightness of the projector and makes the lamp last longer. Read about other tips for extending the lamp life in your Viewsonic PJD6531w.

Tagged with: , , ,

Jeff_Golden_Xmas_Lights

Your multi-purpose DLP projector can let you watch your favorite shows with cinema quality on your TV!

It’s easy to get your DLP projector and TV hooked up.

Step 1: Cables

Your TV must have an outgoing video connection. Older models will not have this option, the newer smart TVs definitely do. If you TV doesn’t have an outgoing video connection, you’ll need to hook it up through a cable. Read our blog on Hooking up your projector through an AV source.

The cable you need depends on the type of VIDEO OUT pin you have on your TV:

Cables_HDTV_Projectors

  • RCA: composite video (yellow) and stereo audio (white and red) plugs. Similar to headphone or video gaming plugs. Find this on Amazon: Basics 2-Male to 2-Male RCA Audio Cable – 4 Feet
  • S-video: All in one cable using a four-pin DIN connector
  • HDMI: High-Definition Multimedia Interface connector integrating 19 cable pairs. This single-cable, all-digital solution is becoming the industry standard. Used with most HD devices. Find this cable on Amazon  25FT HDMI HDTV 1080P
  • DVI: Most common digital video cables, similar to VGA connectors, with up to 24 pins. Supports analog as well as digital video so it most used with desktops and LCD monitors. It doesn’t do video so replace it with HDMI cables. Find this cable on Amazon:Basics DVI to DVI Cable – 3 Feet (0.9 Meters)
  • VGA: Video Graphics Array connector has a 3-two, 15-pin connector and is used for video cards, computer monitors and HDTV. If you have an HDTV it will use the HDMI connection while older TVs will use either the VGA, S-video connection or RCA jack system. Find this cable on Amazon:<Cable Matters VGA to VGA Cable with Ferrites (SVGA Cable) 6 Feet (Available 3FT – 100 FT in Length)/li>

Step 2: Positioning

Cables_Projectors

You’ll still need to determine how far away your projector needs to be away from the projector screen. Check your manual to see how you need to set up the TV and projector.

Step 3: Connecting

  • Unplug the projector. You will be connecting a cable from the VIDEO OUT jack on the TV to the VIDEO IN jack at the back of the projector.
  • If you are using a VGA or HDMI connector you will have a single cable connection from one end to the other. If you are using a RCA jack system you will need to match up the colors accordingly: Yellow for video, white and read for stereo.
  • Connect the power cords on both devices. Turn on the TV
  • Open the TV menu settings using the remote control or buttons on the TV.
  • Go to the menu and look for the Enable Video Out or Auxiliary Video Out. Set it onto ON.
  • Turn on the projector.
  • Go to the MENU or SETTINGS menu on the projector. Go to the INPUT SOURCE and change to the appropriate jack used. Some projectors have an SOURCE SEARCH button or function that will automatically find the video source. Refer to your projector user manual for more information.
  • Remember that your projector will be reading what is on your TV screen. So if the TV screen in dark or blank so will be the projector.

Step 4: Tweaking the sound quality

Since most projector don’t have high quality, you may want to use surround sound speakers. This is easy to do it you are using the RCA jack set-up. Simply unplug the RED and WHITE cables from the projector and plug them into the AUDIO IN slots on your sound source.

Happy viewing.

Learn more about hooking up your projector:

Tagged with: , ,

HappyNewYear2104

Happy New Year! Keep joining us in 2014 as we continue to offer the best guides for replacing your projector lamps, more helpful articles on presentations and design trends, technology and everything to help you get the best experience with your DLP projectors and RPTVs. Be sure to check out our forum for more advice. All the best in 2014.

Philips_Certificate_to_Discount_MerchantIn this age of counterfeit products and cheap overseas goods, let’s be thankful for OEM manufacturers still producing authentic products.

Let’s thank the dealers selling those products.

They are committed to providing the best for their customers.

Not all projector lamps are equal!

The official brand lamp manufactured by Philips Lighting handles over 60% of the projector lamp market. They’ve spent millions of dollars creating a product that works with the sophisticated optics in DLP projectors.

These lamps are also created with the highest safety standards and with the correct materials. Generic lamps are usually thrown together with inferior materials in order to sell quickly.

The Internet has been flooded with companies selling “generic” projector lamps. Many claim to be compatible with your projector. Only a few companies actually are selling OEM (Original Equipment Manufacturer) that are genuine.

It may be tempting to buy a cheaper generic replacement but that may end up costing you more in the long run.

Look for the seal of approval when buying projector lamps

Buy authentic and stay safe

Philips_OEM_lamps_versus_counterfeit_lampsDLP Projectors use high pressure to generate light and this pressure needs to be controlled inside the lamp. Authentic projector lamps have been calibrated to the exact wattage. Generic lamps have not designed to handle the subtleties in wattage and pressure. They give off either too much wattage so are prone to overheating and explosions. When generic lamps also give off too little pressure the result is low light and poor picture quality.

But more disturbing is the fact that generics are created with the safety standards to protect your eyesight.

PHILIPS lamps use a UV coated reflectors allowing for a brighter and more vibrant picture. These reflectors reduce the harmful rays so you don’t damage your eyes looking into the projector. Generic lamps have a non-coated reflector and without this coating looking into the lamps is similar to looking directly into the sun.

Prolonged UV exposure eventually damages the retina causing macular degeneration, eventually resulting in permanent blindness. Operating your projector with a generic compatible lamp means putting your eyesight at risk.

Look for the seal of approval

When you purchase from an authorized manufacturer and dealer, you know you’re receiving a Philips bulb that is reliable, durable and safe. Philips gives select companies its Global Premium Partner status. This seal of approval guarantees that the company is selling high quality lamps guaranteed to deliver the best performance while protecting your health and your projector.

Generic brands sold through the Internet can’t offer this kind of guarantee, particularly those manufactured in China, where the standards are lower and regulations not as strict. Installing a cheaper brand may actually damage other sensitive components connected to your projectors operating system. You may also find your warranty has become void after installing these third-party parts.

The few dollars you save with generic “compatible” lamps is not worth it in the long run. Save yourself unnecessary headaches — buy a You’ll be getting a far superior product with a replacement guarantee and tech support.

6 good reasons to avoid generics

Protect yourself and ask for the Philips seal of approval before buying any projector lamps off the Internet.

Learn the 7 Ways to spot a counterfeit lamp.


Tagged with: , ,
Join the discussion on Facebook! All your questions, answered! The Screen & Projector Group