We're now Screen and Projector! For updated content, visit ScreenAndProjector.com and follow @screenandproj on social media!

counterfeitAuthentic projector lamps keep your projector working

Installing authentic projector lamps means better performance, better lighting and better viewing.

Ignition and connections are crucial parts for making sure your newly installed projector lamp is working at its optimum level.

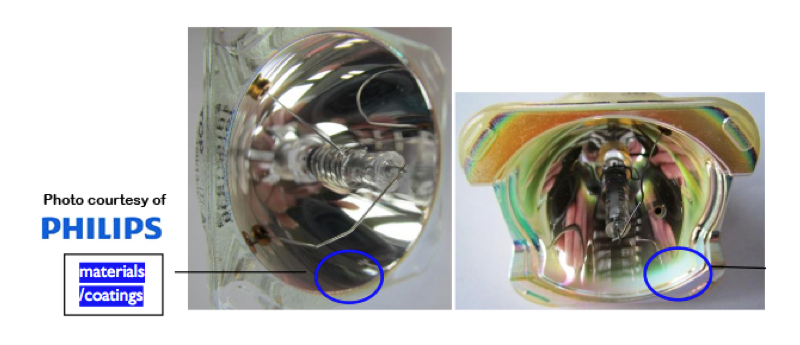
Other important considerations include arc distance, wattage, reflector size as well as glass, air gaps and coatings

Ignition voltage

Ignition Voltage-counterfeit awareness
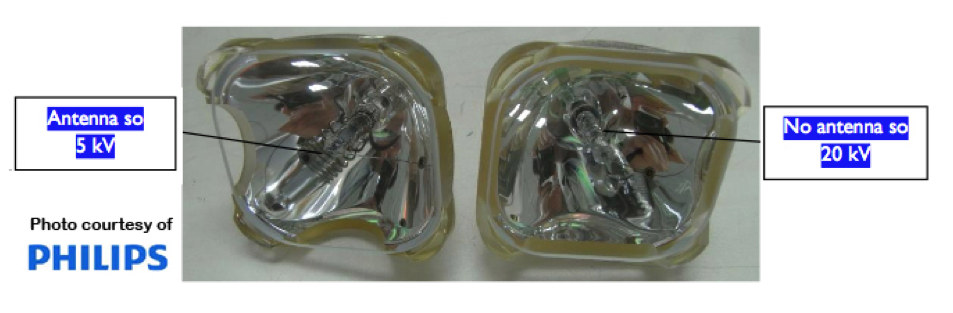
Projector lamps operate with a lamp driver with a 5kV ignition voltage. Lamps with metal antenna in the ignition chamber are 5kV lamps. Some lamps have their antenna in the front while others have the antenna in the rear. Some projectors need high ignition voltage of 20kV so have no antenna. Generic manufacturers often don’t have the specs needed to create the proper antenna for each projector lamp and instead create lamps that faulty antenna that short circuits in the projector.

Connection methods

Connection methods

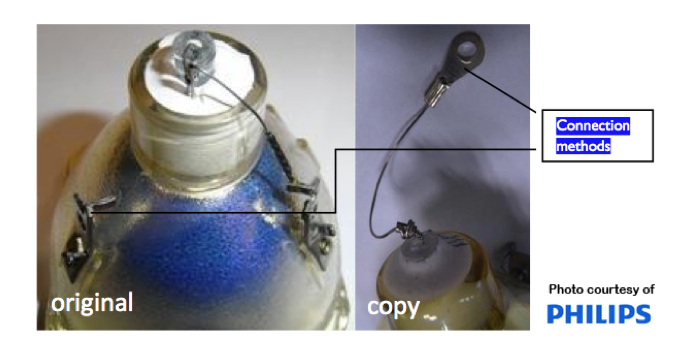
Every projector lamp must connect to its projectors by cables or wires. Each projector has its own particular connection method. Generic lamps have substitute connection cables and wires results in ill-fitting lamps that can’t ignite but can easily short circuit causing  melting and burning inside the projector.

 Lamp driver combinations

Lamp driver combinations
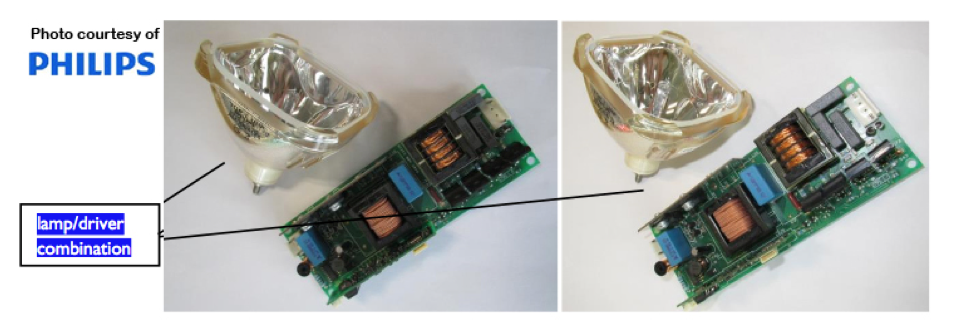
Projector lamps also work with the projector driver to bring the image to the screen. The combination of lamp and driver is unique to each projector model. Only authentic manufacturers know the specifications for each particular brands and how to use those specification to create OEM lamps. Generic lamps can never have the correct combination and installing them creates unbalanced electrical power with danger of explosions.

Correct shape

Correct shape authentic projector lamps
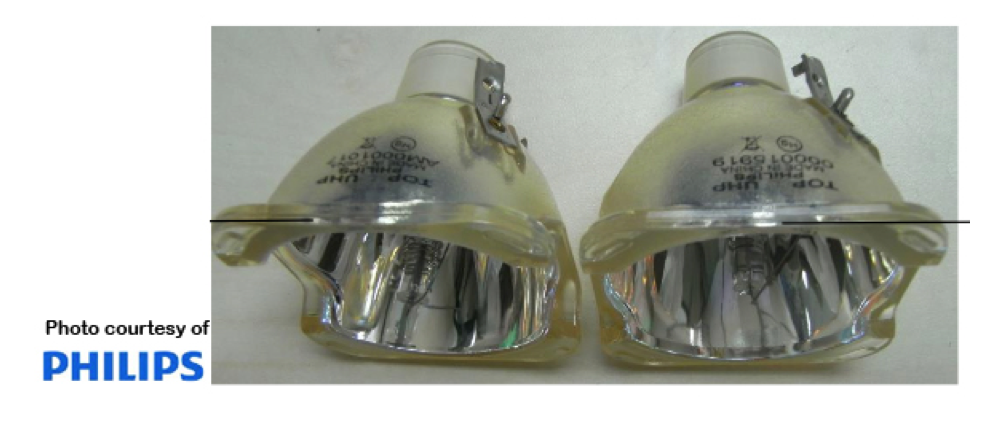
Almost all projector lamps have the same outer shape but the inner shape is dependent on the projector model.  Most generics don’t have the correct specifications to create the correct inner shape. It creates a lamp with uneven light output distribution.

Knowledge is power

Learn more about authentic projector lamps so you can avoid counterfeits:

Tagged with: , , , , ,

SmartBoard 480iv_projector

Replace the Smartboard 480iv projector lamp using this guide

When the projected image gets darker or starts to deteriorate then it’s time to replace the Smartboard 480iv projector lamp.

Go with authentic

An authentic projector lamp makes all the difference in keeping your Smartboard 480iv projector working. If the price is too good to true, then you should avoid the lamp. Bargain basement prices mean problems down the road. Scroll down for the 6 reasons to avoid counterfeit lamps.

The Smartboard 480iv projector lamp using the SmartBoard 20-01500-20 Replacement Projector Lamp.

Buy this lamp on Amazon sold by these authorized sellers:

SpArc Platinum for SmartBoard 20-01500-20 Projector Replacement Lamp with Housing

Important Safety tips BEFORE replacing the projector lamp:

  1. Press the Power button twice on the remote control to put the system into Standby mode.
  2. Wait at least 45 minutes for the projector to cool down completely, and then disconnect the power cable from the power outlet.
  3. Disconnect all cables from the projector.

Step 1: Remove the projector from the boom

SmartBoard_480iv_projector_lamp_SmartBoard 20-01500-20Using the screwdriver, remove the screw from the boom end cap, and then remove and set aside the boom end cap and screw.
Loosen the locking screw and the knob on the projector mounting plate.
SmartBoard_480iv_replace_projector_lamp_SmartBoard 20-01500-20-


SmartBoard_480iv_projector_lamp_SmartBoard 20-01500-20_mount
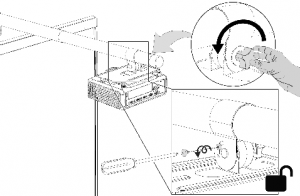
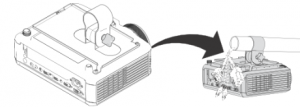
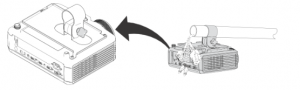
Slide the projector mounting plate and projector off of the boom.

SmartBoard_480iv_projector_lamp_SmartBoard 20-01500-20_coverSmartBoard_480iv_projector_lamp_SmartBoard 20-01500-20_remove_cover
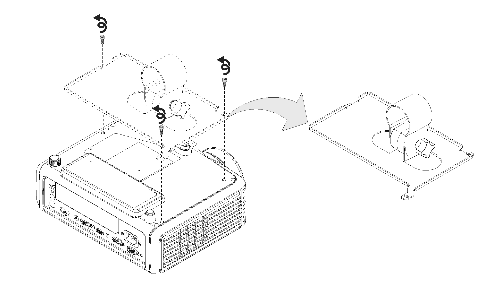
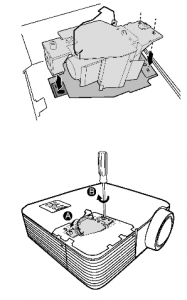
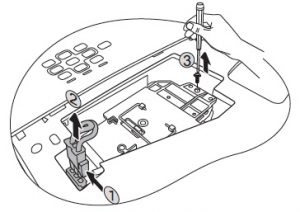
Using the M3 hex wrench, remove the three screws connecting the projector mounting plate to the projector, and then set aside the projector mounting plate and screws.

Turn over the projector so that the outer lamp cover is visible.


To removing the projector lamp module

SmartBoard_480iv_projector_lamp_SmartBoard 20-01500-20_cover-takeoff
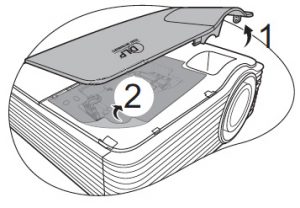
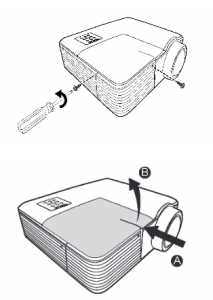
Using the screwdriver, remove the two screws from the lamp cover.

Remove the lamp cover, and then set it and the two screws aside in a safe place.SmartBoard_480iv_projector_lamp_SmartBoard 20-01500-20-remove-lamp

Put the old lamp module in a secure container and handle it gently until you recycle or dispose.

NOTE: The SmartBoard 20-01500-20 Replacement Projector Lamp contains mercury and should properly recycled and NEVER thrown into regular garbage.

Inserting the new lamp

SmartBoard_480iv_projector_lamp_SmartBoard 20-01500-20_install_new

Remove the SmartBoard 20-01500-20 replacement lamp module from its packaging.

Lower the replacement lamp module into the slot, aligning it with the holes in the slot.

Using the screwdriver, tighten the screw on the lamp module.

SmartBoard_480iv_projector_lamp_SmartBoard 20-01500-20_lamp_cover_back_on
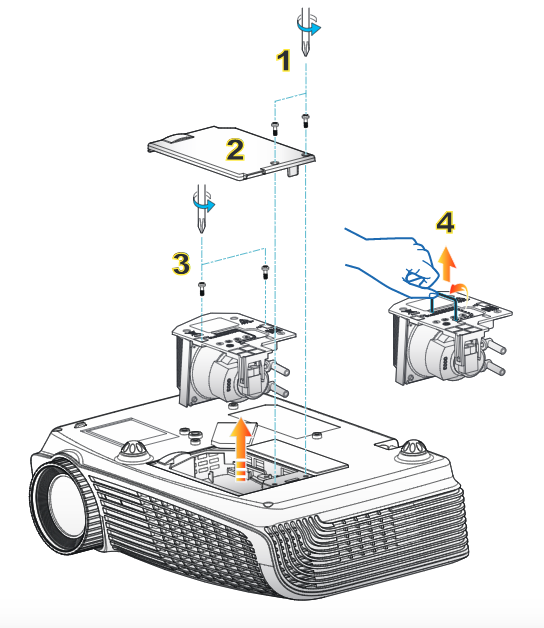
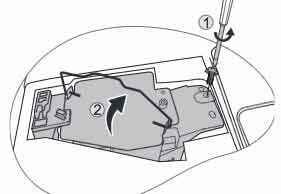
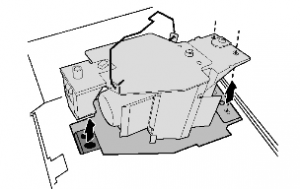
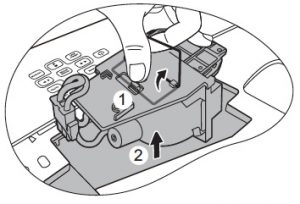
Place the lamp protection film that came with the new lamp module over the slot.

Replace the outer lamp cover, and then replace the screws holding the cover to the projector.

To place the projector on the boom

Turn over the projector. Replace the projector mounting plate on the projector.

SmartBoard_480iv_projector_lamp_SmartBoard 20-01500-20_replace_mounting

Slide the projector mounting plate and projector onto the boom.  Tighten the knob and the locking screw.

SmartBoard_480iv_projector_lamp_SmartBoard 20-01500-20_tightne-knob
SmartBoard_480iv_projector_lamp_SmartBoard 20-01500-20_projector_on_mount


SmartBoard_480iv_projector_lamp_SmartBoard _20-01500-20_Boom_cap
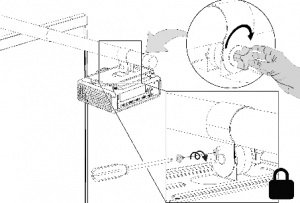
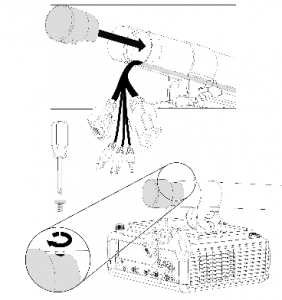
Replace the boom end cap. Connect the cables to the projector. Connect the power cable to a power outlet.

Press the Power button once on the remote control to confirm that the projector is operating and that the lamp module is correctly installed, and then wait for the projector to turn on completely.

Wait five minutes for the projector to warm up.

Resetting the projector lamp timer

Your Smartboard 480iv projector has a built in lamp timer that tracks the life of the SmartBoard 20-01500-20 projector lamp. Whenever you change the lamp you need to reset the lamp timer back to zero. To reset the timer:

  • Down, Up, Up, Left, Up.
  • Scroll down to the Lamp Hour Reset field, and then press OK.
    Both Lamp Hour values (Standard and Economy) are reset to zero.
  • Press the Menu button on the remote control.
    The SMART V25 Settings menu appears.
  • Select to confirm that Lamp Hours is reset to zero.
    CAUTION: Do not use the Lamp Hour Reset feature unless you have just replaced the lamp. Resetting
    the lamp hour counter on an old lamp can damage your projector due to lamp failure. Do not adjust any settings in the service menu other than those listed in this guide. Changing other settings can damage or affect the operation of your projector and invalidates your warranty. You’re unable to reset the Display Hour value because it’s the running total of hours the projector has been in use.

6 reasons to avoid counterfeits:

Tagged with: , , ,

BenQ MX710_projectorLearn how to replace the BenQ MX710 projector lamp
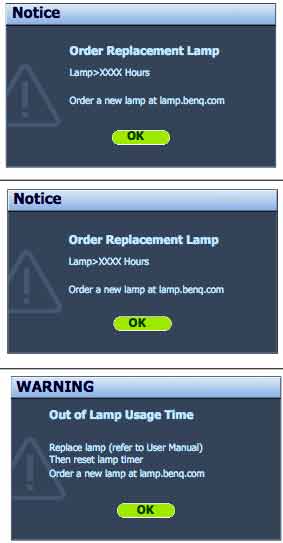
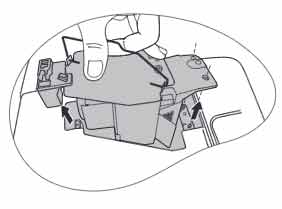
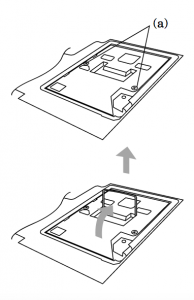
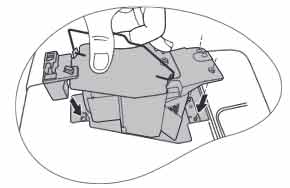
Start off with authentic

Save yourself unnecessary headaches and purchase an authentic BenQ MX710 projector lamp. Avoid counterfeit lamps.

Find this lamp on Amazon from the following authorized dealers:

MX660 BenQ Projector Lamp Replacement. Projector Lamp Assembly with Genuine Original Philips UHP Bulb Inside.

Why go authentic? Counterfeit “compatible” lamps may appear to be a bargain but in the long run end up costing more due to their shorter lamp life. They are prone to explosions and can put your eyesight at risk. Due to their substitute toxic materials and carcinogenic parts, the few dollars you will save are not worth it. Protect your health and keep your BenQ MX710 working at optimum levels. Go with an authentic projector lamp.

End of life warning signs

Your BenQ MX710 projector uses the BenQ 5J.J3T05.001 replacement projector lamp. When it’s time to replace the BenQ MX710 projector lamp you’ll see a series warnings appear on screen.

benq-MS614 -projector_benq-5j-j3t05-001_replacement_lamp-warnings

First warning: The BenQ MX710 projector lamp has been in operation equivalent to 4500 hours or for 6,000 hours Econo Mode, you have up to 6000 hours before changing the lamp. You can wait until the second warning to replace the projector lamp. Press MODE/ENTER to dismiss the message.

Second Warning: The BenQ MX710 projector lamp has been in operation equivalent to 4000 hours or 6,000 hours in Econo mode. You should replace the lamp immediately. Press MODE/ENTER to dismiss the message.

Out of lamp: The BenQ MX710 projector lamp has reached its end of life and the projector will shut down until the lamp is replaced. Install a new BenQ 5J.J3T05.00 projector lamp immediately.

Follow these safety instructions before changing the lamp:

  • Reduce the risk of electrical shock by disconnecting the power cord on the BenQ MX710 projector.
  • Reduce the risk of severe burns by allowing the projector to cool for at least 45 minutes. The projector should be cool to the touch.

Replacing the projector lamp


benq-MS614-projector_benq-5j-j3t05-001_replace_lamp_cover

  • The projector lamp cover is found on the side of the BenQ MX710 projector.
  • benq-MS614 -projector_benq-5j-j3t05-001_replace_lamp_cover-2
  • Loosen the screw holding the projector lamp cover in place
  • Lift up the projector lamp cover.

benq-MS614 -projector_benq-5j-j3t05-001_replace_lamp_screw-1

  • Loosen the screw that secures the lamp.
  • Lift the handle so that it stands up. Use it to slowly pull the BenQ 5J.J3T05.00 projector lamp out of the projector. Pulling out too quickly may cause the bulb to break. benq-MS614 -projector_benq-5j-j3t05-001_remove_lamp

NOTE: The BenQ 5J.J3T05.00 projector lamp contains mercury and should not be thrown into regular garbage. Recycle your used lamps!

benq-MS614 -projector_benq-5j-j3t05_insertInsert the new BenQ 5J.J3T05.00 projector lamp.

  • Tighten the screw that secures the lamp. Loose screw may cause a bad connection,
    which could result in malfunction. Do not over tighten the screw. benq-MS614 -projector_benq-5j-j3t05-001_replace_lamp_screw-2
  • Replace the lamp cover on the BenQ MX710 projector.
  • Reset the lamp timer.

Resetting the lamp timer

Do not reset the BenQ MX710 projector lamp timer if the lamp has not been replaced as this could cause damage. Don’t start the if the lamp cover has not been replaced. To reset the projector lamp timer:

  • Plug the BenQ MX710 projector and get it started.
  • Open up the menu and scroll over to SYSTEM/SETUP: Advanced. Press ENTER
  • Press MODE/ENTER to display the Lamp Settings page
  • Highlight Reset lamp timer to display a warning asking it you want to reset the lamp timer.
  • Select RESET. Press ENTER.
  • Lamp time will be reset to zero.

Extend the BenQ MX710 projector lamp

  • Keep your air filters clean to avoid overheating the projector.
  • Setting Lamp Power to Eco mode. Using Whisper mode reduces system noise and power consumption. It also extends the projector lamp life. To set Econo mode, go into the Advanced Setup > Lamp > Lamp Power menu.
  • Learn more with Top tips for extending DLP projector lamp life.


Save

Save

Save

Save

Tagged with: , , ,

lamps_inside_authentic_projector_lamp
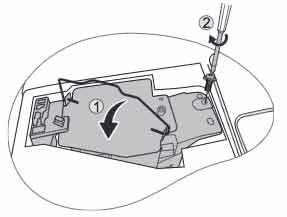
Save time and money with authentic projector lamps

With guaranteed OEM authentic projector lamps,  you’ll never experience the frustration of down time from a projector ruined by a defective lamp.

Three important things to watch for: glass, air gaps and coatings.

Protect your health

Health and safety is always important. Exposure to high-intensity projector lights can damage eyesight without the proper safeguards. Genuine PHILIPS lamps are manufactured with proper filtering glass, UV coating and special air gaps. Generic lamps don’t offer this safety feature. PHILIPS has spent years researching and developing the sophisticated technology of projector lamps. Here are three things to look for with authentic projector lamps.

Filtering front glass

Filtering front glass authentic projector lamp

High intensity projector lamps emit ultraviolet radiation (UV) and infrared radiation (IR) that are not visible to the human eye. In order to protect your eyesight, authentic projector lamps have a high-performance coating blocking out these rays. Most generics are missing this protective coating exposing you to these harmful rays when you install them into your projector.

Air gaps

Air gaps inb authentic projector lamps

Projector lamps operate using high heat and need built in air gaps to create spot cooling in order to prevent overheating of the lamp. Most generic lamps have uneven air gaps and some have none at all. This changes the cooling air in the projector affecting the performance and making generics prone to exploding.

Material and coating

Material and coating authentic projector lamp

Your projector is a well-balanced machine and any lamp installed must also be balanced. Original manufacturers use the correct glass, filters, metal and plastic while copycat manufacturers don’t have access to these proper materials or coatings. To achieve the same results, they use toxic substitutes that lead to poor performance, a shorter lamp life and health risks. One particularly carcinogenic substitute is Krypton-85. Using toxic elements is the only way for copycat manufacturers to re-produce the technology created by PHILIPS.


Learn more about projector lamps and what to look for:

Tagged with: , , , ,

BenQ_MX713ST_projector
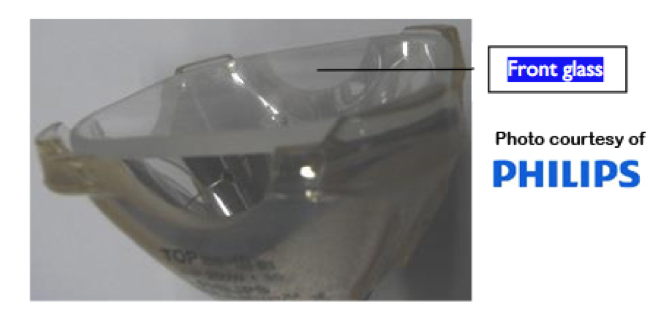
Replace the BenQ MW714ST projector lamp

Go with authentic

Protect your projector by investing in an authentic lamp. An authentic OEM projector lamps is the only lamp that will keep your BenQ MW714ST projector working properly. Here are four reasons to avoid using counterfeit projector lamps:

Shop for this lamp on Amazon sold by these authorized distributors:

Warning signs for end of projector lamp

BenQ-_MW714ST_projector_BenQ 5J.J3K05_projector_lamp_warning
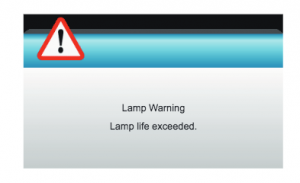
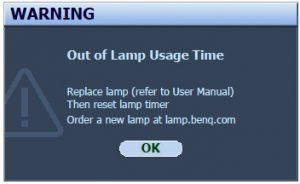
When the BenQ MW714ST projector lamp is reaching end of life, three warning messages will appear on screen. The lamp indicator on the projector will start flashing orange. You may notice the image
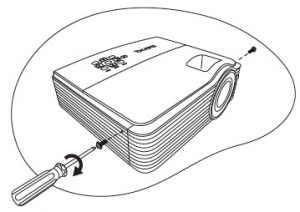
 deteriorating or the color looking off. Lamp hour information can be found on the INFORMATION menu.Setting the projector to economic mode will extend the projector lamp life.

Replacing the projector lamp

Before changing the lamp:

  • Reduce the risk of electrical shock by disconnecting the power cord on the BenQ MW714ST projector.
  • Reduce the risk of severe burns by allowing the projector to cool for at least 45 minutes.

BenQ-_MW714ST_projector_BenQ 5J.J3K05_projector_lamp_remove_cover_screw

Loosen the screw holding the BenQ MW714ST projector lamp cover. The BenQ MW714ST projector uses the BenQ 5J.J3K05.001

BenQ_MW714ST_projector_lamp_remove_cover

Lift up the cover. Remove and dispose of the lamp protection film. Do not insert your fingers between the lamp and the projector. The sharp edges inside the projector may cause injuries.


BenQ-_MW714ST_projector_BenQ 5J.J3K05_disconnect_projector_lamp

Disconnect the projector lamp connector from the projector Loosen the screw that secures the BenQ 5J.J3K05.001 projector lamp.

BenQ-_MW714ST_projector_BenQ 5J.J3K05_remove_old_projector_lamp


Slowly and gently pull the BenQ 5J.J3K05.001 projector lamp out of the projector. Pulling too quickly can cause the bulb to shatter. Learn what to do should the bulb shatter.

NOTE: The BenQ 5J.J3K05.001 projector lamp contains mercury and should not be thrown into regular garbage. Recycle your used lamps.

BenQ-_MW714ST_projector_BenQ 5J.J3K05_install_new_projector_lamp

Insert the new BenQ 5J.J3K05.001 projector lamp first into the connector on the projector and reconnect the lamp connector.

Make sure the handle is fully locked. Tighten the projector lamp screw. If the screw is too loose or too tight, the projector may not turn on.

Re-install the BenQ MW714ST lamp cover and tighten the screw. Reset the total lamp operation t

Reset the projector lamp counter

BenQ-_MW714ST_projector_BenQ 5J.J3K05_reset_projector_lamp_timerWhen the BenQ 5J.J3J05.001 projector lamp in the BenQ MW714ST projector has been changed the projector lamp timer must be reset:

  • Turn on the BenQ MW714ST projector.
  • After the startup logo, open the On-Screen Display (OSD) menu.
  • Go to the SYSTEM SETUP.
  • Scroll over to Advanced > Lamp Settings menu.
  • Press MODE/ENTER to display Lamp Settings page is displayed.
  • Highlight Reset lamp timer. A warning message is displayed asking if you want to reset the lamp timer.
  • Highlight Reset and press MODE/ENTER. The lamp time will be reset to “0”.

Extend the projector lamp life:

  • Keep your air filters clean to avoid overheating the projector.
  • Use the Lamp Power option on the BenQ MW714ST and set to Economic Mode to reduce the amount of power used by 20%.
  • Learn more with Top tips for extending DLP projector lamp life.


Tagged with: , ,

omparison_authentic_counterfeit
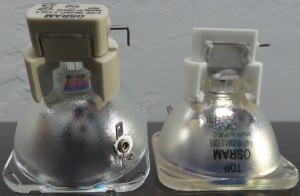
Authentic projector lamps save you time and money

With guaranteed OEM authentic projector lamps,  you’ll never experience the frustration of down time from a projector ruined by a defective lamp. Three important things to watch for: Arc distance, wattage, reflector size.

Protect your health

Health and safety is always important. One of the associated risks from DLP projectors is exposure to high-intensity projector lights that can damage eyesight. Genuine PHILIPS lamps are manufactured with UV coated reflectors to reduce harmful rays and protect your eyesight. Generic lamps don’t offer this safety feature.

Why invest in authentic?

PHILIPS is the premier manufacturer projector and TV lamps. They have spent years researching and developing the sophisticated technology of projector. Here are three things to look for with authentic projector lamps.

 Arc distance

authentic_projector_lamps-arc_distance

Projector bulbs have an arc gap filled with ultra-high pressurized mercury vapor that creates the high intensity light needed to project the image onto the screen. There is an optimal arc distance needed in every projector lamps that is 1.0 mm. Getting this exact measurement takes the right equipment and even the slightest deviations from this exact measurement can result in loss of contrast, brilliance and light eventually damaging the optical components on the projector.

Wattage

authentic_projector_lamps-wattage
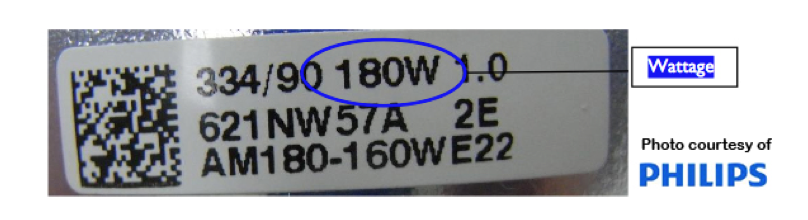
Wattage plays a critical role in lamp power as it supplies the amount of light displayed. Generics usually have higher wattage and when they come in contact with the low wattage ballast/driver (which controls the electrical ignition of the lamp), the projector’s electrodes can be damaged. Since the generic lamp produces too much light, there is often a flickering image, uncontrolled light exposure and overheating of the lamp and projector.

Reflector Size

authentic_projector_lamps-reflector
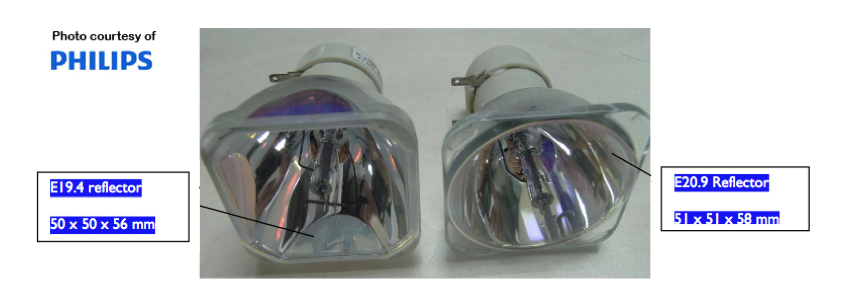
Generics often have a different sized reflector than original OEM lamps, which means they often don’t fit into the projector properly. Bad position of the lamp means the light does not go through the optical elements at the right angle causing damage to the optics and a short circuit of electrical components. This leakage of light can also affect your eyesight by exposing you to high intensity light.

Learn more about projector lamps and what to look for


Tagged with: , , , , ,

Eiki POA-LMP132 projector lamp
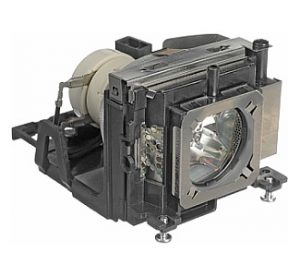
How to replace the Eiki LC-XBL25 projector lamp

When the Eiki LC-XBL20 projector lamp nears the end of life, the Lamp replacement icon appears on the screen. At the same time the LAMP REPLACE indicator starts flashing yellow. Eiki_lc-xbl20_LampReplace

Buy authentic

If you are buying over the Internet, avoid projector lamps with a low price tag for the following reasons:

Learn 7 ways to spot a counterfeit projector lamp. Protect your health and the life of your projector. Invest in authentic.

Find this lamp on Amazon sold by these authorized dealers:


How to replace the LC-XBL25 projector lamp

The Eiki LC-XBL25 projector uses Eiki POA-LMP132 projector lamp.

Before installation:

  • Turn off the projector and unplug the AC cord.
  • Allow the Eiki LC-XBL25 projector lamp projector to be cool to the touch. This can take between 45 to 60 minutes. Don’t open the projector when hot since these machines operate under high temperatures and you can burn yourself.

1. Remove the lamp cover fiki_LC-XBL20_projector_lamp_replacement_Sanyo_POA-LMP132
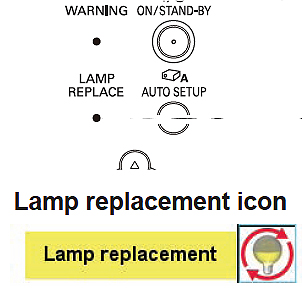
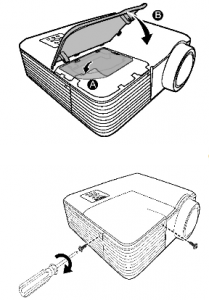
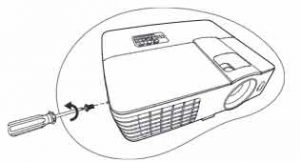
or the Eiki LC-XBL25 projector. Loosen the screw to remove the cover.

2. Loosen all three screws holding the lamp cage in place. Grab the handles on the lamp cage and gently lift the lamp out of its socket. Place to one side.

NOTE: These lamps contain mercury and should be properly recycled. Don’t put it into the regular garbage.

3. Take the new Eiki POA-LMP132 projector lamp by the handle—avoid touching the lamp surface as oil from your fingers can cause black spots to appear when the projector is turned on. Gently maneuver the lamp into place. Don’t force the lamp as this may damage it.

4. Once the lamp is in, tighten all three screws on the Eiki POA-LMP132 Lamp Assembly. Make sure the screws have been tightened properly or the Eiki LC-XBL25 projector will not turn on.

5. Replace the Lamp Cover and tighten the screw.

Resetting the Eiki LC-XBL25 Lamp Timer

Resetting the lamp timer mode allows your projector accurately track the number of hours left in your Eiki POA-LMP132 projector lamp.

Eiki_LC-XBL20_projector_lamp_replacement_Sanyo_POA-LMP132_LampCounter

  • Turn the Eiki LC-XBL25 on.
  • Press the Menu option to display the On-Screen Menu.
  • Press Point left/right button(s) to move a red frame poster to Setting Menu icon.
  • Press the black arrow point button to move the red framed pointer to the Setting Menu Icon.
  • Press Point Down button to move the red frame pointer to Lamp counter reset.
  • Press the Select button.


Eiki_LC-XBL20_projector_lamp_replacement_Sanyo_POA-LMP132_LampReset-3

  • Another confirmation dialog box appears, select YES.
  • The Lamp box will disappear and the Lamp Replace Dialog box appears.
  • Select YES to reset Lamp Replace Counter.
  • There are two modes for Lamp life control. Mode 1 lets the lamp be turned on even after exceeding the recommended total hours of use. Mode 2 lets the lamp be turned on even after exceeding the recommended total hours BUT the projector turns off automatically after 3 minutes.


NOTE: When you reset the Lamp Replace Counter the Lamp Replace indicator stops lighting.

Extend the life of the projector lamp

Get more hours from your Eiki POA-LMP132 projector lamp by following these maintenance tips:

  • Keep your air filters clean to avoid overheating the projector.
  • Turn off the Eiki LC-XBL25 projector and let it stand unused for at least one hour ever 24 hours. An average use of four to five hours per day will ensure longer lamp life.
  • Make sure there is enough airflow around the projector particularly if it’s been permanently mounted.
  • Learn more with Top tips for extending DLP projector lamp life.


Tagged with: , ,

Mitsubishi LVP SA51UX projectorHow to install a replacement Mitsubishi LVP SA51UX projector lamp

The best investment you can make is to invest in an authentic Mitsubishi LVP SA51UX projector lamp. Knock-off counterfeit lamps have a shorter lamp life and have been created with toxic substitutes and are prone to explosions that s often damage the sensitive electronics in your projectors. Invest in authentic. This Mitsubishi LVP SA51UX projector uses the Mitsubishi VLT-PX1LP model.

Buy this lamp on Amazon from the following retailers:

Warning

The Mitsubishi LVP SA51UX projector lamp has a lamp life of approximately 2,000 hours. End of lamp life indicators include a decreases in luminescence and/or color brightness. At 1500 hours, the indicator will flash alternately between green and red. When the lamp has been used for close to 1,900 hours, a message “LAMP!!.” appears on the screen for one minute. When the lamp has reached about 2,000 hours, the projector will automati-
cally shut off for safety and the power indicator light will be red. The lamp must be replaced immediately.

Replacing the projector lamp

Before replacing the projector lamp, please follow these safety precautions.

  • Reduce the risk of electrical shock by disconnecting the power cord on the Mitsubishi LVP SA51UX projector.
  • Reduce the risk of severe burns by allowing the projector to cool for at least 45 minutes. It should be cool to the touch.

Mitsubishi_LVP SA51UX_projector_lamp_VLT-PX1LP_remove_cover

Reverse the projector gently and place it on a soft surface.
Loosen the screws of the lamp lid to remove the lid.
Mitsubishi_LVP SA51UX_projector_lamp_VLT-PX1LP_remove_lamp
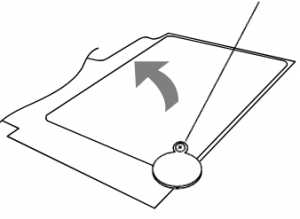
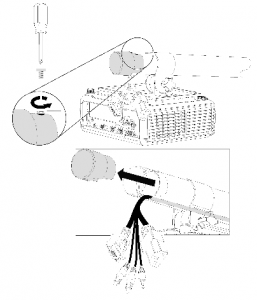
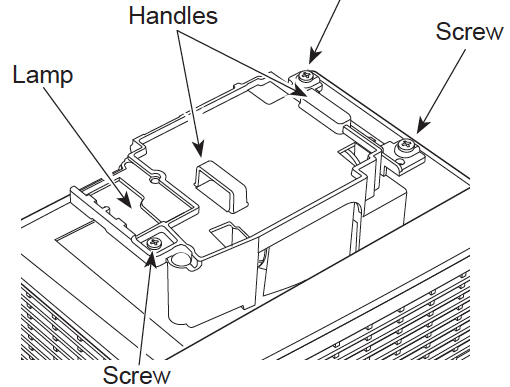
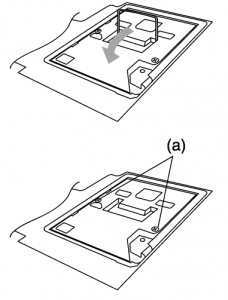
Remove the lamp cover in the direction of the arrow as indicated. Loosen the two screws on the Mitsubishi VLT-PX1LP lamps (a). Pull up the handle.
Hold onto the Mitsubishi VLT-PX1L projector lamp by the handle as you pull straight
upward. Note: The used Mitsubishi VLT-PX1L lamp contains mercury and should be properly recycled. Don’t throw it into regular garbage. Please recycle this lamp.
Mitsubishi_LVP SA51UX_projector_lamp_VLT-PX1LP_insert
Insert the new Mitsubishi VLT-PX1 projector lamp securely into the Mitsubishi LVP SA51UX projector in the right direction.
• Make sure the two section of the lamp are properly positioned into the proper holes before inserting the lamp (b).
Mitsubishi_LVP SA51UX_projector_lamp_VLT-PX1LP_replacement
Put the handle back to the holding point making sure the  handle is locked.
Tighten up the screws (a) using a phillips screwdriver (+).
Put the lamp lid back onto the Mitsubishi LVP SA51UX projector Tighten up the screws of the lamp lid using

Resetting the Lamp Hour Timer

It’s important to only reset the lamp timer when the Mitsubishi LVP SA51UX lamp has been replaced. Resetting the projector lamp timer without changing the lamp can make it work beyond its recommended hours and cause harm to your projector.

To reset the lamp operation time

  • Plug in the power cord
  • Reset the lamp operation time by holding down the ARROW key and the POWER button on the control panel at the same time.
  • Make sure that the STATUS indicator blinks twice and the lamp operation time is reset successfully.
  • IMPORTANT: Unless these three buttons are pressed at the same time, the lamp operation time isn’t reset.

Extending the life of the projector lamp:


Tagged with: , , ,

dollar-authentic
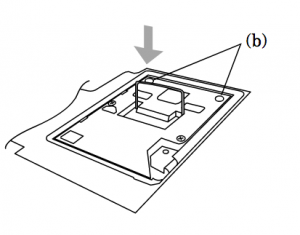
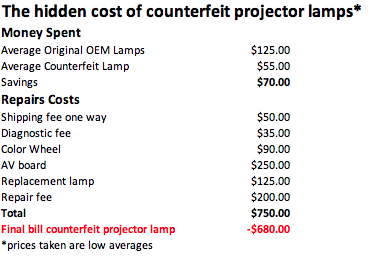
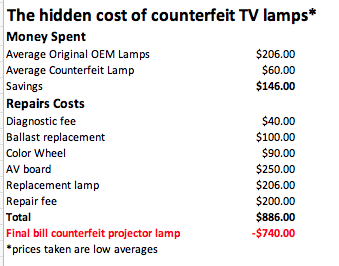
What is the real cost of counterfeit lamps?

Replacing the DLP lamp is one of the expenses associated with owning a projector or a RPTV. The low prices of counterfeits lamps are tempting. Who doesn’t love a bargain?

Remember that “you get what you pay for” when you are online shopping around for the lowest price. Projector lamps are not your ordinary light bulb. The cost of creating this advanced technology is reflected in the price. If you come across a projector lamp that seems like an incredible bargain it’s probably counterfeit.

True costs

We need a cost analysis of the actual cost of counterfeit lamps and they turn out to be more expensive that original OEM lamps.

hidden costs

Copy-cat manufacturers can be clever at disguising their knock-off products including using original PHILIPS logos and parts numbers. So even if the lamp looks authentic if the price is too good to be true, then chances are it’s a counterfeit.

Authentic technology

projector lamps

On the surface counterfeit brands may appear to be the same but their technology is actually quite different from the OEM lamps manufactured by Philips Lighting.

DLP Projectors use high pressure to generate light and this pressure needs to be controlled inside the lamp.  Authentic projector lamps have been calibrated to the exact wattage in order to control the pressure.

Too high a pressure may result in the lamp exploding and damaging the inside of your projector. You may need to replace the color wheel or the AV board.

TV Lamps cost

If the damage is too bad, the projector may need to be replaced.

What is the real cost?

Tagged with: , , ,

optoma HD25 projector
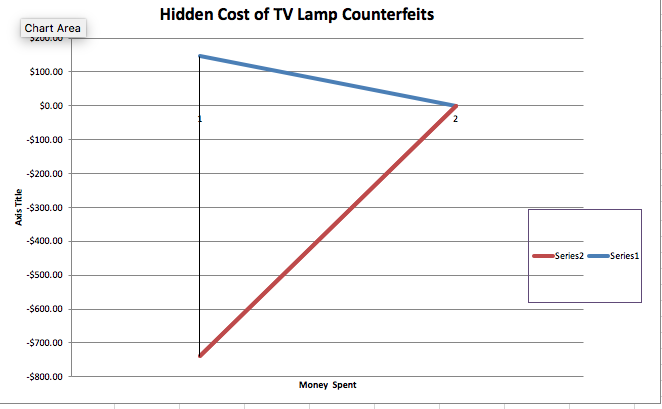
How to replace the Optoma HD25 projector lamp

When the Optoma DH1011 projector lamp approaches end of life, a replacement message will flash on screen. You may also notice the picture quality starting to have poor resolution with washed out colors. Change your projector lamp immediately. The projector will not work if the lamp has burnt out or broken.

Optoma_HD25_projector_lamp_BL-FU250A_warning

Buying the right lamp

Your Optoma HD25 projector uses the Optoma BL-FU240A.

Learn 7 ways to spot a counterfeit projector lamp.

Installing the Optoma HD25 lamp

Before replacing the Optoma BL-FU24 follow these important safety tips:

  • Switch off the power to the Optoma HD25 projector by pressing the Power/Standby button.
  • Disconnect the power cord.
  • Allow the projector to cool down for at least 30 minutes. If should be cool to the touch. These projectors run using high temperatures and you can burn yourself badly if you don’t allow the projector to cool down.

Optoma_HD25_projector_lamp_BL-FU250A-replace

1. Use a screwdriver to undo the two screws holding the lamp cover in place. The screws on the lamp cover and the lamp cannot be removed.

2. Remove the lid and place to one side. Don’t lose the lid as the Optoma HD25 projector will not turn back on until the lamp cover has been properly installed.

3. Remove the two screws holding the Optoma BL-FU24 in place.

Note: The used Optoma BL-FU24 lamp contains mercury and should be properly recycled. Don’t throw it into regular garbage. Please recycle this lamp.

4. Lift up the wire handle on the Optoma BL-FU24 lamp and slowly remove it from the projector.

Be careful not to bang the lamp against the projector as this may case the bulb to break. Learn how to clean up a broken lamp.

5. Remove the new Optoma BL-FU24 from its packaging. Taking care not to touch the actual bulb, lift up the handle on the new lamp and insert it gently into the Optoma HD25 projector.

6. Tighten the two screws on the lamp.

7. Replace the lamp cover and tighten its two screws. You are now ready to reset the Lamp Replacement Timer.

Reset the Lamp Replacement Timer

The Optoma HD25 projector has an automatic lamp timer that tracks the numbers of hours left in the lamp. If you don’t reset the lamp replacement timer you run the risk of the lamp being used beyond its recommended life and possibly exploding in the projector.

To reset the Lamp Replacement Timer:

  • Turn on the projector.
  • Press MENU.
  • Select OPTIONS.
  • Select Lamp Settings.
  • Select Lamp Reset.
  • Select Yes.
  • Press MENU to exit.

Tips for extending projector lamp life:

  • Keep your air filters clean to avoid overheating the projector.
  • Every 24 hours, turn off the projector and let it stand for 1 hour
  • Make sure there is enough airflow around the Optoma HD25 projector particularly if it’s been permanently mounted.
  • Learn more with Top tips for extending DLP projector lamp life
Tagged with: , , ,
Join the discussion on Facebook! All your questions, answered! The Screen & Projector Group