We're now Screen and Projector! For updated content, visit ScreenAndProjector.com and follow @screenandproj on social media!

Epson-Powerlite-83-projector-Epson-ELPLP42-lampGuide for changing the Epson PowerLite 83 projector lamp

Changing the Epson PowerLite 83 projector lamp is simple with this guide.

The life span of the Epson PowerLite 83 projector lamp ranges from approximately 3000 hours in HIGH brightness mode to about 4000 hours in LOW brightness mode.

When to replace

Epson-Powerlite-83-lamp-hours-Epson-ELPLP42-lamp

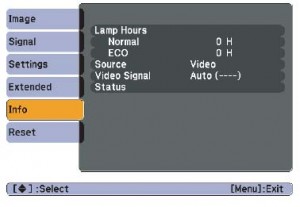
When you are reaching the 3000 mark, have your new Epson PowerLite 83 projector lamp ready for installation. Find the exact hours the lamp has been used on the Info Menu. If the number of hours is under 10, the time will be displayed as 0H.

Watch for the signs that the Epson ELPLP42 lamps needs to be replaced in the Epson PowerLite 83 projector:


  • Dark image
  • Image that has deteriorated
  • Replace the Lamp message appears on screen
  • Lamp light flashes orange

Buy authentic

It’s critical to install a genuineEpson PowerLite 83 projector lamp rather than a compatible generic lamps. Although lower in price initially, generic, knock-off lamps end up costing much more in the long run because of the following problems:

Be sure the purchase an authentic Epson ELPLP42 projector lamp for your Epson PowerLite 83 projector. Save yourself unnecessary headaches and buy authentic from a recognized dealer. You’ll be getting a far superior product with a replacement guarantee and tech support.

Read more about the 7 Ways to Spot a Counterfeit Lamp.

Buy this lamp on Amazon sold by these authorized dealers:

Install the Epson PowerLite 83 projector lamp

Before installation:

  • Turn power button off and wait for light to stop flashing.
  • Turn off power swtich on the back of the Epson PowerLite 83 projector.
  • Unplug the power cord.
  • Allow the Epson PowerLite 83 projector to cool for one hour – it should be cool to the touch. Inside of the projector can be very hot since these machines operator under high temperatures and you run the risk of being burned if the projector has not cooled down.
  • Do not operate the projectors while any of the lamps are removed as this may result in malfunctions, fire hazard and other accidents.

Caution: Don’t touch the screen or the actual bulb with your finger since the oil from your skin can cause a black spot on the bulb.

Epson-Powerlite-83-loosen-lamp-cover-screw-Epson-ELPLP42-lamp


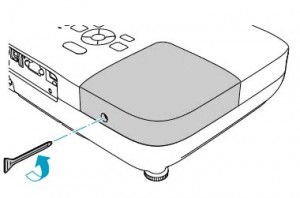
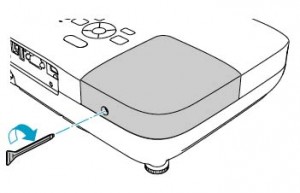
Using the screw driver supplied, loosen the screw holding the Epson PowerLite 83 cover in place.


Epson-Powerlite-83-remove-lamp-cover-Epson-ELPLP42-lamp


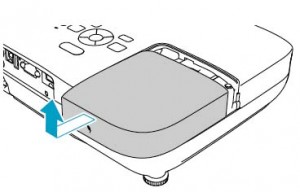
Remove the Epson PowerLite 83 lamp cover and place it to one side.

Epson-Powerlite-83-loosen-lamp-screws-Epson-ELPLP42-lamp


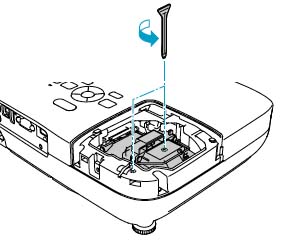
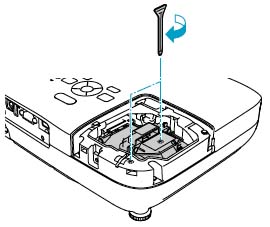
Using the screw driver provided, loosen the screws holding the Epson ELPLP42 lamp in place.


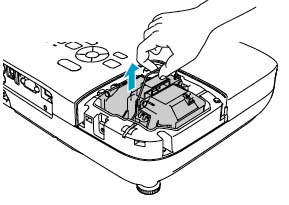
Epson-Powerlite-83-remove-Epson-ELPLP42-lampGrab the Epson ELPLP42 lamp by the two indents on the lamp. Gently remove the lamp.Pulling too quickly can cause the bulb to shatter. Learn what to do should the bulb shatter.

NOTE: The Epson ELPLP42 lamp contains mercury and should not be thrown into regular garbage. Recycle your used lamps!


Epson-Powerlite-83-replace-Epson-ELPLP42-lamp

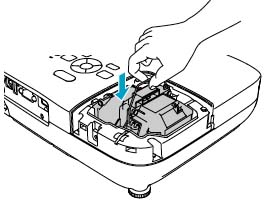
Gently insert the Epson ELPLP42 lamp making sure it’s facing the right way. It should click easily into place. Do not force the lamp into the projector as you may break the light.

Epson-Powerlite-83-tighten-screws-Epson-ELPLP42-lamp

Tighten the screws on the newly installed Epson ELPLP42 lamp. Be sure not to tighten the screw too much or leave the screw too loose as this can stop the newly installed lamp from working.


Epson-Powerlite-83-replace-lamp-cover-Epson-ELPLP42-lamp


Replace the Epson PowerLite 83 lamp cover and tighten the screw. You are now ready to reset the Lamp Timer.

Reset the lamp timer

Reset the Epson PowerLite 83 projector Lamp Replacement Counter only when the Epson ELPLP42 lamp has been replaced.


Epson-Powerlite-83-lamp-reset-Epson-ELPLP42-lamp

  • Press the MENU button on the remote control. The Lamp Reset Menu will appear.
  • Scroll down to the RESET ALL. Press ENTER.
  • A prompt appears asking if you want to replace the lamp.
  • Select YES and press ENTER. Press MENU to exit.

Prolong lamp life:

Extend the life of the newly installed Epson ELPLP42 with the following tips:

  • Keep your air filters clean to avoid overheating the projector.
  • Turn off the Epson PowerLite 83 projector and let it stand for at least one hour ever 24 hours. An average use of four to five hours per day will ensure longer lamp life.
  • Make sure there is enough airflow around the projector particularly if it’s been permanently mounted.
  • Learn more with Top tips for extending DLP projector lamp life
Tagged with: , , ,

Epson-Powerlite-83V+-projector-Epson-ELPLP42-projector_lampFollow our 3-step guide to change the projector lamp in your Epson PowerLite 83V+.

Step 1: Know when to replace

The life span of the Epson ELPLP42 projector lamp ranges from approximately 3000 hours in HIGH brightness mode to about 4000 hours in LOW brightness mode. When you are reaching the 3000 mark, have your new lamp ready for installation.

Find the exact hours the lamp has been used on the Info Menu. If the number of hours is under 10, the time will be displayed as 0H.

Watch for the signs that the Epson ELPLP42 projector lamp needs to be replaced in the Epson PowerLite 83V+ projector:

  • Dark image
  • Image that has deteriorated
  • Replace the Lamp message appears on screen
  • Lamp light flashes orange

Step 2: Buy authentic projector lamp

It’s critical to install a genuine Epson ELPLP42 projector lamp rather than a compatible generic lamps. Although lower in price initially, generic, knock-off lamps end up costing much more in the long run. Counterfeit generic lamp have a shorter lamp life, damage the components in your projector, have poor picture quality and are prone to explosion. You also run the risk of being exposed to the carcinogenic substances such Krypton-85 used in the making of these lamps. The are also incompatibile with sensitive electronics in your projectors and can cause damage.

The warranty will become void on your Epson PowerLite 83V+ projector the moment you install a generic Epson ELPLP42 lamp. Be sure the purchase an authentic Epson ELPLP42 projector lamp for your Epson PowerLite 83V+ projector. Save yourself unnecessary headaches and buy authentic from a recognized dealer. You’ll be getting a far superior product with a replacement guarantee and tech support.

Read more about the 7 Ways to Spot a Counterfeit Lamp.

Step 3: Install the Epson ELPLP42 projector lamp

Before installation:

  • Turn power button off and wait for light to stop flashing.
  • Turn off power swtich on the back of the Epson PowerLite 83V+ projector.
  • Unplug the power cord.
  • Allow the Epson PowerLite 83V+ projector to cool for one hour – it should be cool to the touch. Inside of the projector can be very hot since these machines operator under high temperatures and you run the risk of being burned if the projector has not cooled down.
  • Do not operate the projectors while any of the lamps are removed as this may result in malfunctions, fire hazard and other accidents.

Caution: Don’t touch the screen or the actual bulb with your finger since the oil from your skin can cause a black spot on the bulb.


Epson-Powerlite-83V+-loosen-lamp-cover-screw-Epson-ELPLP42-projector _lamp


Using the screw driver supplied, loosen the screw holding the Epson PowerLite 83V+ cover in place.


Epson-Powerlite-83V+-remove-lamp-cover-Epson-ELPLP42-projector-lamp

Remove the Epson PowerLite 83V+ lamp cover and place it to one side.


Epson-Powerlite-83V+-loosen-lamp-screws-Epson-ELPLP42lprojector_lamp


Using the screw driver provided, loosen the screws holding the Epson ELPLP42 projector lamp in place.

Epson-Powerlite-83V+-remove-Epson-ELPLP42-projector-lampGrab the Epson ELPLP42 lamp by the two indents on the projector lamp. Gently remove the projector lamp.Pulling too quickly can cause the bulb to shatter. Learn what to do should the bulb shatter.

NOTE: The Epson ELPLP42 projector lamp contains mercury and should not be thrown into regular garbage. Recycle your used lamps! If you bought from an authentic manufacturer they will recycle the lamp for you at no extra cost (another reason to buy authentic lamps).Epson-Powerlite-83V+-replace-Epson-ELPLP42-projector-lamp

Gently insert the Epson ELPLP42 projector lamp making sure it’s facing the right way. It should click easily into place. Do not force the lamp into the projector as you may break the light.

Epson-Powerlite-83V+-tighten-screws-Epson-ELPLP42-projector-lamp

Tighten the screws on the newly installed Epson ELPLP42 projector lamp. Be sure not to tighten the screw too much or leave the screw too loose as this can stop the newly installed projector lamp from working.


Epson-Powerlite-83V+-replace-lamp-cover-Epson-ELPLP42-lamp

Replace the Epson PowerLite 83V+ lamp cover and tighten the screw. You are now ready to reset the Lamp Timer.

Reset the lamp timer on the Epson PowerLite 83V+ projector

Reset the Epson PowerLite 83V+ projector Lamp Replacement Counter only when the Epson ELPLP42 projector lamp has been replaced.


Epson-Powerlite-83V+-lamp-reset-Epson-ELPLP42-projector-lamp

  • Press the MENU button on the remote control. The Lamp Reset Menu will appear.
  • Scroll down to the RESET ALL. Press ENTER.
  • A prompt appears asking if you want to replace the lamp.
  • Select YES and press ENTER.
  • Press MENU to exit.

Prolong the life of the Epson ELPLP42 projector  lamp:

Extend the life of the newly installed Epson ELPLP42 with the following tips:

  • Keep your air filters clean to avoid overheating the projector.
  • Turn off the Epson PowerLite 83V+ projector and let it stand for at least one hour ever 24 hours. An average use of four to five hours per day will ensure longer lamp life.
  • Make sure there is enough airflow around the projector particularly if it’s been permanently mounted.
  • Learn more with Top tips for extending DLP projector lamp life
Tagged with: , , , ,

Epson ELPLP54 projector lampReplacing the Epson ELPLP54 projector lamp is quick and easy

Using the Epson ELPLP54 projector lamp you can expect up to 3000 hours from your lamp if the Brightness Controls have been set to High. Setting the Brightness Controls to Low, gives you up to 4,000 hours.

Warning signs: when its time to replace

Watch for the signs that it’s time to replace the Epson ELPLP54 projector lamp:

  • The projector image gets darker and starts to deteriorate.
  • The projector lamp flashes red.
  • The warning message REPLACE THE LAMP appears on screen.

A replacement warning message will also appear on screen. You can expect 4000 hours of lamp from the lamp depending on the settings and usage.

You can expect up to 3000 hours from your Epson ELPLP54 lamp if the Brightness Controls have been set to High.

Setting the Brightness Controls to Low, gives you up to 4,000 hours from the Epson ELPLP54 projector lamp.


Find this lamp on Amazon from these authorized dealers:

6 reasons to buy an authentic

The Internet has been flooded with companies selling projector lamps. It’s critical to install a genuine Epson ELPLP54 rather than a compatible generic lamps. Although lower in price initially, generic, knock-off lamps end up costing much more in the long run

Many advertised their lamps as “generic and compatible” – a euphemism for a knock-off, copycat technology that produces an inferior and dangerous product. Don’t believe the cheap prices you see as there are hidden costs to installing generic lamps.

You get what you pay for and in the case of generic lamps it’s usually a long list of problems:

Be sure the purchase an authentic Epson ELPLP54 projector lamp for your Epson projector. Save yourself unnecessary headaches and buy authentic from a recognized dealer. You’ll be getting a far superior product with a replacement guarantee and tech support.

Read more about the 7 Ways to Spot a Counterfeit Lamp.

Compatible Projectors

The Epson ELPLP54 projector lamp is compatible with:

Epson EB-S7/EB-S8, Epson EB-X7/EB-X8, Epson EB-W7/EB-W8, Epson EB-S72, Epson EB-S82, Epson EB-X8e, Epson EB-X72, Epson EH-TW450, Epson EX31, Epson EX31B, Epson EX51, Epson EX71, Epson PowerLite 79, Epson PowerLite Home Cinema 705HD, Epson PowerLite S7, Epson PowerLite S7+, Epson PowerLite S8+, Epson PowerLite W7, Epson PowerLite W7+, Epson PowerLite W8+, Epson V11H331020.

For step-by-step instructions on replacing your Epson ELPLP54 projector lamp, click on your projector listed below:

Epson-EB-X72-projector-Epson-ELPLP54-lamp

Click here for step-by-step instructions on how to change the Epson ELPLP54 projector lamp for the Epson EB-X72 projector.


Epson-EH-TW450-proejctor-Epson-ELPLP54-lamp

Click here for step-by-step instructions on how to change the Epson ELPLP54 projector lamp for the Epson EH-TW450 projector.


Epson-EX31B-proejctor-Epson-ELPLP54-lamp

Click here for step-by-step instructions on how to change the Epson ELPLP54 projector lamp for the  Epson EX31 projector.


Epson-EX31B-proejctor-Epson-ELPLP54-lamp

Click here for step-by-step instructions on how to change the Epson ELPLP54 projector lamp for the Epson EX31B projector.


Epson-EX51-proejctor-Epson-ELPLP54-lamp

Click here for step-by-step instructions on how to change the Epson ELPLP54 projector lamp for the Epson EX51 projector.


Epson-EX71-proejctor-Epson-ELPLP54-lamp

Click here for step-by-step instruction on how to change the Epson ELPLP54 projector lamp for the Epson EX71 projector.


Epson-PowerLite-79-projector-Epson-ELPLP54-lamp


Click here for step-by-step instruction on how to change the Epson ELPLP54 projector lamp for the Epson PowerLite 79 projector.


Prolong the life of the Epson ELPLP54 lamp:

Extend the life of the newly installed Epson ELPLP54 with the following tips:

  • Keep your air filters clean to avoid overheating the projector.
  • Turn off the Epson projector and let it stand for at least one hour ever 24 hours. An average use of four to five hours per day will ensure longer lamp life.
  • Make sure there is enough airflow around the projector particularly if it’s been permanently mounted.
  • Learn more with Top tips for extending DLP projector lamp life


Tagged with: , , , , , , , , , , , , , , , , , , , ,

Epson-Powerlite-83+-projector-Epson-ELPLP42-lampFollow our guide to change the Epson Powerlite 83+ projector lamp

The life span of the Epson Powerlite 83+ projector lamp ranges from approximately 3000 hours in HIGH brightness mode to about 4000 hours in LOW brightness mode.

Step 1: Know when to replace

Epson-Powerlite-83+-lamp-hours-Epson-ELPLP42-lamp


When you are reaching the 3000 mark, have your new lamp ready for installation. Find the exact hours the lamp has been used on the Info Menu. If the number of hours is under 10, the time will be displayed as 0H.

Watch for the signs that the Epson PowerLite 83+ projector lamp needs to be replaced:

  • Dark image
  • Image that has deteriorated
  • Replace the Lamp message appears on screen
  • Lamp light flashes orange

Step 2: Buy authentic

It’s critical to install a genuine Epson ELPLP42 rather than a compatible generic lamps. Although lower in price initially, generic, knock-off lamps end up costing much more in the long run because of the following problems:

Be sure the purchase an authentic Epson ELPLP42 projector lamp for your Epson PowerLite 83+ projector. Save yourself unnecessary headaches and buy authentic from a recognized dealer. You’ll be getting a far superior product with a replacement guarantee and tech support.

Read more about the 7 Ways to Spot a Counterfeit Lamp.

Buy this lamp on Amazon sold by these authorized dealers:

Step 3: Install the Epson ELPLP42

Before installation:

  • Turn power button off and wait for light to stop flashing.
  • Turn off power swtich on the back of the Epson PowerLite 83+ projector.
  • Unplug the power cord.
  • Allow the Epson PowerLite 83+ projector to cool for one hour – it should be cool to the touch. Inside of the projector can be very hot since these machines operator under high temperatures and you run the risk of being burned if the projector has not cooled down.
  • Do not operate the projectors while any of the lamps are removed as this may result in malfunctions, fire hazard and other accidents.

Caution: Don’t touch the screen or the actual bulb with your finger since the oil from your skin can cause a black spot on the bulb.

Epson-Powerlite-83+-loosen-lamp-cover-screw-Epson-ELPLP42-lamp


Using the screw driver supplied, loosen the screw holding the Epson PowerLite 83+ cover in place.


Epson-Powerlite-83+-remove-lamp-cover-Epson-ELPLP42-lampRemove the Epson PowerLite 83+ lamp cover and place it to one side.

Epson-Powerlite-83+-loosen-lamp-screws-Epson-ELPLP42-lamp


Using the screw driver provided, loosen the screws holding the Epson ELPLP42 lamp in place.


Epson-Powerlite-83+-remove-Epson-ELPLP42-lampGrab the Epson ELPLP42 lamp by the two indents on the lamp. Gently remove the lamp.Pulling too quickly can cause the bulb to shatter. Learn what to do should the bulb shatter.

NOTE: The Epson ELPLP42 lamp contains mercury and should not be thrown into regular garbage. Recycle your used lamps!


Epson-Powerlite-83+-replace-Epson-ELPLP42-lamp


Gently insert the Epson ELPLP42 lamp making sure it’s facing the right way. It should click easily into place. Do not force the lamp into the projector as you may break the light.

Epson-Powerlite-83+-tighten-screws-Epson-ELPLP42-lamp


Tighten the screws on the newly installed Epson ELPLP42 lamp. Be sure not to tighten the screw too much or leave the screw too loose as this can stop the newly installed lamp from working.

Epson-Powerlite-83+-replace-lamp-cover-Epson-ELPLP42-lamp


Replace the Epson PowerLite 83+ lamp cover and tighten the screw. You are now ready to reset the Lamp Timer.

Reset the lamp timer

Reset the Epson PowerLite 83+ projector Lamp Replacement Counter only when the Epson ELPLP42 lamp has been replaced.


Epson-Powerlite-83+-lamp-reset-Epson-ELPLP42-lamp

  • Press the MENU button on the remote control. The Lamp Reset Menu will appear.
  • Scroll down to the RESET ALL. Press ENTER.
  • A prompt appears asking if you want to replace the lamp.
  • Select YES and press ENTER.
  • Press MENU to exit.


Prolong the life of the Epson ELPLP42 lamp:

Extend the life of the newly installed Epson ELPLP42 with the following tips:

  • Keep your air filters clean to avoid overheating the projector.
  • Turn off the Epson PowerLite 83+ projector and let it stand for at least one hour ever 24 hours. An average use of four to five hours per day will ensure longer lamp life.
  • Make sure there is enough airflow around the projector particularly if it’s been permanently mounted.
  • Learn more with Top tips for extending DLP projector lamp life
Tagged with: , , , , ,

Epson-Powerlite-822+-projector-Epson-ELPLP42-lampGuide to change the Epson PowerLite 822+ projector lamp

The life span of the Epson PowerLite 822+ projector lamp ranges from approximately 3000 hours in HIGH brightness mode to about 4000 hours in LOW brightness mode.

Epson-Powerlite-822p-lamp-hours-Epson-ELPLP42-lamp

When to replace

Find the exact hours the lamp has been used on the Info Menu. If the number of hours is under 10, the time will be displayed as 0H.

Watch for the signs that the Epson PowerLite 822+ projector lamp needs to be replaced:

  • Dark image
  • Image that has deteriorated
  • Replace the Lamp message appears on screen
  • Lamp light flashes orange

Buy authentic

It’s critical to install a genuine Epson ELPLP42 rather than a compatible generic lamps. Although lower in price initially, generic, knock-off lamps end up costing much more in the long run. Generic have so many problems, they actually end up costing more in the end.

6 reasons to avoid generic lamps:

Be sure the purchase an authentic Epson ELPLP42 projector lamp for your Epson PowerLite 822+ projector. Save yourself unnecessary headaches and buy authentic from a recognized dealer. You’ll be getting a far superior product with a replacement guarantee and tech support.

Read more about the 7 Ways to Spot a Counterfeit Lamp.

Buy this lamp on Amazon sold by these authorized dealers:

Install the Epson PowerLite 822+ projector lamp

Before installation:

  • Turn power button off and wait for light to stop flashing.
  • Turn off power swtich on the back of the Epson PowerLite 822+ projector.
  • Unplug the power cord.
  • Allow the Epson PowerLite 822+ projector to cool for one hour – it should be cool to the touch. Inside of the projector can be very hot since these machines operator under high temperatures and you run the risk of being burned if the projector has not cooled down.
  • Do not operate the projectors while any of the lamps are removed as this may result in malfunctions, fire hazard and other accidents.

Caution: Don’t touch the screen or the actual bulb with your finger since the oil from your skin can cause a black spot on the bulb.

Epson-Powerlite-822+-loosen-lamp-cover-screw-Epson-ELPLP42-lamp


Using the screw driver supplied, loosen the screw holding the Epson PowerLite 822+ cover in place.


Epson-Powerlite-822p-remove-lamp-cover-Epson-ELPLP42-lamp


Remove the Epson PowerLite 822+ lamp cover and place it to one side.


Epson-Powerlite-822+-loosen-lamp-screws-Epson-ELPLP42-lamp


Using the screw driver provided, loosen the screws holding the Epson ELPLP42 lamp in place.


Epson-Powerlite-822+-remove-Epson-ELPLP42-lampGrab the Epson ELPLP42 lamp by the two indents on the lamp. Gently remove the lamp.Pulling too quickly can cause the bulb to shatter. Learn what to do should the bulb shatter.

NOTE: The Epson ELPLP42 lamp contains mercury and should not be thrown into regular garbage. Recycle your used lamps!

Epson-Powerlite-822+-replace-Epson-ELPLP42-lamp

Gently insert the Epson ELPLP42 lamp making sure it’s facing the right way. It should click easily into place. Do not force the lamp into the projector as you may break the light.


Epson-Powerlite-822+-tighten-screws-Epson-ELPLP42-lamp


Tighten the screws on the newly installed Epson ELPLP42 lamp. Be sure not to tighten the screw too much or leave the screw too loose as this can stop the newly installed lamp from working.


Epson-Powerlite-822+-replace-lamp-cover-Epson-ELPLP42-lamp

Replace the Epson PowerLite 822+ lamp cover and tighten the screw. You are now ready to reset the Lamp Timer.

Reset the lamp timer

Reset the Epson PowerLite 822+ projector Lamp Replacement Counter only when the Epson ELPLP42 lamp has been replaced.

Epson-Powerlite-822+-lamp-reset-Epson-ELPLP42-lamp

  • Press the MENU button on the remote control. The Lamp Reset Menu will appear.
  • Scroll down to the RESET ALL. Press ENTER.
  • A prompt appears asking if you want to replace the lamp.
  • Select YES and press ENTER. Press MENU to exit.

Prolong lamp life

Extend the life of the newly installed Epson ELPLP42 with the following tips:

  • Keep your air filters clean to avoid overheating the projector.
  • Turn off the Epson PowerLite 822+ projector and let it stand for at least one hour ever 24 hours. An average use of four to five hours per day will ensure longer lamp life.
  • Make sure there is enough airflow around the projector particularly if it’s been permanently mounted.
  • Learn more with Top tips for extending DLP projector lamp life
Tagged with: , , , ,

Epson-Powerlite-822p-projector-Epson-ELPLP42-lampGuide to change the Epson PowerLite 822p projector lamp

The life span of the Epson PowerLite 822p projector lamp ranges from approximately 3000 hours in HIGH brightness mode to about 4000 hours in LOW brightness mode.

Step 1: KnowEpson-Powerlite-822p-lamp-hours-Epson-ELPLP42-lamp when to replace


When you are reaching the 3000 mark, have your new lamp ready for installation. Find the exact hours the lamp has been used on the Info Menu. If the number of hours is under 10, the time will be displayed as 0H.

Watch for the signs that the Epson ELPLP42 needs to be replaced in the Epson PowerLite 822p projector:

  • Dark image
  • Image that has deteriorated
  • Replace the Lamp message appears on screen
  • Lamp light flashes orange

Step 2: Buy authentic

It’s critical to install a genuine Epson ELPLP42 rather than a compatible generic lamps. Although lower in price initially, generic, knock-off lamps end up costing much more in the long run. Counterfeit generic lamp have a shorter lamp life, damage the components in your projector, have poor picture quality and are prone to explosion. You also run the risk of being exposed to the carcinogenic substances such Krypton-85 used in the making of these lamps.

6 reasons to avoid generic lamps:

Be sure the purchase an authentic Epson ELPLP42 projector lamp for your Epson PowerLite 822p projector. Save yourself unnecessary headaches and buy authentic from a recognized dealer. You’ll be getting a far superior product with a replacement guarantee and tech support.

Read more about the 7 Ways to Spot a Counterfeit Lamp.

Buy this lamp on Amazon sold by these authorized dealers:

Step 3: Install the Epson ELPLP42

Before installation:

  • Turn power button off and wait for light to stop flashing.
  • Turn off power swtich on the back of the Epson PowerLite 822p projector.
  • Unplug the power cord.
  • Allow the Epson PowerLite 822p projector to cool for one hour – it should be cool to the touch. Inside of the projector can be very hot since these machines operator under high temperatures and you run the risk of being burned if the projector has not cooled down.
  • Do not operate the projectors while any of the lamps are removed as this may result in malfunctions, fire hazard and other accidents.

Caution: Don’t touch the screen or the actual bulb with your finger since the oil from your skin can cause a black spot on the bulb.


Epson-Powerlite-822p-loosen-lamp-cover-screw-Epson-ELPLP42-lamp


Using the screw driver supplied, loosen the screw holding the Epson PowerLite 822p cover in place.


Epson-Powerlite-822p-remove-lamp-cover-Epson-ELPLP42-lamp


Remove the Epson PowerLite 822p lamp cover and place it to one side.


Epson-Powerlite-822p-loosen-lamp-screws-Epson-ELPLP42-lamp


Using the screw driver provided, loosen the screws holding the Epson ELPLP42 lamp in place.


Epson-Powerlite-822p-remove-Epson-ELPLP42-lampGrab the Epson ELPLP42 lamp by the two indents on the lamp. Gently remove the lamp.Pulling too quickly can cause the bulb to shatter. Learn what to do should the bulb shatter.

NOTE: The Epson ELPLP42 lamp contains mercury and should not be thrown into regular garbage. Recycle your used lamps! If you bought from an authentic manufacturer they will recycle the lamp for you at no extra cost (another reason to buy authentic lamps).


Epson-Powerlite-822p-replace-Epson-ELPLP42-lamp


Gently insert the Epson ELPLP42 lamp making sure it’s facing the right way. It should click easily into place. Do not force the lamp into the projector as you may break the light.


Epson-Powerlite-822p-tighten-screws-Epson-ELPLP42-lamp


Tighten the screws on the newly installed Epson ELPLP42 lamp. Be sure not to tighten the screw too much or leave the screw too loose as this can stop the newly installed lamp from working.


Epson-Powerlite-822p-replace-lamp-cover-Epson-ELPLP42-lamp


Replace the Epson PowerLite 822p lamp cover and tighten the screw. You are now ready to reset the Lamp Timer.

Reset the lamp timer

Reset the Epson PowerLite 822p projector Lamp Replacement Counter only when the Epson ELPLP42 lamp has been replaced.


Epson-Powerlite-822p-lamp-reset-Epson-ELPLP42-lamp

  • Press the MENU button on the remote control. The Lamp Reset Menu will appear.
  • Scroll down to the RESET ALL. Press ENTER.
  • A prompt appears asking if you want to replace the lamp.
  • Select YES and press ENTER.
  • Press MENU to exit.

Prolong the life of the Epson ELPLP42 lamp:

Extend the life of the newly installed Epson ELPLP42 with the following tips:

  • Keep your air filters clean to avoid overheating the projector.
  • Turn off the Epson PowerLite 822p projector and let it stand for at least one hour ever 24 hours. An average use of four to five hours per day will ensure longer lamp life.
  • Make sure there is enough airflow around the projector particularly if it’s been permanently mounted.
  • Learn more with Top tips for extending DLP projector lamp life
Tagged with: , , , ,

Epson-ELPLP54Replacing the Epson ELPLP54 projector lamp is quick and easy

When you use an authentic Epson ELPLP54 lamp you can expect up to 3000 hours if the Brightness Controls have been set to High. Setting the Brightness Controls to Low, gives you up to 4,000 hours.

Find this lamp on Amazon from these authorized dealers:

6 reasons to buy an authentic

The Internet has been flooded with companies selling projector lamps. It’s critical to install a genuine Epson ELPLP54 rather than a compatible generic lamps. Although lower in price initially, generic, knock-off lamps end up costing much more in the long run

You get what you pay for and in the case of generic lamps it’s usually a long list of problems:


Warning signs: when its time to replace

Watch for the signs that it’s time to replace the Epson ELPLP54 projector lamp:

  • The projector image gets darker and starts to deteriorate.
  • The projector lamp flashes red.
  • The warning message REPLACE THE LAMP appears on screen.

A replacement warning message will also appear on screen. You can expect 4000 hours of lamp from the lamp depending on the settings and usage.

Compatible Projectors

The Epson ELPLP54 is compatible with:

Epson EB-S7/EB-S8, Epson EB-X7/EB-X8, Epson EB-W7/EB-W8, Epson EB-S72, Epson EB-S82, Epson EB-X8e, Epson EB-X72, Epson EH-TW450, Epson EX31, Epson EX31B, Epson EX51, Epson EX71, Epson PowerLite 79, Epson PowerLite Home Cinema 705HD, Epson PowerLite S7, Epson PowerLite S7+, Epson PowerLite S8+, Epson PowerLite W7, Epson PowerLite W7+, Epson PowerLite W8+, Epson V11H331020.

For step-by-step instructions on replacing your Epson ELPLP54 projector lamp, click on your projector listed below:

Epson-EB-S7-proejctor-Epson-ELPLP54-lamp

Click here for step-by-step instructions on how to change the Epson ELPLP54 projector lamp for the EB-S7/EB-S8 projector.


Epson-EB-X7-EB-X8-projector-Epson-ELPLP54-lamp

Click here for step-by-step instructions on how to change the Epson ELPLP54 projector lamp for the EB-X7/EB-X8 projector.


Epson-EB-W7-EB-W8-projector-Epson-ELPLP54-lamp

Click here for step-by-step instructions on how to change the Epson ELPLP54 projector lamp for the EB-W7/EB-W8 projector.


 Epson-EB-S72-projector-Epson-ELPLP54-lamp

Click here for step-by-step instructions on how to change the Epson ELPLP54 projector lamp for the EB-S72 projector.


Epson-EB-S82-projector-Epson-ELPLP54-lamp

Click here for step-by-step instructions on how to change the Epson ELPLP54 projector lamp for the EB-S82 projector.


Epson-EB-X8e-projector-Epson-ELPLP54-lamp

Click here for step-by-step instructions on how to change the Epson ELPLP54 projector lamp for the EB-X8e projector.


Prolong the life of the Epson ELPLP54 lamp:

Extend the life of the newly installed Epson ELPLP54 with the following tips:

  • Keep your air filters clean to avoid overheating the projector.
  • Turn off the Epson projector and let it stand for at least one hour ever 24 hours. An average use of four to five hours per day will ensure longer lamp life.
  • Make sure there is enough airflow around the projector particularly if it’s been permanently mounted.
  • Learn more with Top tips for extending DLP projector lamp life


Tagged with: , , , , , , , , , , , , , , , , , , ,

Epson-Powerlite-83C-projector-Epson-ELPLP42-lampFollow our 3-step guide to change the Epson PowerLite 83C projector lamp

The life span of the Epson PowerLite 83C projector lamp ranges from approximately 3000 hours in HIGH brightness mode to about 4000 hours in LOW brightness mode.

Step 1: KnowEpson-Powerlite-83C-lamp-hours-Epson-ELPLP42-lamp when to replace

When you are reaching the 3000 mark, have your new lamp ready for installation. Find the exact hours the lamp has been used on the Info Menu. If the number of hours is under 10, the time will be displayed as 0H.

Watch for the signs that the Epson ELPLP42 needs to be replaced in the Epson PowerLite 83C projector:

  • Dark image
  • Image that has deteriorated
  • Replace the Lamp message appears on screen
  • Lamp light flashes orange

Step 2: Buy authentic

It’s critical to install a genuine Epson ELPLP42 rather than a compatible generic lamps. Although lower in price initially, generic, knock-off lamps end up costing much more in the long run. Counterfeit generic lamp have a shorter lamp life, damage the components in your projector, have poor picture quality and are prone to explosion. You also run the risk of being exposed to the carcinogenic substances such Krypton-85 used in the making of these lamps.

6 reasons to avoid generic lamps:

Be sure the purchase an authentic Epson ELPLP42 projector lamp for your Epson PowerLite 83C projector. Save yourself unnecessary headaches and buy authentic from a recognized dealer. You’ll be getting a far superior product with a replacement guarantee and tech support.

Read more about the 7 Ways to Spot a Counterfeit Lamp.

Buy this lamp on Amazon sold by these authorized dealers:

Step 3: Install the Epson ELPLP42

Before installation:

  • Turn power button off and wait for light to stop flashing.
  • Turn off power swtich on the back of the Epson PowerLite 83C projector.
  • Unplug the power cord.
  • Allow the Epson PowerLite 83C projector to cool for one hour – it should be cool to the touch. Inside of the projector can be very hot since these machines operator under high temperatures and you run the risk of being burned if the projector has not cooled down.
  • Do not operate the projectors while any of the lamps are removed as this may result in malfunctions, fire hazard and other accidents.

Caution: Don’t touch the screen or the actual bulb with your finger since the oil from your skin can cause a black spot on the bulb.

Epson-Powerlite-83C-loosen-lamp-cover-screw-Epson-ELPLP42-lamp


Using the screw driver supplied, loosen the screw holding the Epson PowerLite 83C cover in place.


Epson-Powerlite-83C-remove-lamp-cover-Epson-ELPLP42-lamp


Remove the Epson PowerLite 83C lamp cover and place it to one side.


Epson-Powerlite-83C-loosen-lamp-screws-Epson-ELPLP42-lamp


Using the screw driver provided, loosen the screws holding the Epson ELPLP42 lamp in place.


Epson-Powerlite-83C-remove-Epson-ELPLP42-lampGrab the Epson ELPLP42 lamp by the two indents on the lamp. Gently remove the lamp.Pulling too quickly can cause the bulb to shatter. Learn what to do should the bulb shatter.

NOTE: The Epson ELPLP42 lamp contains mercury and should not be thrown into regular garbage. Recycle your used lamps! 


Epson-Powerlite-83C-replace-Epson-ELPLP42-lamp


Gently insert the Epson ELPLP42 lamp making sure it’s facing the right way. It should click easily into place. Do not force the lamp into the projector as you may break the light.


Epson-Powerlite-83C-tighten-screws-Epson-ELPLP42-lamp


Tighten the screws on the newly installed Epson ELPLP42 lamp. Be sure not to tighten the screw too much or leave the screw too loose as this can stop the newly installed lamp from working.


Epson-Powerlite-83C-replace-lamp-cover-Epson-ELPLP42-lamp


Replace the Epson PowerLite 83C lamp cover and tighten the screw. You are now ready to reset the Lamp Timer.

Reset the lamp timer

Reset the Epson PowerLite 83C projector Lamp Replacement Counter only when the Epson ELPLP42 lamp has been replaced.

Epson-Powerlite-83C-lamp-reset-Epson-ELPLP42-lamp

  • Press the MENU button on the remote control. The Lamp Reset Menu will appear.
  • Scroll down to the RESET ALL. Press ENTER.
  • A prompt appears asking if you want to replace the lamp. Select YES and press ENTER. Press MENU to exit.

Prolong lamp life:

Extend the life of the newly installed Epson ELPLP42 with the following tips:

  • Keep your air filters clean to avoid overheating the projector.
  • Turn off the Epson PowerLite 83C projector and let it stand for at least one hour ever 24 hours. An average use of four to five hours per day will ensure longer lamp life.
  • Make sure there is enough airflow around the projector particularly if it’s been permanently mounted.
  • Learn more with Top tips for extending DLP projector lamp life
Tagged with: , , ,

Epson-PowerLite-W7+-projector-Epson-ELPLP54-lampFollow this quick guide to replacing the Epson PowerLite W7+ projector quickly

Life expectancy of Epson Powerlite W7+ projector lamp is 4000 hours if the Power Consumption in the Settings Menu is set at the default of Normal. If you switch to ECO mode, you can expect up to 5000 hours of usage.

When it’s time to replace the Epson Powerlite W7+ projector lamp you’ll see warning signs.

  • Dark image
  • Image that has deteriorated
  • “Replace the lamp” warning appears on screen.
  • Lamp light flashes orange
  • Lamp light turns red and stays lit.

Consult the Lamp Usage Screen to find out how many hours are left.

Epson-PowerLite-W7+-lamp-usage-screen-Epson-ELPLP54-lamp

To check the number of hours left for the lamp:

  • Press the MENU button.
  • Scroll down to highlight the INFO menu.
  • If you have used the projector for less than 10 hours, the hours will be listed at 0H.


Find the right lamp

It’s critical to install a genuine projector lamp rather than a compatible generic lamps. Generic lamps look appealing because of their low cost but this should be your first indication that the lamp you are about to purchase is counterfeit. These lamps present a lot of problems and are simply not worth buying in the long run.

Find this lamp on Amazon from these authorized dealers:

6 reasons to avoid generic lamps

Save yourself unnecessary headaches and buy an authentic Epson ELPLP54 from a recognized dealer. You’ll be getting a far superior product with a replacement guarantee and tech support. Read more about the 7 Ways to Spot a Counterfeit Lamp.

Installing the Epson ELPLP54

Before installation:

  • Turn power button off wait for light to stop flashing.
  • Turn off power switch on Epson Powerlite W7+ projector.
  • Unplug the power cord.
  • Allow the Epson Powerlite W7+ projector to cool for one hour – it should be cool to the touch. These projectors run a high temperatures so you can burn yourself every badly if the projector has not cooled enough before being opened up.
  • Do not operate the projectors while any of the lamps are removed as this may result in malfunctions, fire hazard and other accidents.

Caution: Don’t touch the screen or the actual bulb with your finger since the oil from your skin can cause a black spot on the bulb.


Epson-PowerLite-W7+-remove-lamp-cover-screws-Epson-ELPLP54-lamp

1. The lamp cover is found on top of the Epson Powerlite W7+ projector. Loosen the lamp cover screw — you can’t remove it only loosen it.


Epson-PowerLite- S7+-lamp-cover-removed-projector-Epson-ELPLP54-lamp

2. Slide the Epson Powerlite W7+ projector lamp cover off.


Epson-PowerLite-W7+-loosen-lamp-screw-Epson-ELPLP54-lamp

3. Loosen the two screws holding the Epson ELPLP54 lamp in place.


Epson-PowerLite-W7+-remove-Epson-ELPLP54-lamp

4. Grab the Epson ELPLP54 lamp by the wire handle. Gently pull the lamp out.Pulling too quickly can cause the Epson ELPLP54 bulb to shatter. Learn what to do should this happen.

NOTE: The Epson ELPLP54 lamp contains mercury and should not be thrown into regular garbage.  Recycle your used lamps!


Epson-PowerLite-W7+-install-new-Epson-ELPLP54-lamp
5. Gently insert the Epson ELPLP54 lamp making sure it’s facing the right way.


Epson-PowerLite-W7+-lamp-screw-tighten-Epson-ELPLP54-lamp


6. Tighten the screws on the new Epson ELPLP54 lamp. Be sure not to tighten too much or the lamp may not work.


Epson-PowerLite-W7+-lamp-cover-reinstalled-Epson-ELPLP54-lamp7. Replace the lamp cover and tighten the screw on the Epson Powerlite W7+ projector lamp cover.

8. Reset the lamp timer.


Resetting the lamp timer on the Epson Powerlite W7+ projector

Reset the Epson Powerlite W7+ projector Lamp Replacement Counter only when the Epson ELPLP54 lamp has been replaced.


Epson-PowerLite-W7+-reset-lamp-hour-screen-Epson-ELPLP54-lamp

  • Press the MENU button on the remote control. The Lamp Reset Menu will appear.
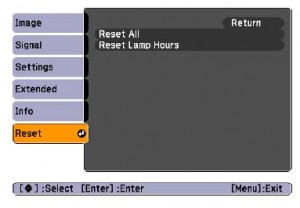
  • Scroll down to the RESET LAMP HOURS. Press ENTER.
  • A prompt appears asking if you want to RESET LAMP HOURS?
  • Select YES and press ENTER.
  • Press MENU to exit.


Prolong the life of the Epson ELPLP54 lamp:

Extend the life of the newly installed Epson ELPLP54 with the following tips:

  • Keep your air filters clean to avoid overheating the projector.
  • Turn off the Epson Powerlite W7+ projector projector and let it stand for at least one hour ever 24 hours. An average use of four to five hours per day will ensure longer lamp life.
  • Make sure there is enough airflow around the projector particularly if it’s been permanently mounted.
  • Learn more with Top tips for extending DLP projector lamp life
Tagged with: , , ,

Epson-V11H331020-projector-Epson-ELPLP54-lampFollow our 3-step guide to replace Epson V11H331020 projector lamp

When it’s time to replace the Epson V11H331020 projector lamp, you’ll see the following warning signs:

  • Dark image
  • Image that has deteriorated
  • On warning message appears on screen
  • Lamp light flashes orange
  • Lamp light turns red and stays on

To check the number of hours left for the Epson V11H331020 projector lamp check the Lamp Usage Screen to find out how many hours are left with the lamp.

Epson-V11H331020-lamp-usage-screen-Epson-ELPLP54-lamp

  • Press the MENU button.
  • Scroll down to highlight the INFO menu.
  • If you have used the projector for less than 10 hours, the hours will be listed at 0H.

Life expectancy of the Epson ELPLP54 is 4000 hours if the Power Consumption in the Settings Menu is set at the default of Normal. If you switch to ECO mode, you can expect up to 5000 hours of usage.

Step 1: The importance of  buying authentic

It’s critical to install a genuine Epson ELPLP54 rather than a compatible generic lamps. Although lower in price initially, generic, knock-off lamps end up costing much more in the long run. Counterfeit generic lamp have a shorter lamp life, damage the components in your projector, have poor picture quality and are prone to explosion. You also run the risk of being exposed to the carcinogenic substances such Krypton-85used in the making of these lamps.

Be sure the purchase an authentic Epson V11H331020. You’ll need the Epson ELPLP54 model.

Find this lamp on Amazon from these authorized dealers:

Step 2: Installing the Epson ELPLP54

Before installation:

  • Turn power button off and wait for light to stop flashing.
  • Turn off power on Epson V11H331020 projector.
  • Unplug the power cord.
  • Allow the Epson V11H331020 projector to cool for one hour – it should be cool to the touch. Inside of the projector can be very hot since these machines operator under high temperatures and you run the risk of being burned if the projector has not cooled down.
  • Do not operate the projectors while any of the lamps are removed as this may result in malfunctions, fire hazard and other accidents.

Caution: Don’t touch the screen or the actual bulb with your finger since the oil from your skin can cause a black spot on the bulb.

PowerLite-Home-Cinema-705HD-remove-lamp-cover-screws-Epson-ELPLP54-lamp

1. The lamp cover is found on top of the Epson V11H331020 projector. Loosen the lamp cover screw — you can’t remove it only loosen it.


Epson-V11H331020-lamp-cover-removed-projector-Epson-ELPLP54-lamp

2. Slide the Epson V11H331020 projector lamp cover off.


Epson-V11H331020-loosen-lamp-screw-Epson-ELPLP54-lamp

3. Loosen the two screws holding the Epson ELPLP54 lamp in place.


Epson-V11H331020-remove-Epson-ELPLP54-lamp

4. Grab the Epson ELPLP54 lamp by the wire handle. Gently pull the lamp out. Pulling too quickly can cause the Epson ELPLP54 bulb to shatter. Learn what to do should this happen.

NOTE: The Epson ELPLP54 lamp contains mercury and should not be thrown into regular garbage.  Recycle your used lamps.


Epson-V11H331020-install-new-Epson-ELPLP54-lamp
5. Gently insert the Epson ELPLP54 lamp making sure it’s facing the right way.


Epson-V11H331020-lamp-screw-tighten-Epson-ELPLP54-lamp


6. Tighten the screws on the new Epson ELPLP54 lamp. Be sure not to tighten too much or the lamp may not work.


Epson-V11H331020-lamp-cover-reinstalled-Epson-ELPLP54-lamp7. Replace the lamp cover and tighten the screw on the Epson V11H331020 projector lamp cover.

8. Reset the lamp timer.


Step 3: Reset the lamp timer on the Epson V11H331020

Reset the Epson V11H331020 Lamp Replacement Counter only when the Epson ELPLP54 lamp has been replaced.


 Epson-PowerLite- S7+-reset-lamp-hour-screen-Epson-ELPLP54-lamp-reset-lamp-hour-screen-Epson-ELPLP54-lamp

  • Press the MENU button on the remote control. The Lamp Reset Menu will appear.
  • Scroll down to the RESET LAMP HOURS. Press ENTER.
  • A prompt appears asking if you want to replace the lamp.
  • Select YES and press ENTER.
    Press MENU to exit.

Prolong lamp life:

Extend the life of the newly installed Epson ELPLP54 with the following tips:

  • Keep your air filters clean to avoid overheating the projector.
  • Turn off the Epson V11H331020 projector and let it stand for at least one hour ever 24 hours. An average use of four to five hours per day will ensure longer lamp life.
  • Make sure there is enough airflow around the projector particularly if it’s been permanently mounted.
  • Learn more with Top tips for extending DLP projector lamp life
Tagged with: , , ,
Join the discussion on Facebook! All your questions, answered! The Screen & Projector Group